
 Lessons: 10Length: 46 minutes
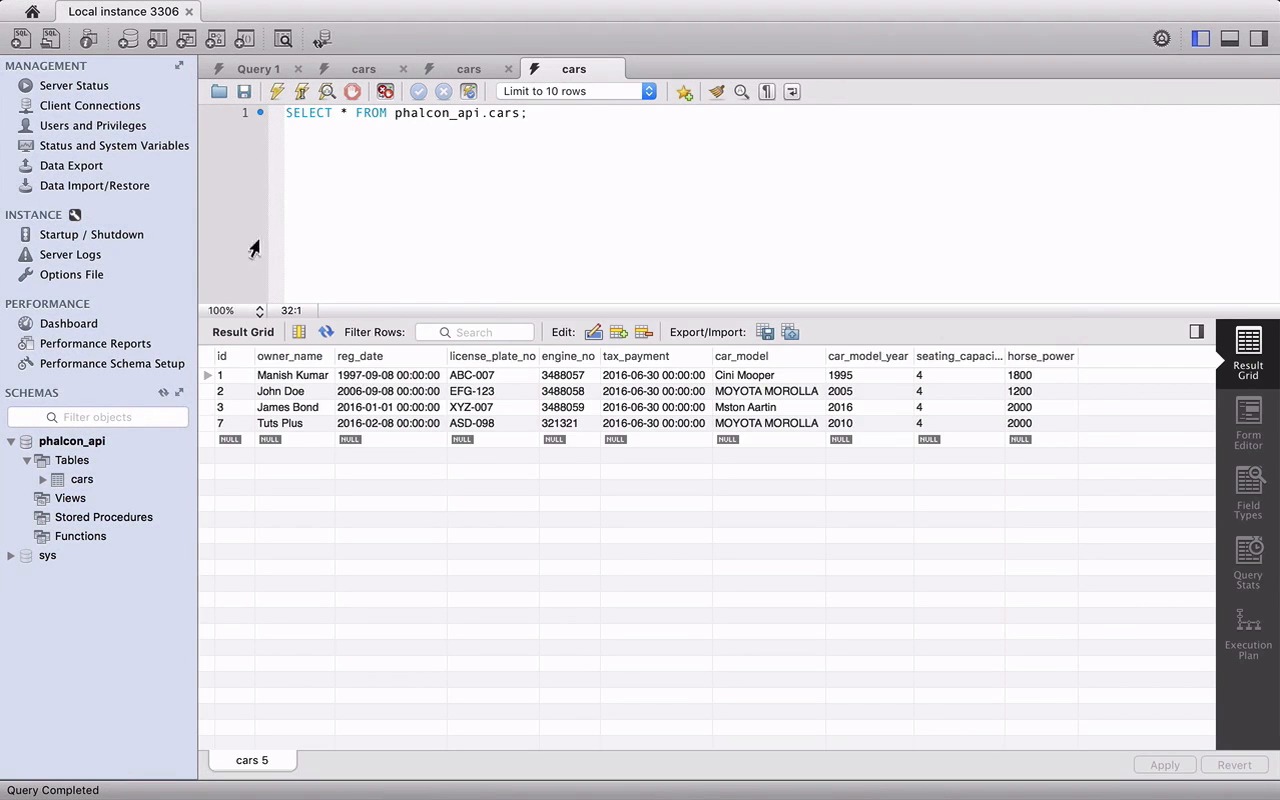
- Overview
- Transcript
2.6 Wild Card
What if somebody tries to request a route that doesn't exist? That's where a wild card route comes in. In this lesson I'll show you how to create a wild card route to handle requests to unknown routes.
We'll also do some testing of our API to make sure everything is working the way it should!
1.Introduction
1.1Introduction01:18
1.2What We'll Be Building01:08
1.3Set Up the Application03:37
2.Create a REST API With Phalcon
2.1Create the Endpoints05:44
2.2Create Models07:32
2.3Create a Database06:48
2.4Retrieve Data06:10
2.5Create, Update and Delete Routes07:06
2.6Wild Card04:09
3.Conclusion
3.1Conclusion01:58
2.6 Wild Card
Hey everyone, good to have you back. This is technically our last lesson where I have a surprise route and the testing of our previous ones. So, without wasting any more time let's jump into the surprise. Well, the idea here is that you can define as many routes as you want and they can be accessed and return your results as you wish but what if you, or someone else for that matter, try to request a route that doesn't even exist. Let's try it here. So, if we try to access fake route, Falcon will raise an uncaught exception. You can also try it in the terminal. It's going to give you the same output and we can fix it by defining a wildcard route. We can do it with a method called not found. It takes just one parameter. The anonymous function which will be executed if there is any unknown route requested and we can entertain it with a simple response and the status code and the usual headers. Actually, we can also add a message to inform that the route was not found. Let's do a quick test go to your terminal and types cURL followed by dash-I which includes the HTTP headers then a fake bat and there you go. Our message with the status code. We can also tried in the same browser, hitting the same URL and you should see the same error message. So, I hope you found my surprise that very useful. Now that we are done with it, it's time to move on to our previous route. So, we had three routes, let's start with the POST method and insert some new records. Starting with typing cURL and followed by dash-I and dash-X the capital one which lets you specify a custom request method that we want to use and the last parameter dash-T for the custom data input followed by your route. Notice that the data input is adjacent object with all the fields and values record by their school curry in our previous lesson. Now, hit enter and here we are with a successful response. Status is okay, the data object is there, and especially the new ID. Let's confirm the new ID in the database, and here is our new record with ID 7. Now, let's try to fail it by adding another record with the new owners name, but a duplicate license_plate_no and engine_no, so we expect errors here. We can also change the car_model just for fun. And there you are with the validation errors, license_plate_no has already been used and so is the engine_no. So ,congratulations guys, the create route works exactly the way we wanted it to work. The next route we are going to test is the PUT method which lets us update or record and you can to start with the same record that we just created. Just in the couple of things that starting with this method name then the values that we want to update like the owner's name to Kumar. The last change is the URL remember the put met had needs an ID in the URL for the record you want to update. If you remember from the previous lesson are a bit required all the fields and seized of just the one that we want a bit like the owner's name in our case. That's the reason we are sending all the files and it will use here as our input. Great updated call event successful status seems fine. Let's check for the updated values in the database. We reload the result. And there you go the owner's name for ID 7 is now Kumar. Now, let's try to fail it. I'm trying to update the same record but with an invalid plate_no. Actually, let's change the name to just to make sure the full update query fails not the columns with errors only there you are with error message. Let's jump to the D.B. reloaded and everything is same as it was. Cngratulations you once again did it. Now, the last one in the delete method, delete route is very simple just to start with cURL dash-I, dash-X. The name of the method and the last but not least the URL along with the ID of the record that we want to delete and here we are with a status as okay. It's always okay. Let's check out the database. Reload and congratulations. We don't have the record with ID 7 anymore. I really hope this lesson and discourse added some good value in your knowledge. And served as a good starting point with Falcon. I have some tips and suggestions for you in the conclusion lesson. As you never get stuck in your learning process down the road. So, do check it out.


