
 Lessons: 10Length: 46 minutes
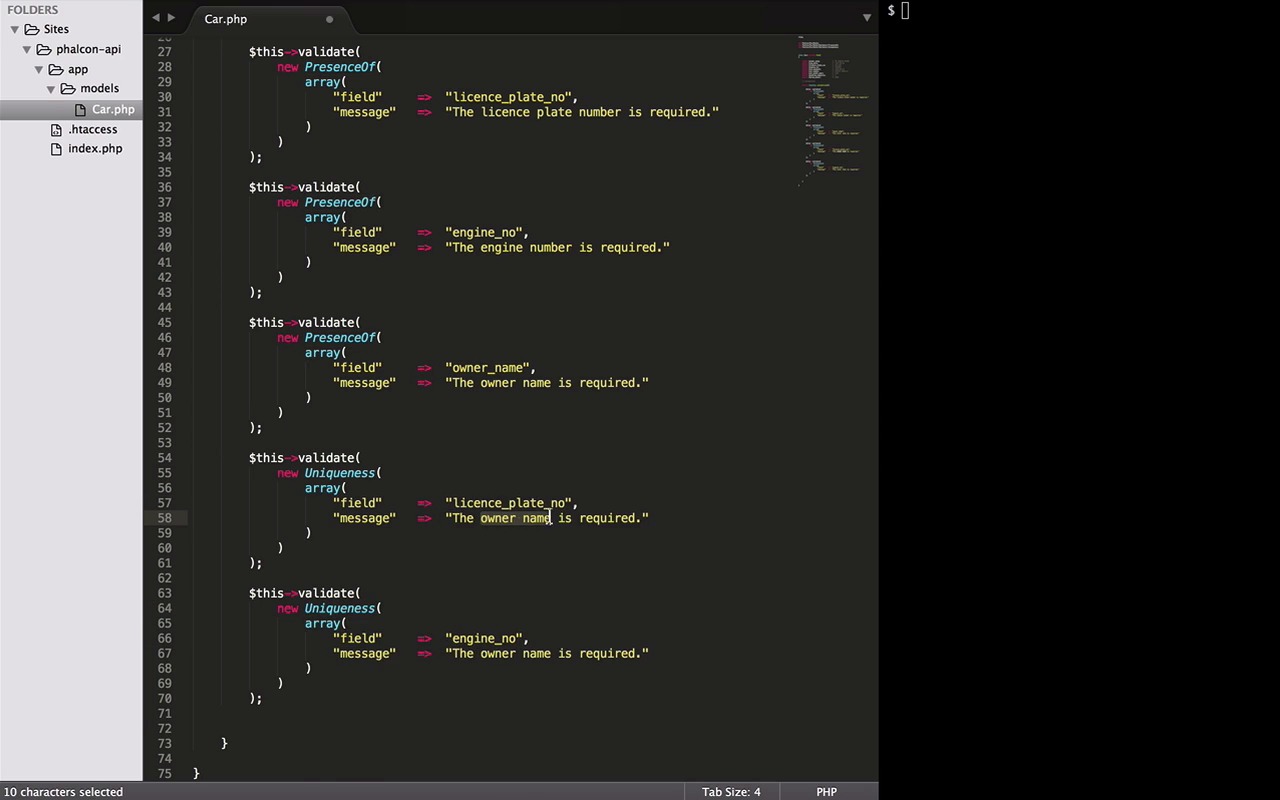
- Overview
- Transcript
2.2 Create Models
Now that we are done with the basics, in this lesson we will learn how to define models and implement some business rules. We'll do this with the built-in Phalcon validator classes and also with our own custom validations.
1.Introduction
1.1Introduction01:18
1.2What We'll Be Building01:08
1.3Set Up the Application03:37
2.Create a REST API With Phalcon
2.1Create the Endpoints05:44
2.2Create Models07:32
2.3Create a Database06:48
2.4Retrieve Data06:10
2.5Create, Update and Delete Routes07:06
2.6Wild Card04:09
3.Conclusion
3.1Conclusion01:58
2.2 Create Models
Hey, everybody, welcome back. As promised, I'm back with the lesson on models and validations. Here we will learn how to define models and implement some business rules by either using some of the built-in Phalcon valid data classes or our own custom validations. So let's get started. Now if you remember our first lesson, we mentioned that we are going to create an API that will be consumed by some hypothetical mobile application. And that application is going to be all about cars, to add, update and delete cars, find information about cars. And really trust me it's a multibillion dollar idea. This app can change the world upside down. Think about it, information about cars is surely going to be the new big thing. But anyway, let's come back to Earth. And before we jump into anything, this is how our basic databases schema looks like. Now surely this doesn't seem like an ideal schema, but remember our first goal is to learn Phalcon. So for the sake of this course, I will stick to this one, but you feel free to play around with this if you want. Okay, so moving forward, let's start with the same php tag within the model file. Model can be defined just as a simple class, but every model need to extend the Phalcon model class. To use it, we need to type use and the reference to the class like this. Please note that a model file must contain a single class and its class and filename should be in CamelCase notations, great. Now that you are done with the basic structure, we have two more steps to go. The first one is declaration of columns and other is implementing some validations. For declaration, it's very simple, you just define the scope and the name of your column like this. A quick tip from Phalcon documentation, it's recommended that if you are using PHP 5.4, 5.5, you should declare each column that makes part of the model in order to save memory and reduce the memory location. If not, you are free to skip this step and directly head over to the validations. So here we are, with all the column names that I introduced you in the beginning of this lesson. If you change your schema, don't forget to accommodate your changes here. I've also added some sample values as comments here to avoid the confusion while implementing validations. That brings us to the second part of the lesson, The Validations. A public method named validation would be all. Now, since the Phalcon is very loosely coupled, this method can accommodate any type of validation, be it the one that the Phalcon provides out of the box, or the custom created ones, and we will see both of them here. So the first validator that we are going to use is presence off. It checks if the given column has a value. To use it we need to call a method called validation. It takes one parameter as a new instance of any valid data class. And the valid data classes requires an array as their parameter. This array can differ from class to class but these two elements, the field and an error message, remains the same for almost every valid data class. This validation will make sure that the license number plate is not null. I will copy this and quickly create the same validation for a couple of more columns like engine number or nurse name. Let's chain these messages, And we are done. Now the second valid data we will try is uniqueness. It prevents a column getting a duplicate value. To implement uniqueness validator, everything remains same but the name of the class. And the two possible columns that supposedly need to be unique in our schema are the license plate number and the engine number. Don't forget to change the error messages. Now the last validator that we are going to try is my favorite one because it gives endless possibilities of validations by using the regular expression. It's called RegEx. One interesting example from our schema can be the validation of the pattern a license number plate will have. Let's copy this, change the name of the class, then the column and enter a message. Let's say invalid license plate number. This validator requires an extra element called pattern which takes a regular expression. Now depending on the country you are from, there can be different possible arrangements for a license plate number. But for the sake of this example, I will stick to the one I have mentioned in the default values above. So here in this expression, it checks for the start of any given string. Then three characters that can be anything from A to Z and followed by a dash or hyphen, followed by three digits that can be anything from 0 to 9. And in the last, the end of the string. And with this we are done with the validators. However, Phalcon provides many more validator classes that we can check out by going to Phalcon's repository tree on GitHub and navigating to the part to validator classes. We only use presence of RegEx and uniqueness but as you can see there are lots of them like inclusion and IP ETC. Now a quick tip, if you plan on using any of these, you can always see the implementation here in the file to know the structure of the input array to be passed. RegEx only needs a pattern along with the field name, whereas inclusion needs a domain. And one more thing, if you notice here, some of them don't have the message element in their array like an inclusion or here even in the RegEx. But in the presence of we have one. So don't get confused with this, it's because all of them contain a default error message here. It checks if there is a message passed. If not, it uses the default one anyway. So you can skip it sometimes. And the last thing to notice here is this method, validation has failed. And maybe if you have noticed earlier, it's every viewer. In presence of, in RegEx, even in the inclusion. So let's just copy it from here. Now coming back to our code, we are done with defining all the validations but there is no way to check or return false to inform our validation method if any of the validation has failed. So here enter the validation has failed method. So we will paste it in the end of all the validations. This method tells us whether any of the validation has generated any error message. And if it, say, it's true, that means something has failed. And in that case, we return a false to terminate the process. And that said, Phalcon will take care of the rest. Now there is one last thing that remains, the custom validations. And a simple way to do it is with an if-then statement, we can access the columns like this and check it for, let's say, the car model is not less than zero. Now, if you remember, I mentioned earlier that the method validation has failed checks, whether there is any error message generated. So, the best way to let this method in from is by generating an error message. And we can do it by using a method called append message. It takes an instance of a message class that we will just refer in a second. And lastly a nice message as a parameter. Here we go. Now the reference of class, use ModelsMessage. And with this we have reached the end of our lesson. Unfortunately we can't test anything yet, but in the next lesson we will create our database, define a schema, and connect it with our API. And after that, in the coming lesson we will be using these models. Till then, have a good time. Bye, bye.


