
 Lessons: 10Length: 46 minutes
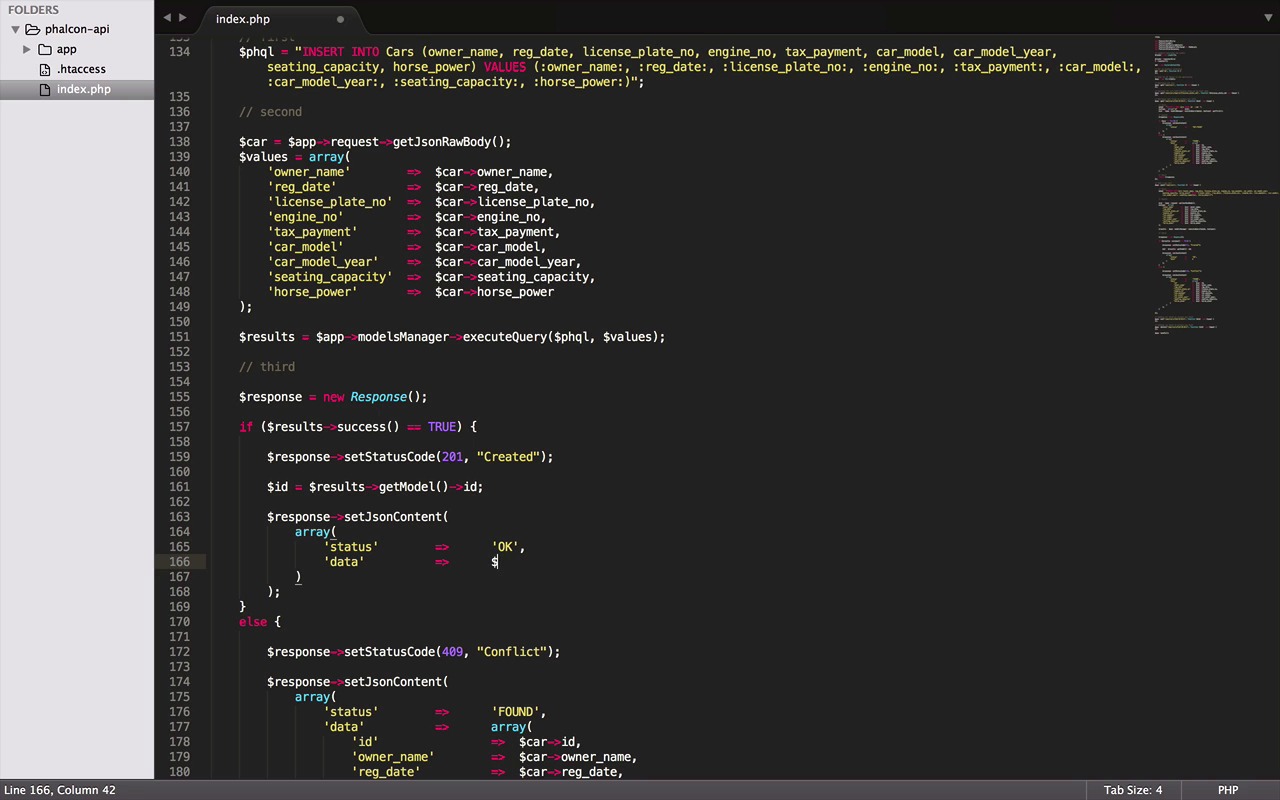
- Overview
- Transcript
2.5 Create, Update and Delete Routes
Now that we have data fetching implemented, it's time to handle the create, update and delete routes.
1.Introduction
1.1Introduction01:18
1.2What We'll Be Building01:08
1.3Set Up the Application03:37
2.Create a REST API With Phalcon
2.1Create the Endpoints05:44
2.2Create Models07:32
2.3Create a Database06:48
2.4Retrieve Data06:10
2.5Create, Update and Delete Routes07:06
2.6Wild Card04:09
3.Conclusion
3.1Conclusion01:58
2.5 Create, Update and Delete Routes
Hey everybody, welcome back. I must say, I'm very happy to see that our ABI is getting some shape now, it's connected to a database and has its models validations as well as some working routes. So now, for this lesson, we will work on the rest of the routes. We will see how to create, update and delete records. So, let's get started. Well, these are the remaining three routes. All of them operate quite similarly to the previous ones, but don't worry, I have managed to keep a significant change to make it interesting and more available to you. But the code is still divided into the three major parts. Let's start with the first one, the SQL query. By the way if you already noticed, this route uses a post HTTP method. So, it will insert a new record in the database and will be a little bit different to implement as well. But first here in this SQL query, we ask for inserting a record into car stable with these fields and then adding tags in seat of the values itself. Just do it we did in the previous ones, now in the second part, just like before we are going to execute SQL query, along with the area of values as parameter, but this time, it won't be just an ID in the area. In fact, there will not be any ID in there at all, but all the other fields that we have mentioned in the SQL query above, but there is an issue. In the case of get method, we could easily pass input as parameter in the function. Because in a get request, input parameters come with a URL, but in post, it's totally a different story. But you don't have to worry about it, Falcon has got us covered. It's a request object has a method for this call to getJasonRowBody it returns the input parameter passed with your post request. Now that we have all the values in the variable, this area can easily use them. Just one last change since this car variable is all ready in use. Now let's make it something else and we don't need this getFirst anymore. That said, we are good. Now for the third and the last part, we will send back a response. Let's copy this from one of our previous routes. Oops, forgot to copy the line for the response object. Now, in case of insertion depending on the situation, if we are lucky enough and everything worked fine, these results variable will have a success flag equals to TRUE and the else clause in case of fault. The second thing we are going to do is send a response back not just with some Json content but also the status code in case of success 201 which means created. And in case it failed and we got some errors we go with 409, which means conflicts. Well, now from here on, nothing is basically necessary. It all depends on the practices you want to follow. It's totally up to you, if you want to send a status code or just some success or error messages or even if you don't want to do any of it and just echo a message like the previous route. But it always a good practice to follow some industry standards. Great, so let's just continue with this way and say we don't want to send a response back with only this status. We also want to add some useful data, like maybe the idea of the record we just created. So for that, we can do it by adding another element in this area and pass it the new ID. Now how do we get the ID? Well, that's the easy part. This is also the object has a method of called getmodel that we can use and it will return the ID for the record we just created. Now, let's imagine your client doesn't want just an ID to return, they want a complete object that we just insert in the database. How do we do it? Well for that, let's start by changing this variable name. Here we add the ID in the car object, and if you remember, we already had all the values in this car object. Moving to the case of failure, first of all, we don't want to return any data back when it fails. Second, we change this is status to errors and we can also return error messages instead of data. You can retrieve errors returned by courier execution from the same results object that we got our ID and the status from. We can do it by using getMessages method. Great, now, sometimes depending on the situation, it can also return multiple error messages, for that, we can make this error variable an array. And then using a for each loop. We can iterate through all the earlier message objects one by one and save the messages in an area like this. Now, all you need is to return the response object and with that, we would be successfully done with the post route, which will insert new cars in the database for us. That's cool, but this time we won't be testing it right away. A plan to first finish all the route with you and then test them all together in the end of this lesson. So, let's jump into the next one without wasting our time. Put method is used for updating a record and is not very different from the insertion. The very first interesting difference is the parameters for put method, like deciding here should be passed as a parameter just like a get method, because it comes with the URL, but on the other hand put method can also have a just an object like the post method. It will contain the values to update the car record. The next difference is the SQL query, there we want to update all the fields of the car with these new values, but only if your ID equals the one we will provide. Now the values of our SQL query, everything remains same except the name of the variable that we can change by the Find and Replace or we could also keep the same name for the variable. Lastly, our query will need an extra element ID for its variable clause, which comes with the URL. Great, now since all tags are there in the area, it should return a success and if that's the case, the status code need to be changed to 200, which means okay, unlike the created case, STP doesn't provide a special success code for update and delete cases. The next I think, we can remove this data here. Since it's just an update call, the status code should be enough and in the failure case, remains as it is. With this we are also done with updating our record. Now the last row, the delete method. First let's got copy the update route. Now starting with a query, which now asks for deleting a record with a given ID and since there is just one tag ID in our SQL query. We don't need this just in body, nor here in this area and that your delete method is ready as well and in my opinion, it couldn't have get any simpler than this. By the way, you can also remove this line now because our response only contains a status, which is enough, so we don't need a car object. I must have left it in update route two and created two maybe. Well, here I think we definitely need it, but not do with an equal sign as it would have only to returned an ID. And there you go, everything seems in place now. And with this, I'm very proud to say that we are almost to the end of our course. I do remember that we didn't do our routes testing, but don't worry. We will do it in the next one, along with the surprise that I have planned for you guys. So, don't miss it. Catch you guys in the next one. Till then, chow.


