
 Lessons: 10Length: 46 minutes
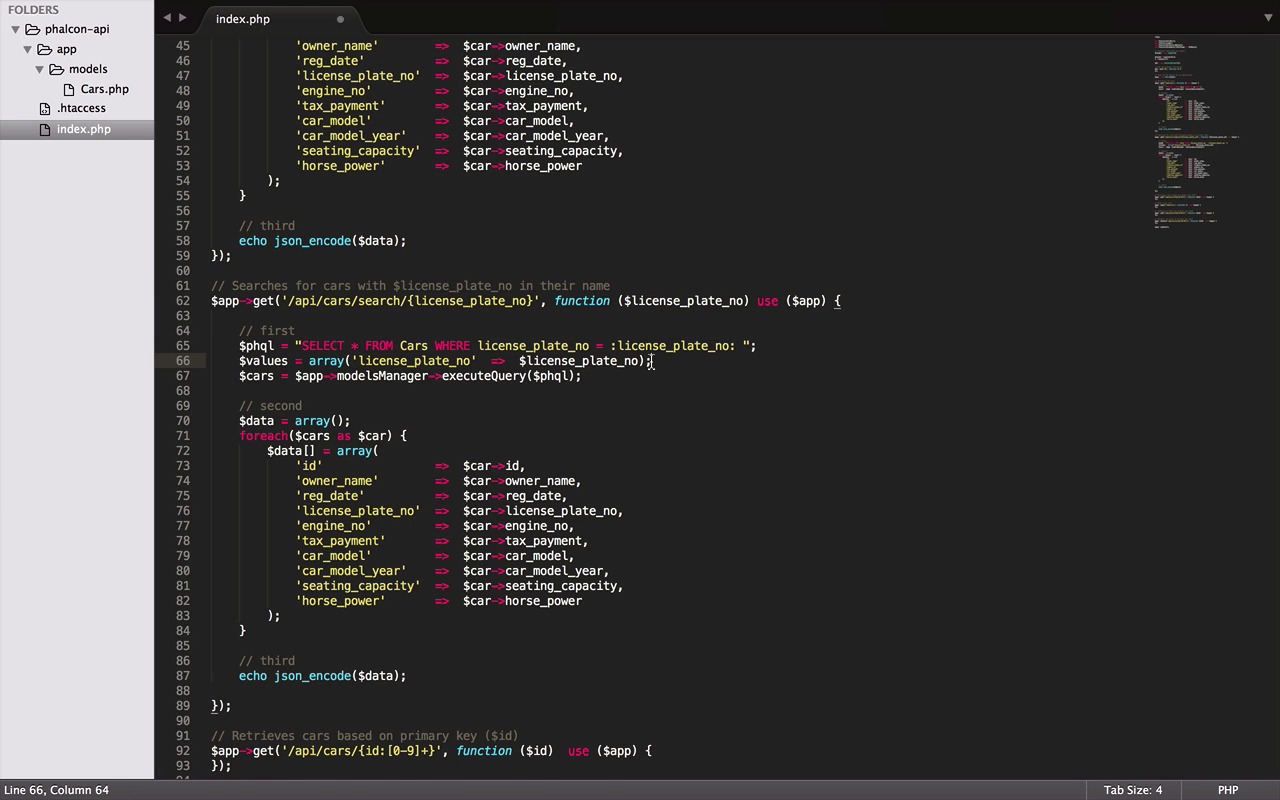
- Overview
- Transcript
2.4 Retrieve Data
In this lesson we'll work on the data retrieval routes that we previously defined. Specifically, we'll implement the GET routes that we created for retrieving all records, retrieving a single record and for searching.
1.Introduction
1.1Introduction01:18
1.2What We'll Be Building01:08
1.3Set Up the Application03:37
2.Create a REST API With Phalcon
2.1Create the Endpoints05:44
2.2Create Models07:32
2.3Create a Database06:48
2.4Retrieve Data06:10
2.5Create, Update and Delete Routes07:06
2.6Wild Card04:09
3.Conclusion
3.1Conclusion01:58
2.4 Retrieve Data
Hey everybody, welcome back. In this lesson we will work on the route that we defined in one of our previous lessons, and here is my dummy data that I asked you guys to prepare in the last lesson. But if you haven't, this is the right time to pause the lesson and do it. Okay great, now that all of us are on the same page. These are the three endpoints that we will be working in this lesson. Let's start with api/cars. This route is supposed to return all the cars in the table. Let's start by making a small change here by adding the use clause in the anonymous function which allows us to pass some variable from the global to the local scope very easily like the app variable here. We will need to execute queries. So I have divided the code in three parts to make it very simple to understand. In the first part we are going to perform a very simple query by using Phalcon Query Language, or PHQL as short. It allows us to write queries using a high level object oriented SQL dialect that internally translate the right SQL statements depending on the database system you are using. And the SQL query here is quite self explanatory. We ask for all the records with all the fields from cars table. And I have just started them in descending order just to get the new records first. To execute this query, we will use this app object and a method provided by models manager called execute query. It takes the MySQL query as a parameter and returns the result from the table. Now here comes the second part where we will convert the results into a JSON friendly format. Since PHQL doesn't support it out of the box. To do it here, I have taken an array, and with the help of foreach loop, going through every record in the results object. I'm assigning the values and the respective column names. And here we are with all the column names. Now in the last part once we are done preparing the format, by using a php method called json_encode, we convert the array into adjacent object and display it with an echo method. Great, so now we can test our first route by simply typing curl, and the endpoint. Great it works, but it's a bit ugly. So to make it readable, I normally use a python json tool by piping the results into it like this. It makes the results readable. Here we have some nicer stats. And also the results are in descending order, as we wanted them to be. Great, now let's implement the search route. It's very similar to the last one, so let's copy it first and then I start by tweaking the SQL query. Let's ask falcon to find us the car, with the license plate number we will provide. And to pass the license plate number or any other value in a query, one of the way is by adding tags like this. And then providing the values of all the tags as an array like this. Now if you are thinking where did this license plate number came from, well it's coming from here in the URL. And because it's a get route, you can access the values by just passing them into your anonymous function as a parameter. Now the last part, just pass these values into your executeQuery method as a second parameter. And that's it. Though the second and third part will work fine as it is in this case. But since the license_plate_no is a unique field, we will never receive more than one car from the result. So we can remove this array and the for loop from here. Renaming the variable to the car and one last change to getFirst method. Which will make sure that the returning object is not a multi-dimensional array. And with this, we are done with the searcher outlets, let's quickly test it. We can add it to the previous route. Add search in the end, followed by the plate number we want to run. Congratulations, it works fine. Let's try another one. Great, so we have successfully finished the search route. And you know I remember when I was learning Falcon for the first time. These tiny milestones gave me a great sense of achievement. So I hope it does the same for you. Now, the last route for this lesson is finding a record with a given ID. However this one is also quite similar but to make it a bit more interesting, we will add an extra step to notify if the car was found or not. And also we will make use of a proper http response instead of a simple echo method which obviously was not a good practice in the first place but just for the learning purpose we did it anyway. So starting with a query and value, a little change in WHERE clause, and the same for the value here. Now, for the HTTP responses, we will use a new Falcon component, HTTP response, and create a new instance of it. The HTTP responses are usually composed of headers and body. This is where this component will help us do it in a very elegant manner. But first, we need to check if we received any record. And if we didn't then we will use the new response object and set the status as Not Found. But if we did receive something their status will be found. Followed by the data array just the way we did in our previous route. The very last step is to return the response object. It will be fun testing this one. Let's start with the URL localhost and your path, followed by the ID we want to find. Great, there we go. We have the car with the ID 3. The status is found, not to say or that the status is coming after the data element. That's because Python tool I'm using, not just make digits on object readable, but also orders the element in an alphabetical order. Let's try another id. Now a fake one. And there we have the not found status. So all the scenarios work just fine the way we want. And with this we have finished the data retrieval. I hope this lesson was very useful and you learned some good stuff. In the next one, we are going to do the create update and delete route. So I'm very excited, we are almost there to finish it. I hope you are too, so, see you in the next one. Chow.


