
 Lessons: 10Length: 46 minutes
- Overview
- Transcript
2.3 Create a Database
In this lesson we are going to create a database and then connect it to our REST API. Finally, we'll load the data models into our API.
1.Introduction
1.1Introduction01:18
1.2What We'll Be Building01:08
1.3Set Up the Application03:37
2.Create a REST API With Phalcon
2.1Create the Endpoints05:44
2.2Create Models07:32
2.3Create a Database06:48
2.4Retrieve Data06:10
2.5Create, Update and Delete Routes07:06
2.6Wild Card04:09
3.Conclusion
3.1Conclusion01:58
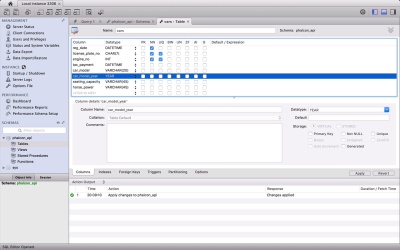
2.3 Create a Database
Hey, everybody welcome back in this lesson we are going to create a database then connect it with the rest API, and lastly load the models. Great, so let's quickly jump into the schema first. This is how our car schema will look like I'll be using MySQL Workbench as MySQL client, but there are tons of them out there, like phpMyAdmin and SQL Buddy. So feel free to choose that suits you more. Here I am with my MySQL Workbench. Let's start by creating a database. I'll name it phalcon_api. Now, let's create a table and name it cars. Well, notice here that the name of the table is exactly the same as the model's name. This is because by default this is how models work in Falcon. Though we can change this behavior if needed but let's save it for the end of this last for now let's define the columns. Starting with creating an ID first, which is going to act as a primary key for this table, ensure it never has to be null. Also a primary key need to be unique and auto-incremented as well. Next is owner_name. Character seems like perfect data type for it and since as per our business rule, it is a required field. Don't forget to check the Not Null box here. Next is registration date, since the value it will contain is a date, date time should be the right data type for it. I know we didn't set any validations on registration date and models but it's also an important field which we cannot afford to keep null. Now the very important one, the license plate number. Since the field will contain digits, alphabets and characters as its value. Var character should seem like a perfect choice here just to reduce the size a bit and it should work. But no, why? Because if our characters will works really great, if the length differs vary significantly, for example, in the case of owners name, one name can be just six seven characters long, and other fourteen. So we don't know, and have no control over the length of the owners name. But when you have fixed length or very close to fix, like the case of license plate number, the character type is faster and more a spesificant, which makes it perfect for this case. And we definitely don't want it to be null, we also need it to be unique, so that there are no duplicate number plate. Next is engine number in our example if you remember the value for engine number was a numeric value and it's very important to know the range of your numeric input to choose the right data type. Otherwise, you can end up using your database and storage very inefficiently. I have used N type for these but here is a cheat sheet from my school documentation to consider before choosing any numeric data. So according to this table, each of the type can save a number, let's say 67 as an input because it's within the range. But tiny will only use one byte whereas big will end up using 8. So always choose according to the range your input will fall in. Now coming back to the table tax payment, car model, car model year, seating capacity and lastly horsepower are not so important fields. All of them are optional and can be note and about the data types, well tax payment is here to save a date till your tax has been paid. So I will go with Datetime. Car model on the other hand is just a model name and the length of all model names can also differs significantly, so Var character is a good fit here. But let's fix the length to 20 characters which I think would be enough for any model name. For cars model year we have a very special data type, year, which saves the year as a four digit number in the range of 1901 to 2155. We could also use small integer pod, but the year is special because unlike small It uses just one byte to store the value. Last is seating capacity and horsepower which I think are well suited with tiny and small in types respectively, and with this we are done with the database. Now let's quickly set up a connection, and load our models in our A.P.I. Welcome back to your index dot B.H.P. file. Don't panic if you guys just noticed some changes in this file. It's just these comments and the small change in the name of this parameter because I think the earlier name registration number was a bit confusing for this field. Anyway starting with the loading of models we need to use Phalcon\Loader component which helps us load all project classes automatically. To register the models, loader component provide a method called registerDirs. It takes an area as an input with the part to your model classes and that Falcon will take care of the rest. Now the second thing we are going to do here is set up a connection with the database, and for that we will use Falcon speed adopter for my skill. Now DispU adopter is a service that basically can be used by many modules and classes in this API, so using it is bit different than other components we have used so far. First thing that we need is to create a service container with a new component called Factory Default create a new instance for this container. Now the last part to set up a database service, di object provides us with a method called set. It takes two parameters, one is the service name and other is an anonymous function, which will return the object of the video service. And the new instance of our service sticks an area of credentials as a parameter. I'm using the basic ones that you will always need, but you can always look into the documentation for other parameters that this service this offers. The last thing you need is to bind this DI object with the application by passing it to this micro Mvc instance. By doing this now this connection is available to all the classes in our API as a service. Maybe in the beginning the service container and dependency injection can be a very complex concept to absorb, but don't worry it's not that complex. Just stick to it and in couple of lessons you will be fine. We could go into more details in this lesson but it's very big topic in itself which will go out of the scope from this course. So, I highly recommend to read this article on dependency injection and service location from the Falcon documentation, which, according to them, is also a bit lengthy example. But by the end of this article, you will get the importance and ideology of going with this pattern. It's also one of the reason Falcon is a loosely coupled framework. With this we have reached to the end of this lesson before finishing it up here is a quick solution for using a custom table name with the model. You can do it by manually returning the name of your mapping table with this public method get source. There are also some cosmetic changes here, like these references use a backslash within them. But in the previous lesson, I accidentally used the forward ones. And lastly the name of this model should be plural, because of the class and database table name. In the next lesson, we will start with some routes and learn how to search and retrieve data. For that, I recommend you to add some dummy records beforehand in your cars table, or you can also find my skill dump in the GitHub repository. So, see you in the next lesson. Until then, bye bye.


