
 Lessons: 9Length: 36 minutes
- Overview
- Transcript
3.1 Create the Home Component
In this lesson, we'll create the home component. This will be the default route and will display an index of projects in the portfolio.
1.Introduction
1.1Introduction00:35
2.Getting Started
2.1Set Up the Project06:47
2.2Create the Routes and Root Component07:02
2.3Create Utility Files04:25
3.Building the Ui Components
3.1Create the Home Component04:57
3.2Create the Detail Component03:09
3.3Create the Projects Component02:56
3.4Finishing Up05:09
4.Conclusion
4.1Conclusion00:49
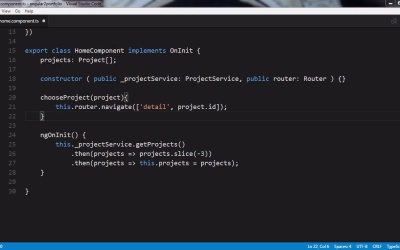
3.1 Create the Home Component
Hello, everyone. I'm Reggie Dawson. Welcome to the build a portfolio site with Angular 2 course for Tut's plus. In this video, we will configure the home component that will be displayed when our app starts. Remember, this is the route we will go to from our redirect route. Create a folder called home in the app folder. First, we will create a file called Home.component.ts. Of course the first thing we have in this file is our imports. We have seen component before, but we also have OnInit. We will get into to what this does in a moment, after that we have router directive, so that we can use RouterLink in this component. Project Service and Project will provide the project data. Then the router is present, so we can use its method, and then the truncate pipe so we can format our projects. Then we add our component decorator. Notice that we don't need to select this, since this component will be loaded by routing. Here we have an external template in router directives. Then we have a style URL. This allows us to add some component-level styles that only affect this component. Then we add our pipe the same way we add our router directives. Then after that, we add our class with the implements OnInIt keyword. First we creating an array to hold our projects. We will use our project interface as the shape of this data. Then we add our constructor. Using constructors in our classes is totally optional, but we need them any time we need to make use of an external service. Here we are pulling these services into our class by using the public key where these services will be available outside of this class. Then we will add the choose project method that allows us to choose an individual project. This takes an argument of project and then uses the router navigate to go through the detail route. You'll also notice that we are passing project idea along with the route. This is route parameter and allows us to pass information along to another route while we navigate. In this case we are passing the ID. For more on how this works, check out the angular to routing course. Then finally we add the ngOnInit method. We use this because any method in here will execute when the component is created. In this case, we will use this to grab the data for our projects. We use the get projects method from the project service. After that we chain in the result to a slice method. We have five projects, but what if we had 20? We just want to display a sampling of the projects on the home page. So I use the slice method to grab the last three objects in the array. After that, we set the result to the project's array. The cool thing about promises is that we could continue to pass the data in a chain as long as we like. After that, our component is finished. Next we can create a folder called images in the home folder. We'll add our hero image to this folder. Once we do that, create a file called Home.html. First we'll add at a jumbotron to hold our hero image. The jumbotron is a standard bootstrap component. Then we add a container. This will serve to line the content up with some padding around it. If we wanted our content to be the full width of the screen., we would add container fluid. Then we will add a row. Inside this row, we have set up a 12 column container from the bootstrap grid system. The text inside is set to center. This is just going to be a label that appears over our project sampler. Then I add a row as a spacer. Then I add a row that will display the projects. Inside that row, I add a four column to hold the project. In the column div, we have an ng for that allows us to loop over our array and add content for each item in the array. In this case, the project variable will hold the individual object on each pass. Then we have an image with the source set to our project image. Here we use the project variable with Interpolation to access the image property of the object. Then we set the image to be 140 pixels by 140 pixels. Then we have our project name in an h2 tag. After that we have our project info with our truncate pipe. Then finally, we have our button with a click event handler attached. The method set to execute from this click is the choose project method with the project variable as an argument. As a result, this method will pass the object that was selected when we click this button. This allows us to access the ID property that we pass in through our route parameter. After this the file is finished. The last thing we need to do is create the home.css file. First we will add our jumbotron and jumbo classes that help format the image better. And then we have our styles for our project listings. We add a little padding into the right and left margins to give some space between the projects. And then finally, we add styles for the button and spacer. Even though bootstrap shifts with a lot of different buttons styles, I like to customize them further. Also note that I try to use percentages wherever possible and avoid using pixels. This is in an effort to remain responsive to mobile display. After that, the home component is finished. In the next video, we will create the detailed component to display an individual project.


