
 Lessons: 9Length: 36 minutes
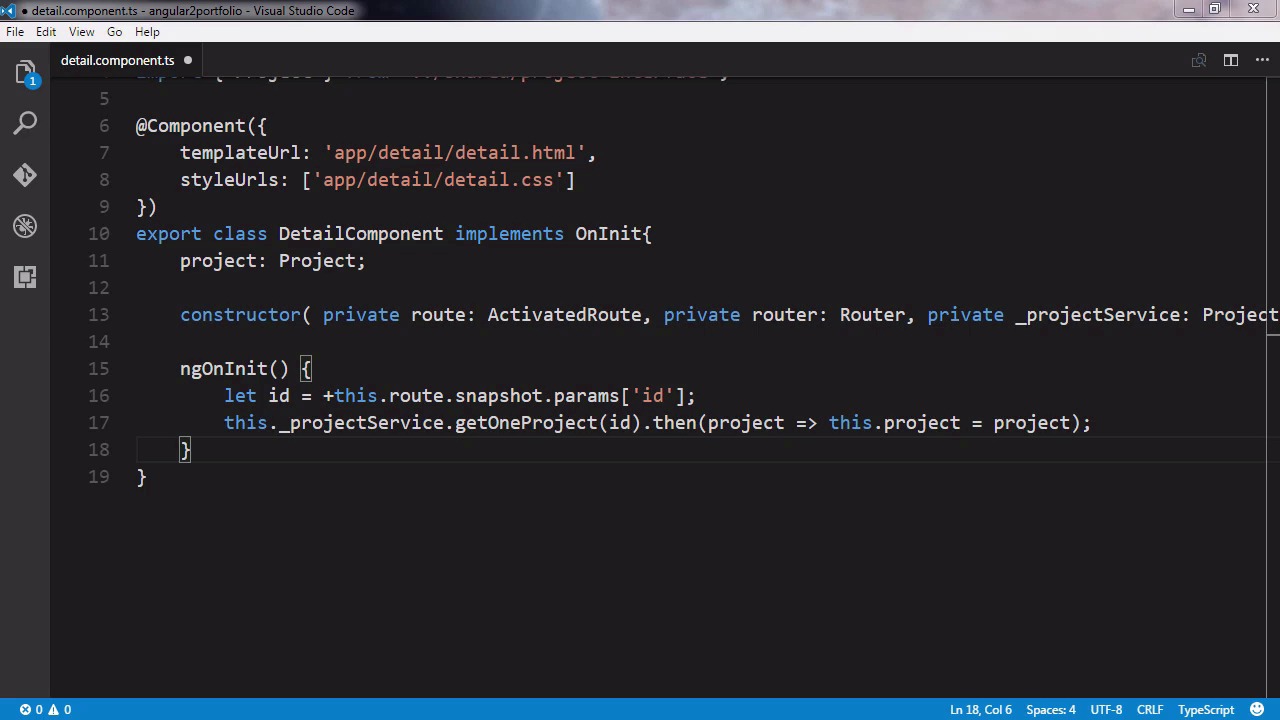
- Overview
- Transcript
3.2 Create the Detail Component
In this lesson, we’ll create the detail component. This component will use the project id parameter from the route to display detail about that project.
Related Links
1.Introduction
1.1Introduction00:35
2.Getting Started
2.1Set Up the Project06:47
2.2Create the Routes and Root Component07:02
2.3Create Utility Files04:25
3.Building the Ui Components
3.1Create the Home Component04:57
3.2Create the Detail Component03:09
3.3Create the Projects Component02:56
3.4Finishing Up05:09
4.Conclusion
4.1Conclusion00:49
3.2 Create the Detail Component
Hello, everyone. I am Reggie Dawson. Welcome to the build a portfolio site with angular2/cores for Tuts+. In this video, we will create the detail page that will display a single project when it is clicked. The neat thing about how all this fits together is that this page will work regardless where we navigate from. The key will be passing along the route parameter when navigating to the detail page. We already saw where we added a route parameter to the router navigate method that we used. In this video, we will learn how to access those parameters. First, create a folder called detail on the @folder. After that, we will create a file called detail.component.ts. First, we have our import for component and OnInit, which we know we will use to grab data when our component is created. Then we import router and activated route. We will see what activated route does in a moment. After that, we import our service and the project interface. Then we add our component decorator. Here we have a template URL and a style URL. But again, since we are using routing we don't need a selector. Then we add our class, again using the implements on Init keyword. First, we add a variable to hold our individual project. We use our project interface to provide the shape for the single project. Then we add our constructor, as usual we add the services we want to inject into our component. We're grabbing the activated route, router and project service in our constructor. Then we add the NG OnInit method, which we know we have to add since we use the NG OnInit keyword. First, we grab the past an ID from our route parameter. The plus sign is there because the route parameters are strings. The plus sign makes this value into a number, which is the format we need the ID to be in. Then we use the activated route to supply the parameter. Activated route just allows us to grab the past and parameter of the current route. After that we use the get one project method from our service. This method uses the ID we grab from the route and in turn, returns the project that we selected. After that we can create a file called detail.HTML. Now, we will start this fall off with a div that has ngIf attached. We have seen in gif4 which allows us to loop over an array and display a template for each value. NgIf on the other hand, will display a constant block if the expression is true. In this case, the div will not appear until our project variable as data. We know this won't happen unless we set it to the route parameter and after that the div will be displayed. First, we will add a row to display the project image. Then we add a container which we know will cause our text to have padding around it. The image will fill the full width of the screen since it is outside of the container. Then we add a row for the project name and project info. After that our template is finished. The last thing we need to do is add the detail.CSS file. All we will add to this file as a rule to manage the project image. We set our image to be full width and 80% of the height of the display. After that, our detail component is finished. Go ahead and save your project. Now I know a lot of what we are doing will start to get repetitive but that is the good thing about Angular 2. Once you start using it, building applications becomes easy since you get familiar with the design patterns that it uses. In the next video, we will set up the project page that will display a listing of all of our projects.


