
 Lessons: 16Length: 3 hours
- Overview
- Transcript
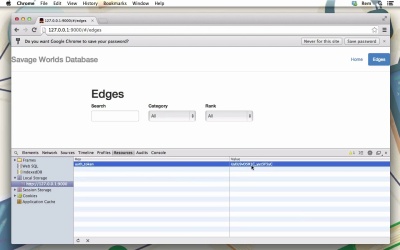
4.2 Token Authentication
In this lesson we'll implement basic token authentication.
1.Introduction
1.1Introduction01:12
2.Application Setup
2.1Front-End Application Setup10:37
2.2Backend Application Setup06:48
3.Public Area
3.1Routes, Navigation and Directives12:06
3.2Unit Tests and E2E Tests With Protractor15:24
3.3Testing With Capybara04:39
3.4Display Edges on the Page16:46
3.5Filter Edges22:35
3.6Testing Boundaries of Two Applications14:39
3.7Acceptance Tests With Capybara and Factory Girl11:47
4.User Section
4.1Front-End Login Form and Validation12:54
4.2Token Authentication27:56
4.3Create New Edge10:32
4.4Refactor09:36
4.5Delete Edges03:14
5.Conclusion
5.1Conclusion00:31
4.2 Token Authentication
Hi. In this episode, we'll implement the simplest token authentication functionality. So, let's get started. first, we need to actually make request to server from our log in form. Because now, we're just making a console log. We can remove these lines from here, and also the counsel log itself. And we will use auth service which we gonna create in a moment, for making the log in request. And we just provide this scope.user object to this login method. So let's inject this auth into our controller, and let's create it. So we go to services, and here we're going to create auth.gs. And there's usual, and there's gonna be a service which we call auth function and it will make HTTP requests, so we will inject HTTP service into this one. Okay, so let's define login method. There's gonna be a function, which takes user, and inside of it we return promise from http.post request. And the post request will be api/login. And we need to provide parameters, so for email we'll use user.email, and for password, we'll use user password. Okay, let's save it. Now let's open index.html file, and include this service into here, auth. So now if we go to browser, and make valid credentials and make login. You can see that we have API login post request right here. So of course there is no route matching post API auth.login. So how token authentication works? Basically clients sends credentials like we do from this login form, and if credentials are valid, server generates unique token, saves it into the database, and return it to client. Then, client saves it somewhere, like, in cookies or local storage, and then, included in every request it makes to the server. So basically we need to implement the following things. First, checking for credentials, and generating token. Second, client needs to store token and include it into every request. And third, server needs to check token for every resource which requires authentication. So now we need users. In our case, we'll have only admin for now. But later, maybe we'll like to add regular users as well. But, for now, we will have only two roles, guests and admins. So, for authentication, we will use the most popular gem out there, device. So let's go to our backend application and gem file and include gem device. And, of course, we need to go and make bundle install command. Now when we have a device installed, let's generate, rail general device installed. That will generate an initializer, and give us some instructions, but we will ignore them because we use rails like API. And it generates, initializes device.rb with lots of options, which I highly recommend you to read through. So now when we have it. So let's generate, with rails, generate device, and regenerate model, user. And that'll create migration, and all these files, and the model itself. So let's go to this migration. So we go to migration, device create user. And here let's add stream filled authentication token, like this. So now we can run rake db.migrate. Good, so now we also need to go to routes.rb file, and you can see the device created here routes four users. But we will create our own session controller in a bit, so we gonna skip sessions routes, and as user we want to add here the post route for API login. And this route will be pointing to session create action, like this. So now, we need to create this sessions controller. So let's go to app controllers. And inside of it, create sessions controller. So, there's going to be a class sessions controller, which inherits from device sessions controller. And, in here, let's define index. Let's save it. Make sure that both of your servers are running. And, I'm gonna run it in, not in test environment anymore, so in development environment. And let's go to browser and reload the page and try to make request. You can see here that we making request to login API with a post request and we have in response, we have InvalidAuthenticityToken and that happens because we have CSRF protection. But we do not need it any more because Rails app in our case is just an API. So let's go to application_controller, file, and here in protect form forgery, we're going to remove this exception with null session. Like you can, you know, read here in comments. For APIs, we just change it to null session. Let's save it. Go back here again, click on login. And now you can see that the message has been changed. Now we have no method create. Okay that's good. That's what we actually want to see. Not index, of course, create. So in this create action, we need to do three things. First we need to check for credentials. And then if credentials are valid, we want to create authentication token and send it to the client. So let's do this. First of all, we'll have this user find_by_database_authentication. That's the method which device provides us. And which allows us to find user by email. So we specify email from params email. So then, if user is found, and user has a valid password, also method provided by device, and we provide the password itself. So if password is valid, then we create an authentication token and, you know, send it into the user. Else we render nothing, and also, return status unauthorized. Let's save it, let's go back to browser, and let's try it out. And now you can see here that we have find by database authentication, okay? Find for, not by. Let's try it again. Click login. And now you can see nothing returned but the status code is unauthorized. That's exactly what we want. Great. So, now, let's create authentication token. For that, here, if everything's okay, we're going to create this token with the help of user ensure authentication token. And this method will generate token, and save it into the user and into the database. Then now we have this token, we want to render json. With this auth_token. Okay. So now we need to go to user model and define this ensure authentication token method. So let's go to user.rb. And right here, let's define ensure_authentication_token method. So first, it's gonna set authentication_token to the generated authentication_token. So we will use another method, generate_authentication_token, then we will save it. And then we will return it, like this. So now we need to create this method, generate_authentication_token. And this just a code that is provided in a guest from device gem. We're making a loop, infinitive loop. Then we, in this loop, we create token with a help of Devise method friendly_token. And then we break from this infinite loop with this token, unless it's not unique. So, unless User.where authentication_token this token first, like this. Okay. And this, and this whole that we need to do. So this method here will generate_authentication_token and set it to the model, save this model and return this authentication toke. And this method generates_authentication_token by just creating unique token. Okay? So now we need user in the database, so we can actually log in. So for that, go, let's go to seeds. And here at the bottom, let's create user. We have email. Let's say, admin@email.com and password: 12345678. Let's save it. Now, let's go to terminal and run rake db: seed. So now, if you go to rails console, for example, and take the first user, you can see that here is admin user with encrypted password right here. Excellent. So now let's try it in the browser. So we already know that when we provide invalid credentials, it returns unauthorized. But let's provide valid, so we provide admin@email.com. 123456789. And when we click Log In, he has internal server error. Okay. I've got a mistype with render in session controller here. Not renden, but render. Let's try it again. And now you can see here that everything went fine and we have auth_token returned to us. Great. That's exactly what we need. Okay. So now let's make our front-end application to react appropriately. So first, these are smart, the error message. When something goes wrong on our login form, we want to display that, you know, you provided wrong credentials. So for that, let's go back to our login controller. So in here, auth_login will return promise. So let's define this promise here. And then we register on then to call that's success and error. And that's gonna be just a simple function. So let's define them. Success, gonna be for now, just an empty function and error will have the response here. And inside of it, we will just create on a scope. We create wrongCredentials variable and we set it to true. Okay. So now in a login HTML file right here at the top, let's add DIV with class alert alert-danger. And we have ng-show wrongCredentials and we just make it like wrongCredentials. So now lets go to browser and let's try to sign out with wrongCredentials and you can see, we have the wrong credentials. Excellent. It works. So now for this success. On a success, we want to store this auth_token somewhere. So let's make request with valid credentials. And now here in response, you can see the auth_token and we want to save this auth_token. So for the sake of this example, we'll use local storage for this. Of course, in the real world application, you should think about the most universal approach. Maybe you have fallen back to cookies. But now, we will just just a local storage. So let's go back to our login controller. And right here, we have also response object. And in our success, we want to set localStorage.setItem, which called auth_token to response.data.auth_token. Okay? So that will set it. And after that, we want to use a location and change path to let's say, edges. So we make a redirect. So we need, of course, to inject this location to our controller, so we have location and save it. So let's try it now. So, I'm making a request with valid credentials and I am redirected. And if you go to resources and see local storage, you will see that auth_token has been saved in local storage. Excellent. So the next step is to include this auth_token, if it's present to all requests. For that, we need to create interceptor and register it. So every edge request is decorated with auth_token. So we gonna create it right in the app.js, so let's open app.js file. And here be, before this config, let's create new service, because intercept is just a service. It's just a factory and we call it authInterceptor. Okay. So this interceptor returns object, which has special methods. One of these methods is request. So this with the help of this method, we can intercept requests and somehow change them. So this request will have a config object that we're gonna use. So first of all, in this kind of config object, we check in for headers and we set it to config.headers or empty object. And then if local storage has auth_token in it, then we set config.headers and we call it token to localStorage.auth_token and then we return this config object. Okay. So now we have this interceptor object, we need to add it to the interceptors collections and we do it with the help of the config function and we inject httpProvider service. And in here, we'll use it httpProvider.interceptors, that's an array and we push into this array our authInterceptor. Let's save it. Okay. So now, if you go to browser and let's have a look at the network. And into the Edges and Headers, you'll see that we have token here. Because we already logged in, we have this token in our resources in local storage and that's why every time we make a request anywhere, this token here is included into the Headers. So, if for example, in the resources, we delete auth_token and reload the page. Now in network, of course, we won't have this token header here. Okay. So now we have the first part of the equation, user can authenticate itself. It gets the auth_token and this auth_token is sent with every request. The second part is checking whether user authenticated or not on server when request with this auth_token comes in. So let's imagine that we have an admin dashboard page and when the user gets there and your application makes a request to the server to fetch some data. For example, about all users of the system. So, if it's not authenticated, then it just redirects back to login page. So let's implement this behavior. First, we need to define route. So right here, let's define new route. We call it admin. And with templateURL, it's gonna be views, pretty standard admin.html. And with controller: AdminController. Okay? So now let's create con AdminController admin.js. So we define controller AdminController, like a function and we will use http here, just to make the request. So let's make it. Http is just for testing. Get api and, for example, users resource, like this. So now let's create view admin.html. And that's also gonna be very easy, just h1 Admin. Okay. So now if you can go to browser and we are not logged in, because we have nothing in local storage now. And if you go to admin, we of course will see this Admin page. So now, we want to protect it from the server site. So for that in our rails application in routes. Let's create new resource and we will call it users only 4 index and let's create new controller in app controllers api. We're going to create controller users_controller.rb. So inside of this controller, we will have index section. Okay. So now we need to protect this index section or any actions on this controller. And for this, we'll use filter. So before_filter and we call it authenticate_user_from_token. So this method, this filter will authenticate user from the token. So, if it's authenticated, then the current user will be available. If it's not, then current user will return nil. Okay. So for that, let's go to application controller where we can define this method. So let's define authenticate_user_from_token. So first, we need to make sure that token is present. So for that, we check request.headers and we check it for token header and it's presence. If it's presence, it's true. Then user equals token and User_find_by_authentication_token. So, if token is there in headers, then we try to find a user by this authentication token. So let's provide this token and we make it to string and if user indent is there, then we sign it in. Sign_in is provided by device and we just provide user. And also, we said that we do not want to store this user. Okay. And that's all, that's all that we need to do. That's the simplest possible authentication from a token. It's not very safe, but it will do for now. So now when we have it, let's go back to our user's controller and right here in index, we make a very simple check. So if current_user and it will return true or more precisely, it will return user. If authenticate_user_from_token was successful. So in this case, we render nothing. So everything is okay. But if not, then we render json with empty object and status: :unauthorized. Okay. And that should do it. It's not very clean and we should create failure app class. But that's not course about trails, so we settle on this simple solution. So now if you reload the page, we do not do in any request to the server, because we haven't included AdminController into the index.html. So let's go and do this. In index.html, let's include new controller here, admin. Now let's reload the page. And now we are doing this request and we're getting back unauthorized. Excellent. That's what we actually want. Again, if we login with valid credentials and then go to admin, nothing bad is happening. So users return state this okay, so It works. I'm gonna remove all token again and reload the page. So now we need to add responds error method to our interceptor, so the basic idea is to redirect to login every time when we get unauthorized response. So let's go back to our app.js and here in interceptor, we're going to add another method, responseError and it's a function with response object. And first of all, we should return promise with reject and response as a parameter and of course we need to inject this queue service. Now we can do anything we like with this response, intercept it as we like. So for example, if response.status equals to 401, then we want to use location.path to redirect it to login. Okay. So again, we need to add this location here. So, if we go to admin right here, we are redirected back to login, because we have no rights to see this page. Excellent. So the last thing left is logout. So first of all, we need to show this logout link. We will show it right here and we will show it only when the user first logged in. So for that, let's go to navbar HTML where I would have bar stores. And let's add here another list item with ng-show, so we will show it only when the user is loggedIn. And inside of it, we will have. End the tag with ng-click to log out. And we call it logout. Okay, like this. So now if we go to browser, nothing changes, because we do not even have this as logged in method. So, for that, let's go to navigation.gs file. So the controller for our navbar. So inside of it, let's define on scope, we going to define is logged in, and that's gonna be function on auth is logged in, like this. So we need to inject it in here, and of course we will implement it right now, so let's go to auth. And let's create is logged in. So we do this, is logged in. It's a function. And it will return if local storage get item, of token, then it will return true. If not, it will return false. So very easy. Let's save it. And now if we go back to browser and sign in, you will see logout link right here. Excellent. So now click on it. We want to log out. So, we will define this log out functionality right here and now, so we do this logout. That's a function, and it will return promise as usual from HTTP, delete from API, logout. Okay, so now back to our navigation controller, we define scope, logout is the function which we again take the promise from auth.logout. And then we make this promise.then, and attach callback, success callback for it. And inside of it we want to delete localStorage. So removeItem from localStorage, auth_token. And then again, we want to redirect it to log in, okay like this, so now we need to go to our Rails application, and for that we go to routes dot rb and here let's define. For the session destroy, action, we will define logout for the delayed. Let's save it and let's go to sessions controller. And you find here the destroyed action. So basically what we want to do here. Is, we want, for the current user, we want authentication token to set it to nil. And then save this current user. And then, just render successful response. JSON [UNKNOWN]. And also, we want to authenticate before they [UNKNOWN]. So, before filter is gonna be authenticate_user_from_token except create action. Okay. So let's have a look. Now if I click on Logout, I'm logged out. No local storage any more. And I do not see here, anything. And I can go to Admin. So we basically have all needed functionality for login and logout. Okay. In this episode we implemented token authentication. So thank you very much for your time. And see you in the next episode, where we're going to create new edge


