- Overview
- Transcript
4.1 Front-End Login Form and Validation
In this lesson we'll create a login form and power it up with validations. We'll see how to use ng-class and form validations, then even write custom directives.
1.Introduction1 lesson, 01:12
1.1Introduction01:12
2.Application Setup2 lessons, 17:25
2.1Front-End Application Setup10:37
2.2Backend Application Setup06:48
3.Public Area7 lessons, 1:37:56
3.1Routes, Navigation and Directives12:06
3.2Unit Tests and E2E Tests With Protractor15:24
3.3Testing With Capybara04:39
3.4Display Edges on the Page16:46
3.5Filter Edges22:35
3.6Testing Boundaries of Two Applications14:39
3.7Acceptance Tests With Capybara and Factory Girl11:47
4.User Section5 lessons, 1:04:12
4.1Front-End Login Form and Validation12:54
4.2Token Authentication27:56
4.3Create New Edge10:32
4.4Refactor09:36
4.5Delete Edges03:14
5.Conclusion1 lesson, 00:31
5.1Conclusion00:31
4.1 Front-End Login Form and Validation
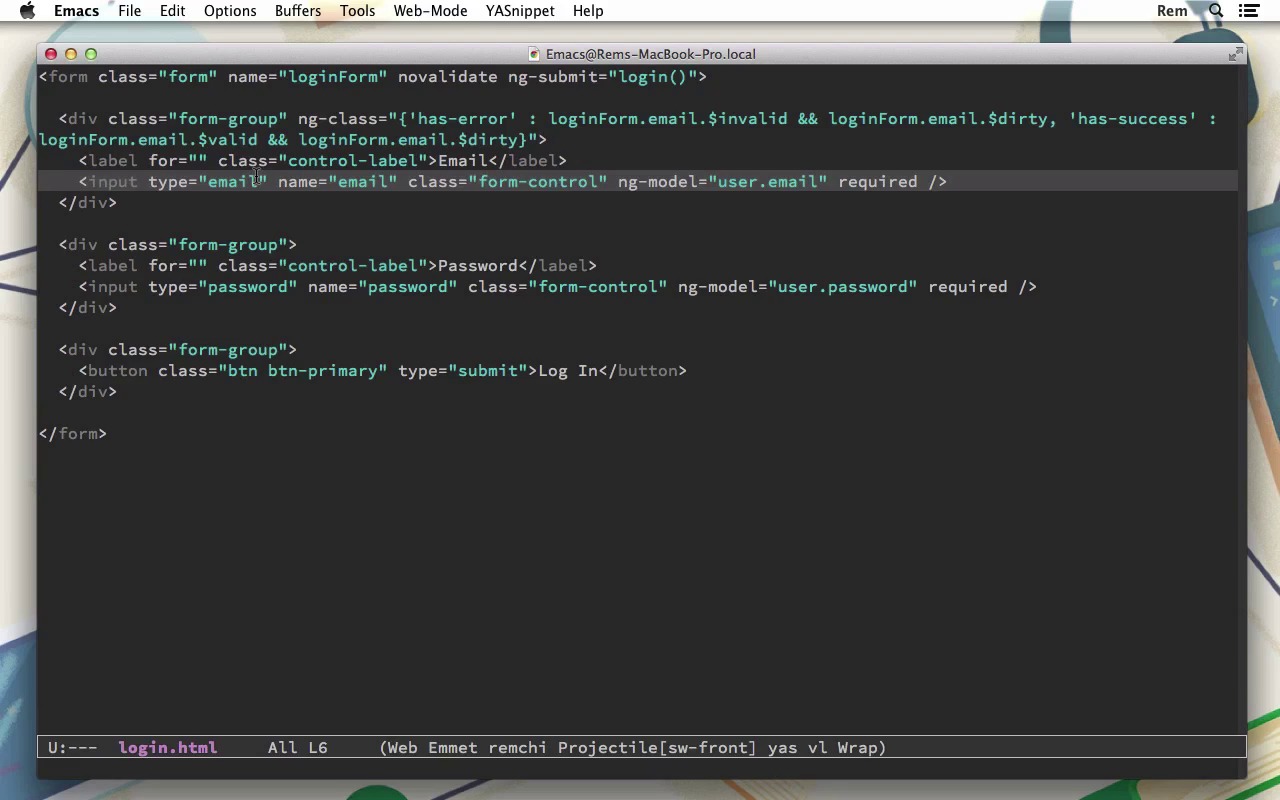
Hi. The next couple of episodes, we'll implement user authentication, and in this episode we'll focus on log in form and validations. So, first of all, let's define new route for a login page. So, in our app.js file, let's create new route, so when we go to login. We want to have templateUrl as views/login.html. And controller is 'LoginController'. Okay, now we need to create these files. So, let's create, in controllers, let's create login.js. So we use strict as usual. Angular module and our application. Controller, login controller. Let's save it. And also we need to create views and in views, we create log in. N.html, and let's save it. So, looking that html is very simple. It's going to be just a simple looking form. So we have a simple form, and inside of this form we will have email, password, and a button. So we'll have div class for group. We are using boot strap. Then we have label. For email. And then we have input field. So the first one is email, and it's very important that we specify type email, because from this type will depends Angular validations. And name is also very important, so email. And next we'll have class as form-control, and ng-model. And we'll have for this, we will have user model and email on it. Okay, so let's create another one and this gonna be password. So, type is password, name is password and user password for model. And the last one is gonna be button with type submit. Login. Okay, so here we have our form. So let's go to browser and go to login URL. And here it is. We do not have the controller login controller. Because we need to go to index.html. And actually right here, include it. Login. Now we do not have this error and we have our form. Great. So now on this form tag we need to add several attributes. So the first one is name. If we want to activate. Angular validations, and the form must have a name, so let's call it log in form. The next one, we want to disable HTML5 validations with no validate, and also we want to have submit and g submit directive, and we call it log in. So now let's go to the controller, and instead of this controller on scope, let's define this log in function, and here we want to check, before we want to make the request to the server, we want to check if this form on the scope. And that's why we actually need to give the form a name. So, when we give the form a name, it appears on this scope. So we can do login form and then check for whether it's valid or not. And, for now, we just console of log, sending request to server. So, now if we go back to browser, scope is not defined. So let's go and inject scope. Let's save it. And now if we go to browser, and try to log in, it's actually sending request to server. And that happens because we simply do not have validations except the email. So for, for, in our case, for login form, we actually want both of these fields. To be required. And we do it with the help of required attribute. So let's save it. And now let's try to do that. And nothing happens. But also, of course, we do not see why nothing is happening, right? So we want to give users some sort of a clue what's going on. So first of all, right here on the div with class form, group, let's add another class. We want to add class has error, when something is wrong. And has success, when everything is okay. So we will use ng-class directive. And inside of this. We'll use JavaScript expression, and we want to have this has-error class, if, so loginform.email.$invalid. And you may think that this is enough, but if we save it and go to browser. You will see that by default when we just go to the page its already red, which maybe not the behavior that we really want to have. So to fix that, we add another thing to the condition and loginForm.email dirty. So that simply means that user has done something with email field. So now we save it. It's not red but when we do something it becomes red. And when we stop doing it, it is not red anymore. So we also want to make green. For that we can specify another class separated by a comma. So another class is has. Success. And we do exactly the same thing. Login form email valid. And dirty. And now if we go back to browser and we start typing, we are red. But when we go to email part, we are green. Excellent. Also, to make it a little bit more prettier, we set class labels. Control label, this way label will also become red or green. Good, but how does angular knows that we want to validate email? Well, that's the cool part, that happens because we specify to here type of input field as an email. That's all that we need to do to activate angular validation for email address, it's very cool. Okay, so we also want to display an error message when something goes wrong. So right here after our inter fills, let's create p-element with class help-block. And inside of it we'll have something like run email. Okay. So, now here we want to show it again. Only when login form email is invalid. And is dirty. So now if we save it, go to browser. And start typing, you'll see wrong email. So, I don't know how about you, but I pretty pissed off when something like this happens. So colors for me are okay, but message just makes me a little bit nervous. I prefer to see the message when I for example. Go to another field. Or when I submit. So, these are two ways to do that and let's have a look how to achieve them both. Let's start from the easiest one and that's for displaying on a submit. So when we submit form, if it's invalid, we want to tell the user what exactly is wrong. So for that, we add here another condition and we call it, if login form submitted, and we set this to true, in our controller. So right here, if it is invalid so we have here else block, then we set on scope. Login form submit it to true, so now we could go back and we do something, and then we submit it only after we clicked on log in this message appeared. Okay, that was easy. So, the second way we try personally preferring user experience is display message in blur when field lost focus. For that we need to create a directive, and this directive will attach uvariable to the form which we can check instead of submitted variable we use now. So let's create this new directive. So in our scripts and directives folder, we're going to create new one. And we call it cu for custom focus.gs. So, again, we have angular module, our application, directive. And we call it custom focus. So, first of all, there's going to return. An object. And, in this object it's restrict to attribute. It's not an element like we did before. We also want to used NG model, so we require NG model. And we define link function, in this link function we can listen to different events like blur or focus that what we actually gonna do, so this link function takes scope, elements, attributes, and controller. So, inside of here, first on the controller, we'll define focused variable and we set it to false by default. Then we want to bind on the element, we want to bind some event so on focus. We want to apply on scope we want to apply function. So this controller focus equals to true, so again what we do here, on element we bind in to event on focus, so every time when element get focus, it actually sets focused variable to true, and we need to do the same thing, we would need to bind. Blur, and we do absolutely the same thing. I'm just gonna copy here, paste it, and here when this happens, when blur happens, we set it back to false. So now we have this directive. Let's go to index.html and include this directive. [INAUDIBLE] Onto our page. And now, let's go back to our login html. And instead of submitted here, we'll use not login form, email, focused. So when it's invalid, when it's dirty, and when there is no focus, then, we display the message. And of course we need to add directive to the element, and pay attention here because we named directive with custom focus and [UNKNOWN]. But when we use it we need to use it with /customfocus. Let's save it. Go to web. Browser. And now you can see only red color. But when we lose focus, we see the arrow. Of course that's not a perfect solution because when we get focus back, the message disappears. Maybe that's also not the behavior that we want, but that's pretty decent. So another thing that I want to add here, except I want to add the same thing for a password, I want to disable login box until the form is valid. So let's go back here, and in button I'll add ng. Disabled attribute. And it will have loginForm invalid. While it's invalid, the login will be disabled. So if we go back here, you can see that it is disabled. But if we have email and password. It's enabled. Great. So, let's add the same thing for password. So I'm just copy ng-class right here, and just, rename all emails to password. Add our cu-focus directive, and also I want to have this. Message here. It also needs to change your mail to password. And make an item error message. Okay, so now we go back here, we'll have very nice form. Login form. And it's pretty good. Great. So now we have a very nice login form with front-end validation and messages if something goes wrong. In the next episode, we'll implement user authentication. So thank you very much for your time, and see you then.


