
 Lessons: 16Length: 3 hours
- Overview
- Transcript
3.1 Routes, Navigation and Directives
In this lesson we create a new route for our edges page. We'll also see how we can extract some behaviour into directive while we develop site navigation and its active links.
1.Introduction
1.1Introduction01:12
2.Application Setup
2.1Front-End Application Setup10:37
2.2Backend Application Setup06:48
3.Public Area
3.1Routes, Navigation and Directives12:06
3.2Unit Tests and E2E Tests With Protractor15:24
3.3Testing With Capybara04:39
3.4Display Edges on the Page16:46
3.5Filter Edges22:35
3.6Testing Boundaries of Two Applications14:39
3.7Acceptance Tests With Capybara and Factory Girl11:47
4.User Section
4.1Front-End Login Form and Validation12:54
4.2Token Authentication27:56
4.3Create New Edge10:32
4.4Refactor09:36
4.5Delete Edges03:14
5.Conclusion
5.1Conclusion00:31
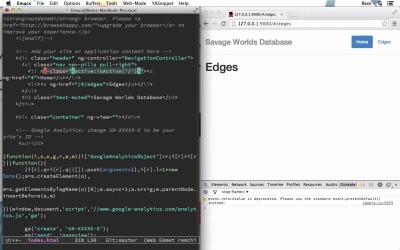
3.1 Routes, Navigation and Directives
Hi. In this episode we'll start develop application, and we'll start from the public part. Displaying and filtering ages. So let's create new route, and specify template and controller for it. So let's open up .gs file. So right here, I'm going to Tuts, front allocation, app, scripts, ap.js. And here I'm gonna define another when block. And I specify that that's gonna be edges. And for that we define templateUrl, which will be in views. And we call that just data.html, and the control for that is gonna be EdgesController. Okay, simple as that. Also we will remove this controller for the main controller because we actually do not need any logic there, only the page itself. So I'm gonna delete it, and delete this comma here. And let's save it. Okay. As you can see when I saved it our list of items disappeared because now we do not have this controller. Great. So let's go to this control and rename it to the ages controller. So we go to main.gs. And right here instead of a main controller, I will have EdgesController. And I'm going to remove resource from here, and, actually everything from here. Just an empty EdgesController. And also I want to rename the file itself. From main js to edges js, okay. So now let's open main.html file, and let's delete this list from here and everything from here to the bottom as well. So basically all we want to have here is the welcome text, so welcome to Savage Worlds. And in lead I'm going to delete this pretty image and make just a slogan here. Fun, Fast, and Furious. And I'm gonna delete button. So, let's save it. And you can see, right away, how beautiful it became. Okay, so, now, this navigation bar is actually the part of the layout, itself. So let's cut it. Again, save this file, and go to index.html. And we go into paste this navigation right before the container. Right here. I save it. You can see it goes back. Also, let's change this swfront to Savage Worlds database. Okay, good. And now at the bottom of this page, we need to rename main to edges. Okay. So now let's create edges html file in views, so for that we go to views and here we need to find edges.html. And for now, it's just gonna be just a simple edges. Okay. Let's go back to index. And here, where we have our menu, we will add, here, the path to edges. And we call it edges. And the hello, we're gonna delete. Save it, and you can see here that now we have edges. So let's click on it and you can see edges, our route in works and we see exactly what we want to see. But right here at the top you see that while we are on edges, it's not active, so let's do something with that, so if you go back here. And in our header, let's add new ng-controller, so this way we can add some logic to this small part of our application. And we call it NavigationController. Save it. Nothing of course changed except one thing. Now we have an error on the page. I'm gonna open here because we do not have navigation controllers, so we need to create one. Okay, so let's do this. In scripts, controllers, we're gonna create navigation.GS file. And let's create it from scratch. We use strict mode and first, we define our controllers on our module application. We, of course, can create a separate module for our controllers, but we will keep simple. So first, we need to get our application, and we do it with angular module. And then the name of our application swfrontapp. And then we just make the control call controller and the name of the controller NavigationController. Then we pass the function where we can inject dependencies and let's close it up. So, after that, we need to go back to index.html. And at the bottom, add to this controller to, right here navigation. Save it, and now we back to green as I may say. No errors. So we have our navigation controller. Great. So now we want this list items, you can see here the class active, but we want to make it conditional. So if we, on the particular page, it should be active. If not, then not. So what we can do, we can change this class to NG class. And NG class takes the expression, angular JavaScript expression, and we can make it to be active if is active return to. And this is active takes one parameter, the target URL. And for this one, we have just a simple root route. So let's copy this NG class, and paste it into here. And for that one we will have edges. Okay, let's save it. Of course nothing happens, because we have no isActive on our controller. So let's go to Controller, up to navigation.js, and here on scope, we define isActive method, which is the function which takes the path. And of course we need to inject this scope into this controller. So almost every controller will have scope. So later when we create new controls we inject scope right away. And now here we're going to make it extremely easy and even naive. And we just return path equals to location path. So we've taken the current path and comparing it to the provided path. So for that to work of course we need to inject also location service. Let's save it. And as you can see, it's reloaded. And now Edges is active. So if we go back and click on Home, Home is active. Wow, that's cool. It works. So we'll complicate this method a little bit when we test it in the next episode. But now let's leave it up to that. So the last thing I want to demonstrate to you is how we can make our HTML more declarative by extracting this header, all of this header right here, into a separate file. So there are two approaches to it. One is to use ngInclude directive. Another one is to create custom directive. So let's try both. First right here, we're going to use NG include. So we're going to define div tag with NG include, and NG include takes JavaScript expression, not a string. So we need to add another set of quotes. Okay, so JavaScript string. And we're gonna reuse, and we call it nav bar.html. So we include this. And also, we will cut this NG controller from here and paste it here. Okay so now we have our div, and this part I'm gonna just cut. And let's create this nav bar in views. So views, nav bar.html. And just place it into here. Let's save it, and it works. And if you can see, our logic works as well. Good. But in our index we have a much cleaner HTML. So we can specify controller right here, as we did. Or, we can specify it right here. This really depends on your needs. Okay, so, now let's have a look at how to create directive. What we want to achieve is instead of using this thing here, I'm gonna delete it. And then I'm gonna just use nav bar, open and close in tags, so like this. Okay, now it doesn't work of course, so let's create custom directive that will paste our nav bar right here with the behavior that we created. So for add in scripts folder, let's create new folder, we call it directives. And instead of this folder, we create navbar.js. And I need to create this directory here. So again we're going to use strict. And again we use angular module. Our application. And then directive. To define directive. Then we call it navbar. [BLANK_AUDIO] And directive returns special object. So we return JavaScript object and, in this simple directive, we just specify three options and two of them we all ready know from route. The first one is restrict. And we restricted this directive to be an element another option for example is to be attribute. But now we want to, to demonstrate how to do the element and then we have the templateurl which we already know in views navbar.html. And controller, which is NavigationController. Let's save it, nothing happens here because we need to add this directive to the index HTML at the bottom here. So I'm gonna copy right here and make directives navbar. Save it, and now you can see that we have our directive. Okay, but I deleted controller, so let's return navigation controller. So let's reload it, and now we are having this nav bar as the directive. And it works exactly the same and our HTML became very short, very declarative. That's great, so let's commit this change. Get add, and get command. So we have edges, route, and navbar directive with active links. Okay great, in this episode we created new route and for now end control for this route. We saw how we can implement simple behavior for style menu items dependent on current URL. We also extracted navigation menu into several directives. In the next episode, we'll see how we can test what we just created. So thank you very much for the time, and see you in the next episode.


