
In this tutorial, I'll explain the major steps and workflow for creating a simple space survival game, based on the gravity mechanic explained in a previous tutorial. This game is written in AS3 using FlashDevelop.
Play the Game
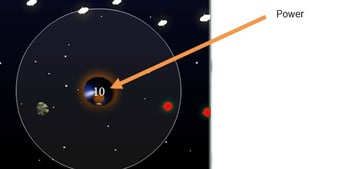
Use the left and right arrow keys to manoeuvre your ship, the up and down arrow keys to increase or reduce the size of the magnetic field it produces, and the space bar to reverse the polarity. Collect the white crystals to increase your fuel supply - but avoid the red ones, because they use it up. Don't hit a rock, or it's game over!
In this tutorial, we won't actually create the full game displayed above; we'll just get started on it, by making a very simple version with primitive graphics and just one type of object. However, by the end, you should have learned enough to be able to add the other features yourself!
The game itself is very simple in its current state - take a look at this critique for tips on how you can take it from a simple demo to a full game!
Let's Get Started!
Set up a new AS3 project in FlashDevelop, and set its dimensions to 550x600px.
1 |
|
2 |
package
|
3 |
{
|
4 |
[SWF(width = "550", height = "600")] |
5 |
|
6 |
public class Main extends Sprite |
7 |
{
|
8 |
|
9 |
}
|
10 |
}
|
Step 1: Identifying the Game Objects
There are six objects in particle that you can identify from playing the game above:
- Energy supply - represented by an white oval shape object
- Asteroid - represented by a rock-like object
- Energy consumer - represented by a red star bounded with green light.
- Stars - the background
- Range indicator - represented by a white circle
- Ship - player object
Of course you can add in any other object to make the game more interactive or add a new feature. For this tutorial we'll just make
Step 2: The Energy Class
From the objects we identified, four of them actually work in exactly the same way: by falling from top to bottom.
They are:
- Stars
- Energy supply
- Energy consumer
- Asteroid
In this tutorial, we're only going to make the "energy supply" objects, out of the four above. So let’s begin by creating these objects and making them fall down, with a random spawning position and speed.
Start by creating an Energy class:
1 |
|
2 |
package
|
3 |
{
|
4 |
import flash.display.MovieClip; |
5 |
import flash.events.Event; |
6 |
|
7 |
public class Energy extends MovieClip |
8 |
{
|
9 |
private var rSpeed:Number = 0; |
10 |
|
11 |
public function Energy(speed:Number) |
12 |
{
|
13 |
graphics.beginFill(0x321312); |
14 |
graphics.drawCircle(0, 0 , 8); |
15 |
|
16 |
rSpeed = speed; |
17 |
}
|
18 |
|
19 |
// we will call this every frame
|
20 |
public function move():void |
21 |
{
|
22 |
this.y += rSpeed; |
23 |
//rotation speed is linked to moving speed
|
24 |
this.rotation += rSpeed / 8; |
25 |
}
|
26 |
}
|
27 |
}
|
Step 3: The GameScreen Class
This class will eventually control most of the aspects of our game, including the player movement and the game loop.
Create the class:
1 |
|
2 |
package
|
3 |
{
|
4 |
|
5 |
public class GameScreen extends MovieClip |
6 |
{
|
7 |
|
8 |
public function GameScreen() |
9 |
{
|
10 |
|
11 |
}
|
12 |
}
|
13 |
}
|
That's all we need for now.
Step 4: Update The Main Class
We'll now create an instance of GameScreen within Main:
1 |
|
2 |
package
|
3 |
{
|
4 |
import flash.display.Sprite; |
5 |
import flash.events.Event; |
6 |
|
7 |
[SWF(width = "550", height = "600")] |
8 |
|
9 |
public class Main extends Sprite |
10 |
{
|
11 |
private var game:GameScreen; |
12 |
|
13 |
public function Main():void |
14 |
{
|
15 |
// don't display a yellow rectangle on the screen at startup
|
16 |
stage.stageFocusRect = false; |
17 |
|
18 |
game = new GameScreen(); |
19 |
addChild(game); |
20 |
|
21 |
// give keyboard focus to the game screen immediately
|
22 |
stage.focus = game; |
23 |
}
|
24 |
}
|
25 |
}
|
Why bother? Well, this way, it'll be easier to add extra screens later if we want to (like a preloader, a title screen, a game over screen...).
Step 5: Introducing a Manager Class
To avoid the GameScreen class becoming too much of a mess, we'll use separate classes to manage each object.
Each manager class will contain all the functions that relate to, and interact with, a particular object. Here's the EnergyManager class:
1 |
|
2 |
package
|
3 |
{
|
4 |
import flash.display.MovieClip; |
5 |
|
6 |
public class EnergyManager |
7 |
{
|
8 |
// this Vector will store all instances of the Energy class
|
9 |
private var energyList:Vector.<Energy> |
10 |
private var gameScreen:GameScreen; |
11 |
|
12 |
public function EnergyManager(gs:GameScreen) |
13 |
{
|
14 |
gameScreen = gs; |
15 |
energyList = new Vector.<Energy>; |
16 |
}
|
17 |
}
|
18 |
}
|
Note that we require a reference to the GameScreen to be passed to the constructor, and we store this reference in a private variable. We also set up a Vector to store references to all the energy objects.
So far the class contain no other functions; we will add them in later.
Step 6: Creating Energy
Add the below function for creating energy, this is just a function; we will call the function later from GameScreen Class:
1 |
|
2 |
public function createEnergy(number:int):void |
3 |
{
|
4 |
var energy:Energy; |
5 |
for (var i:int = 0; i < number; i++) { |
6 |
|
7 |
energy = new Energy(4); |
8 |
|
9 |
gameScreen.addEnergyToScreen(energy); |
10 |
|
11 |
energyList.push(energy); |
12 |
|
13 |
energy.x = Calculation.generateRandomValue(30, 520); |
14 |
energy.y = Calculation.generateRandomValue( -150, -20); |
15 |
}
|
16 |
}
|
We create a new energy supply with a speed of 4, add it to the display list (via the GameScreen), add it to the Vector of all energy objects that we just created, and set its position to a random point within certain bounds.
The Calculation.generateRandomValue(#, #) is a static function we haven't written yet, so let's do that now. Create a new class called Calculation and add this function:
1 |
|
2 |
public static function generateRandomValue(min:Number, max:Number):Number |
3 |
{
|
4 |
var randomValue:Number = min + (Math.random() * (max - min)); |
5 |
|
6 |
return randomValue; |
7 |
}
|
This function will generate a random number between the two values passed to it. For more information on how it works, see this Quick Tip. Since this is a static function, we don't need to create an instance of Calculation in order to call it.
Now, what's that addEnergyToScreen() function? We haven't defined that yet, so let's do it now. Add this to GameScreen:
1 |
|
2 |
public function addEnergyToScreen(energy:Energy):void |
3 |
{
|
4 |
addChild(energy); |
5 |
}
|
It just adds the passed instance of energy to the display list. Let's also make a corresponding function to remove a given energy object from the screen:
1 |
|
2 |
public function removeEnergyFromScreen(energy:Energy):void |
3 |
{
|
4 |
if (energy.parent == this) |
5 |
{
|
6 |
removeChild(energy); |
7 |
}
|
8 |
}
|
Step 7: Spawning Energy
Let's set a timer that defines the interval for each spawning. This code goes in GameScreen's constructor function:
1 |
|
2 |
energyM = new EnergyManager(this); //remember to pass a reference to the game screen |
3 |
|
4 |
var spawnTimer:Timer = new Timer(3000, 0); |
5 |
spawnTimer.addEventListener(TimerEvent.TIMER, spawnEnergy); |
6 |
spawnTimer.start(); |
So, every three seconds, the timer will call spawnEnergy(). Let's write that function now:
1 |
|
2 |
private function spawnEnergy(e:TimerEvent):void |
3 |
{
|
4 |
energyM.createEnergy(4); // create 4 energies |
5 |
}
|
Step 8: Creating Player
Let's use another, bigger circle to represent the player. Feel free to import an image to use instead:
1 |
|
2 |
public function Player() |
3 |
{
|
4 |
graphics.beginFill(0x7ebff1); |
5 |
graphics.drawCircle(0, 0, 20); |
Add this code to GameScreen to add the player to the screen:
1 |
|
2 |
// in the variable definitions
|
3 |
public var player:Player; |
1 |
|
2 |
// in the constructor function
|
3 |
player = new Player; |
4 |
addChild(player); |
5 |
player.x = 275; |
6 |
player.y = 450; |
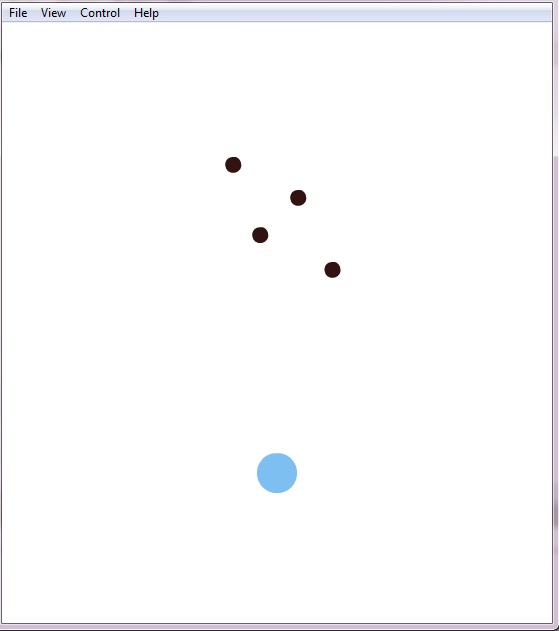
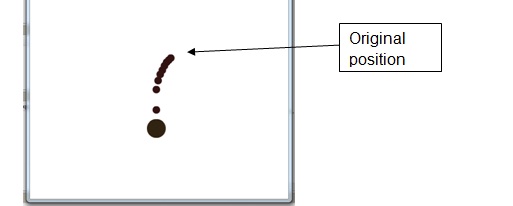
So far we should have a few energy supplies falling few seconds, and the player appearing in the middle of the screen:
Step 9: Moving the Player
There are basically two ways to apply movement:
-
Using Boolean (true/false) values - true = moving, false = not moving. When the right arrow key is pressed, the value for "moving right" will change to
true. In each frame update, "moving right" istrue, we increase the object's x-value. -
Using direct update each frame- when the right arrow key is pressed, an object is told to move right immediately, by increasing its x-value.
The second method does not lead to smooth movement when the key is continuously pressed, but the first method does - so we shall use the first method.
There are three simple steps to doing this:
- Create two Boolean variables, one for moving right and one for moving left.
1
2
private var moveRight:Boolean = false;
3
private var moveLeft:Boolean = false;
- Toggle the Boolean when keys are pressed or released:
1
2
addEventListener(Event.ENTER_FRAME, update);
3
addEventListener(KeyboardEvent.KEY_DOWN, KeyDownHandler);
4
addEventListener(KeyboardEvent.KEY_UP, KeyUpHandler);
5
}6
7
private function KeyDownHandler(e:KeyboardEvent):void
8
{9
if (e.keyCode == Keyboard.RIGHT) {
10
moveRight = true;
11
}12
if (e.keyCode == Keyboard.LEFT) {
13
moveLeft = true;
14
}15
if (e.keyCode == Keyboard.SPACE) {
16
if (isGravityPushing == true) {
17
isGravityPushing = false;
18
} else {
19
isGravityPushing = true;
20
}21
}22
}23
24
private function KeyUpHandler(e:KeyboardEvent):void
25
{26
if (e.keyCode == Keyboard.RIGHT) {
27
moveRight = false;
28
}29
if (e.keyCode == Keyboard.LEFT) {
30
moveLeft = false;
31
}32
} - Based on these Booleans, actually move the player every frame:
Don't forget to first create a function listen from the enter frame event, "updating" :
1
2
//call this function every frame3
private function update(e:Event):void
4
if (moveRight == true) {
5
player.x += 6;
6
}7
if (moveLeft == true) {
8
player.x -= 6;
9
}Keep the player within the bounds of the screen:
1
2
if (player.x >= 525) {
3
moveRight = false;
4
}5
if (player.x <= 20) {
6
moveLeft = false;
7
}
Here's how all that looks, in place:
1 |
|
2 |
package
|
3 |
{
|
4 |
import flash.display.MovieClip; |
5 |
import flash.events.Event; |
6 |
import flash.events.TimerEvent; |
7 |
import flash.ui.Keyboard; |
8 |
import flash.utils.Timer; |
9 |
import flash.events.KeyboardEvent; |
10 |
|
11 |
public class GameScreen |
12 |
{
|
13 |
public var player:Player; |
14 |
|
15 |
private var energyM:EnergyManager; |
16 |
|
17 |
private var moveRight:Boolean = false; |
18 |
private var moveLeft:Boolean = false; |
19 |
private var isGravityPushing:Boolean = true; |
20 |
|
21 |
private var returnedPower:int = 0; |
22 |
|
23 |
private var scoreText:Text; |
24 |
private var totalScore:int=0; |
25 |
private var score:Text; |
26 |
|
27 |
public function GameScreen() |
28 |
{
|
29 |
scoreText = new Text("Score :"); |
30 |
addChild(scoreText); |
31 |
|
32 |
energyM = new EnergyManager; |
33 |
|
34 |
var spawnTimer:Timer = new Timer(3000, 0); |
35 |
spawnTimer.addEventListener(TimerEvent.TIMER, spawnEnergy); |
36 |
spawnTimer.start(); |
37 |
|
38 |
player = new Player; |
39 |
addChild(player); |
40 |
player.x = 275; |
41 |
player.y = 450; |
42 |
|
43 |
addEventListener(Event.ENTER_FRAME, update); |
44 |
addEventListener(KeyboardEvent.KEY_DOWN, KeyDownHandler); |
45 |
addEventListener(KeyboardEvent.KEY_UP, KeyUpHandler); |
46 |
}
|
47 |
|
48 |
private function KeyDownHandler(e:KeyboardEvent):void |
49 |
{
|
50 |
if (e.keyCode == Keyboard.RIGHT) { |
51 |
moveRight = true; |
52 |
}
|
53 |
if (e.keyCode == Keyboard.LEFT) { |
54 |
moveLeft = true; |
55 |
}
|
56 |
if (e.keyCode == Keyboard.SPACE) { |
57 |
if (isGravityPushing == true) { |
58 |
isGravityPushing = false; |
59 |
}else if (isGravityPushing == false) { |
60 |
isGravityPushing = true; |
61 |
}
|
62 |
}
|
63 |
}
|
64 |
|
65 |
private function KeyUpHandler(e:KeyboardEvent):void |
66 |
{
|
67 |
if (e.keyCode == Keyboard.RIGHT) { |
68 |
moveRight = false; |
69 |
}
|
70 |
if (e.keyCode == Keyboard.LEFT) { |
71 |
moveLeft = false; |
72 |
}
|
73 |
}
|
74 |
|
75 |
private function update(e:Event):void |
76 |
{
|
77 |
if (player.x >= 525) { |
78 |
moveRight = false; |
79 |
}
|
80 |
if (player.x <= 20) { |
81 |
moveLeft = false; |
82 |
}
|
83 |
if (moveRight == true) { |
84 |
player.x += 6; |
85 |
}
|
86 |
if (moveLeft == true) { |
87 |
player.x -= 6; |
88 |
}
|
89 |
}
|
90 |
}
|
91 |
}
|
Step 10: Move the Energy Supplies
At the moment, the energy supplies are spawning but not moving. We'll use the GameScreen.update() function to make them move, since it runs every frame.
Add this code to GameScreen.update():
1 |
|
2 |
energyM.moveAll(); // will make every energy object move |
Now of course we need to make the EnergyManager.moveAll() function, so add this to EnergyManager.as:
1 |
|
2 |
public function moveAll():void |
3 |
{
|
4 |
for (var i:int = 0; i < energyList.length; i++) { |
5 |
var energyS:Energy = energyList[i]; |
6 |
energyS.move(); |
7 |
}
|
8 |
}
|
Step 10: Collision Detection
We will need to check for collisions between each energy object and the player. (If you develop the game further, you'll need to check this for asteroids and energy consumers, but not for stars.)
The best place to handle these checks is inside the EnergyManager, triggered every frame by the GameScreen.
One thing to consider: the collision checks will be between two circles, so hitTestObject() is not ideal. Instead, we'll be using the method explained in this tutorial.
We can write the function as below:
1 |
|
2 |
public function checkCollision(p:Player):int |
3 |
{
|
4 |
// energy transferred due to collision
|
5 |
var energyTransfer:int = 0; |
6 |
|
7 |
for (var i:int = 0; i < energyList.length; i++) { |
8 |
var energyS:Energy = energyList[i]; |
9 |
|
10 |
var newX:Number = p.x - energyS.x; |
11 |
var newY:Number = p.y - energyS.y; |
12 |
|
13 |
var distance:Number = Math.sqrt(newX * newX + newY * newY); |
14 |
|
15 |
if (distance <= 28) { |
16 |
gameScreen.removeEnergyFromScreen(energyS); |
17 |
energyList.splice(i, 1); |
18 |
// for this simple game, we'll always transfer 1 unit
|
19 |
// but you could alter this based on speed of collision
|
20 |
// or any other factor
|
21 |
energyTransfer = 1; |
22 |
}
|
23 |
}
|
24 |
return energyTransfer; |
25 |
}
|
- Line 32: note that we pass in a reference to the player, so that we can access its position.
- Line 38:
EnergySis short for Energy Supply. - Line 40 & 41: finding the difference in x- and y-coordinates between the player and the energy supply we are currently checking.
- Line 43: calculate the distance between the objects via Pythagoras.
- Line 45: check for collision; 28 is the sum of the two objects' radii (player radius is 20, energy radius is 8).
- Line 46 & 47: remove energy supply from screen and from Vector.
- Line 51: add a maximum of one unit of energy per frame.
You could alter Line 51 to energyTransfer += 1, to allow the player to absorb more than one energy object at once. It's up to you - try it out and see how it affects the game.
Step 11: Call Collision Detection Routine
We need to check for collisions every frame, so we should call the function we just wrote from GameScreen.update().
First, we need to create an integer variable to store the energy transfer value from the collision detection function. We'll use this value for increasing the ship's energy and adding to the player's score.
1 |
|
2 |
private var returnedPower:int = 0; |
1 |
|
2 |
returnedPower = energyM.checkCollision(player); |
Step 12: Newton's Law of Gravitation
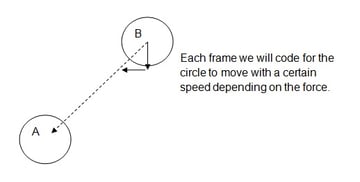
Before we go into creating the game mechanic for the ‘Push’ and ‘Pull’ function of the ship, I would like to introduce the physics concept on which the mechanic is based.
The idea is to attract the object towards the player by means of a force. Newton’s Law of Universal Gravitation gives us a great (and simple) mathematical formula we can use for this, where the force is of course the gravitational force:

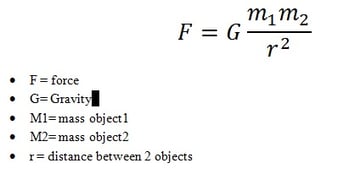
G is just a number, and we can set it to whatever we like. Similarly, we can set the masses of each object in the game to any values that we like. Gravity occurs across infinite distances, but in our game, we'll have a cut-off point (denoted by the white circle in the demo from the start of the tutorial).
The two most important things to note about this formula are:
- The strength of the force depends on the square of the distance between the two objects (so if the objects are twice as far away, the force is one-quarter as strong).
- The direction of the force is along the direct line connecting the two objects through space.
Step 13: Revising Math Concepts
Before we start coding the game mechanics for the 'Push' and 'Pull' function, let's be clear on what we want it to do:
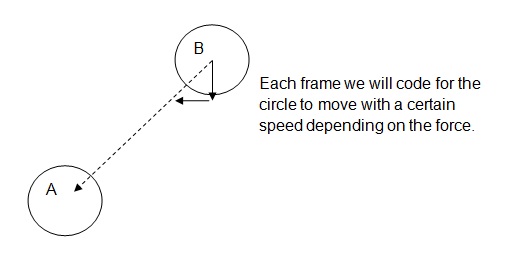
Essentially, we want A (the player) to exert a certain force on B (a crystal), and move B towards A based on that force.
We should revise a few concepts:
- Flash works in radians rather than degrees.
- Flash's coordinate system has its y-axis reversed: going down means an increase in y.
- We can get the angle of the line connecting A to B using
Math.atan2(B.y - A.y, B.x - A.x). - We can use trigonometry to figure out how much we need to move B along each axis, based on this angle and the force:
B.x += (Force*Math.cos(angle));B.y += (Force*Math.sin(angle));
- We can use Pythagoras's theorem to figure out the distance between the two objects:


For more information, see the tutorials Gravity in Action and Trigonometry for Flash Game Developers.
Step 14: Implementing Push and Pull
Based on the previous explanation, we can come up with an outline for our code that attracts each crystal to the ship:
- Find the difference in x and y between the ship and a given crystal.
- Find the angle between them, in radians.
- Find the distance between them, using Pythagoras.
- Check whether object is within the ship's gravitational field.
- If so, calculate the gravitational force, and...
- ...apply the force, changing the x and y values of the crystal.
Sample Code:
1 |
|
2 |
public function gravityPull(p:Player): void |
3 |
{
|
4 |
for (var i:int = 0; i < energyList.length; i++) { |
5 |
var energyS:Energy = energyList[i]; |
6 |
|
7 |
var nX:Number = (p.x - energyS.x); |
8 |
var nY:Number = (p.y - energyS.y); |
9 |
|
10 |
var angle:Number = Math.atan2(nY, nX); |
11 |
|
12 |
var r:Number = Math.sqrt(nX * nX + nY * nY); |
13 |
|
14 |
if (r <= 250) { |
15 |
var f:Number = (4 * 50 * 10) / (r * r); |
16 |
energyS.x += f * Math.cos(angle); |
17 |
energyS.y += f * Math.sin(angle); |
18 |
}
|
19 |
}
|
20 |
}
|
- Line 53: get a reference to the player.
- Line 55: we loop through each energy object.
- Line 61: find the angle between the ship and the energy.
- Line 63: find the distance between them, too.
- Line 65: check whether the energy is within the ship's force field.
- Line 67: use the formula:
- 4 = G, the "gravitational constant" I've chosen.
- 50 = m1, the mass of the ship player.
- 10 = m2, the mass of the energy object.
- Line 69: apply movement.
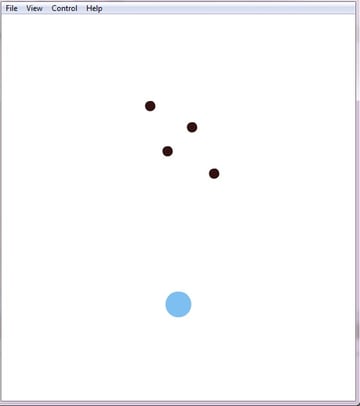
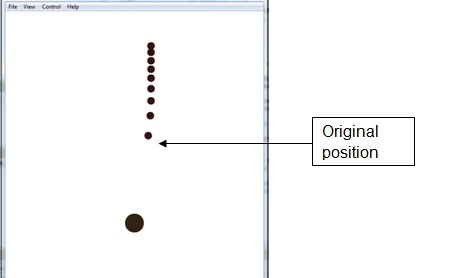
Here's a timelapse showing how this looks:
Note that the energy moves faster the closer it gets to the ship, thanks to the r-squared term.
We can implement the pushing function just by making the force negative:
1 |
|
2 |
public function gravityPull(p:Player): void |
3 |
{
|
4 |
for (var i:int = 0; i < energyList.length; i++) { |
5 |
var energyS:Energy = energyList[i]; |
6 |
|
7 |
var nX:Number = (p.x - energyS.x); |
8 |
var nY:Number = (p.y - energyS.y); |
9 |
|
10 |
var angle:Number = Math.atan2(nY, nX); |
11 |
|
12 |
var r:Number = Math.sqrt(nX * nX + nY * nY); |
13 |
|
14 |
if (r <= 250) { |
15 |
var f:Number = (4 * 50 * 10) / (r * r); |
16 |
energyS.x -= f * Math.cos(angle); |
17 |
energyS.y -= f * Math.sin(angle); |
18 |
}
|
19 |
}
|
20 |
}
|

Here the object moves more slowly as it gets further away from the player, since the force gets weaker.
Step 15: Apply the Mechanic
Of course that you will need this function to be run each frame by GameScreen - but before that, we will need to use a Boolean function to toggle between the two functions:
1 |
|
2 |
private var isGravityPushing:Boolean = true; // hitting space toggles it |
We are going to use true for 'Push' and false for 'Pull'.
Inside KeyDownHandler():
1 |
|
2 |
if (e.keyCode == Keyboard.SPACE) { |
3 |
if (isGravityPushing == true) { |
4 |
isGravityPushing = false; |
5 |
} else if (isGravityPushing == false) { |
6 |
isGravityPushing = true; |
7 |
}
|
8 |
}
|
Afterwards, you will have to check the Boolean each frame. Add this to update():
1 |
|
2 |
if (isGravityPushing == true) { |
3 |
energyM.gravityPull(player); |
4 |
}
|
5 |
if (isGravityPushing == false) { |
6 |
energyM.gravityPush(player); |
7 |
}
|
Step 16: Modification
You might find that the movement doesn't look so nice. This could be because the force is not quite ideal, or because of the r-squared term.
I'd like to alter the formula like so:
1 |
|
2 |
var f:Number = (0.8 * 50 * 10) / r; |
As you can see, I've reduced the value of "G" to 0.8, and changed the force to depend simply on the distance between the objects, rather than the distance squared.
Try it out and see if you enjoy the change. You can always alter it however you like.
Step 17: The Text Class
We will need to show some text on the screen, for showing the score and the ship's remaining power.
For this purpose, we'll build a new class, Text:
1 |
|
2 |
package
|
3 |
{
|
4 |
import flash.display.MovieClip; |
5 |
import flash.text.TextField; |
6 |
import flash.events.Event; |
7 |
import flash.text.TextFormat; |
8 |
|
9 |
import flash.text.TextFormatAlign; |
10 |
|
11 |
public class Text extends MovieClip |
12 |
{
|
13 |
public var _scoreText:TextField= new TextField(); |
14 |
|
15 |
public function Text(string:String) |
16 |
{
|
17 |
var myScoreFormat:TextFormat = new TextFormat(); //Format changeable |
18 |
myScoreFormat.size = 24; |
19 |
|
20 |
myScoreFormat.align = TextFormatAlign.LEFT; |
21 |
myScoreFormat.color = (0x131313); |
22 |
|
23 |
_scoreText.defaultTextFormat = myScoreFormat; |
24 |
|
25 |
_scoreText.text = string; |
26 |
|
27 |
addChild(_scoreText); |
28 |
}
|
29 |
|
30 |
public function updateText(string:String) |
31 |
{
|
32 |
_scoreText.text = string; |
33 |
}
|
34 |
}
|
35 |
}
|
It's very simple; it's basically a MovieClip with a text field inside.
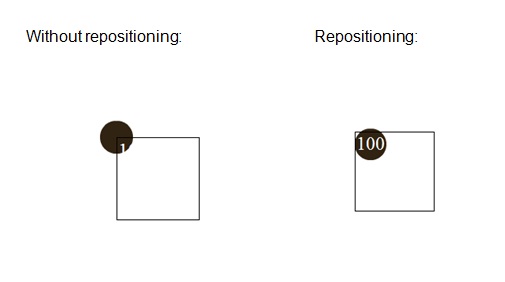
Step 18: Adding Power for Player
To give the game some challenge, we'll make the ship's power get used up slowly, so that the player has to collect energy objects in order to recharge.

To make the ship's power appear on the ship itself, we can simply add an instance of Text to the ship object's display list.
Declare these variables within the Ship class:
1 |
|
2 |
public var totalPower:Number = 100; // ship starts with this much power |
3 |
private var powerText:Text; |
We'll need to keep the amount of power (both stored and displayed) updated every frame, so add this new function to Player:
First, in the constructor:
1 |
|
2 |
// add a new text object if it doesn't already exist
|
3 |
if (!powerText) { |
4 |
powerText = new Text(String(int(totalPower))); |
5 |
addChild(powerText); |
6 |
powerText.x -= 20; //Adjust position |
7 |
powerText.y -= 16; |
8 |
}
|
And then...
1 |
|
2 |
public function updatePower():void |
3 |
{
|
4 |
// fps = 24, so this makes power decrease by 1/sec
|
5 |
totalPower -= 1 / 24; |
6 |
powerText.updateText(String(int(totalPower))); |
7 |
}
|

The power will decrease every frame by 1/24th of a unit, meaning it'll decrease by one full unit every second.
We need to make this run every frame, so add this line to GameScreen.update():
1 |
|
2 |
player.updatePower(); |
Step 19: Make Energy Increase Power
When the ship collides with an energy object, we want it to increase its power.
In GameScreen.update(), add the highlighted line:
1 |
|
2 |
returnedPower = energyM.checkCollision(player); |
3 |
player.totalPower += returnedPower; |
Remember you can alter how much power is returned in the EnergyManager.checkCollision() function.
Step 20: Setting Up the Score
Again, we will need the text class. This time, we'll display “Score” and then the value.
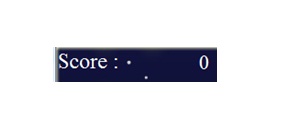
Here, we will need three more variables:
- The "Score" text.
- The score value text.
- A variable to store the actual score.
Declare these in GameScreen class:
1 |
|
2 |
private var scoreText:Text; |
3 |
private var totalScore:int = 0; |
4 |
private var score:Text; |
In the constructor, add this code:
1 |
|
2 |
scoreText = new Text("Score :"); |
3 |
addChild(scoreText); |
4 |
|
5 |
score = new Text(String(totalScore)); |
6 |
addChild(score); |
7 |
score.x = scoreText.x + 100; //Positioning it beside the "Score : " Text. |
8 |
score.y += 2; |
Now, in the update() function, add this:
1 |
|
2 |
score.updateText(String(totalScore)); |
That's it - we've created a basic version of the above game!
Take a look (you may need to reload the page):
Extra Features and Polishing
Space Background
Maybe you would also like a background with an embedded image and stars. Add this to your Main class:
1 |
|
2 |
[Embed(source = "/../lib/SpaceBackground.jpg")] //embed |
3 |
private var backgroundImage:Class; //This line must come immediately after the embed |
4 |
|
5 |
private var bgImage:Bitmap = new backgroundImage(); |
6 |
private var numOfStars:int = 70; |
Now create the Star class:
1 |
|
2 |
package assets |
3 |
{
|
4 |
import flash.display.MovieClip; |
5 |
import flash.events.Event; |
6 |
|
7 |
public class Star extends MovieClip |
8 |
{
|
9 |
private var speed:Number; |
10 |
|
11 |
public function Star(alpha:Number, size:Number, speed1:Number) |
12 |
{
|
13 |
graphics.beginFill(0xCCCCCC); |
14 |
graphics.drawCircle(0, 0, size); |
15 |
|
16 |
speed = speed1; |
17 |
}
|
18 |
|
19 |
// make sure you call this every frame
|
20 |
private function moveDown():void |
21 |
{
|
22 |
this.y += speed; |
23 |
|
24 |
if (this.y >= 600) { |
25 |
this.y = 0; |
26 |
}
|
27 |
}
|
28 |
}
|
29 |
}
|
In the Main() constructor, add this to create the stars:
1 |
|
2 |
|
3 |
for (var i:int = 0; i < numOfStars; i++) { |
4 |
createStars(); |
5 |
}
|
Here's the actual createStars() function:
1 |
|
2 |
|
3 |
private function createStars():void |
4 |
{
|
5 |
var star:Star = new Star( |
6 |
Math.random(), |
7 |
Calculations.getRandomValue(1, 2), |
8 |
Calculations.getRandomValue(2, 5) |
9 |
); //random alpha, size and speed |
10 |
|
11 |
addChild(star); |
12 |
|
13 |
star.x = Calculations.getRandomValue(0, 550); |
14 |
star.y = Calculations.getRandomValue(0, 600); |
15 |
}
|
With random alpha, size, position, and speed, a pseudo-3D background can be generated.
Range indicator
A range indicator circle can be made by simply creating another circle and adding it to the ship's display list, just like how you added the power indicator text. Make sure the circle is centred on the ship, and has a radius equal to the ship's push/pull range.
Add transparancy (alpha value) to the circle with the below code:
1 |
|
2 |
graphics.beginFill(0xCCCCCC, 0.1); |
Try adding extra controls that make the range increase or decrease when the up and down arrow keys are pressed.
Conclusion
I hope you enjoyed this tutorial! Please do leave your comments.
Next: Read this critique for a guide to taking Flux from a simple demo to a full game!
 By
By


