
 Lessons: 11Length: 1 hour
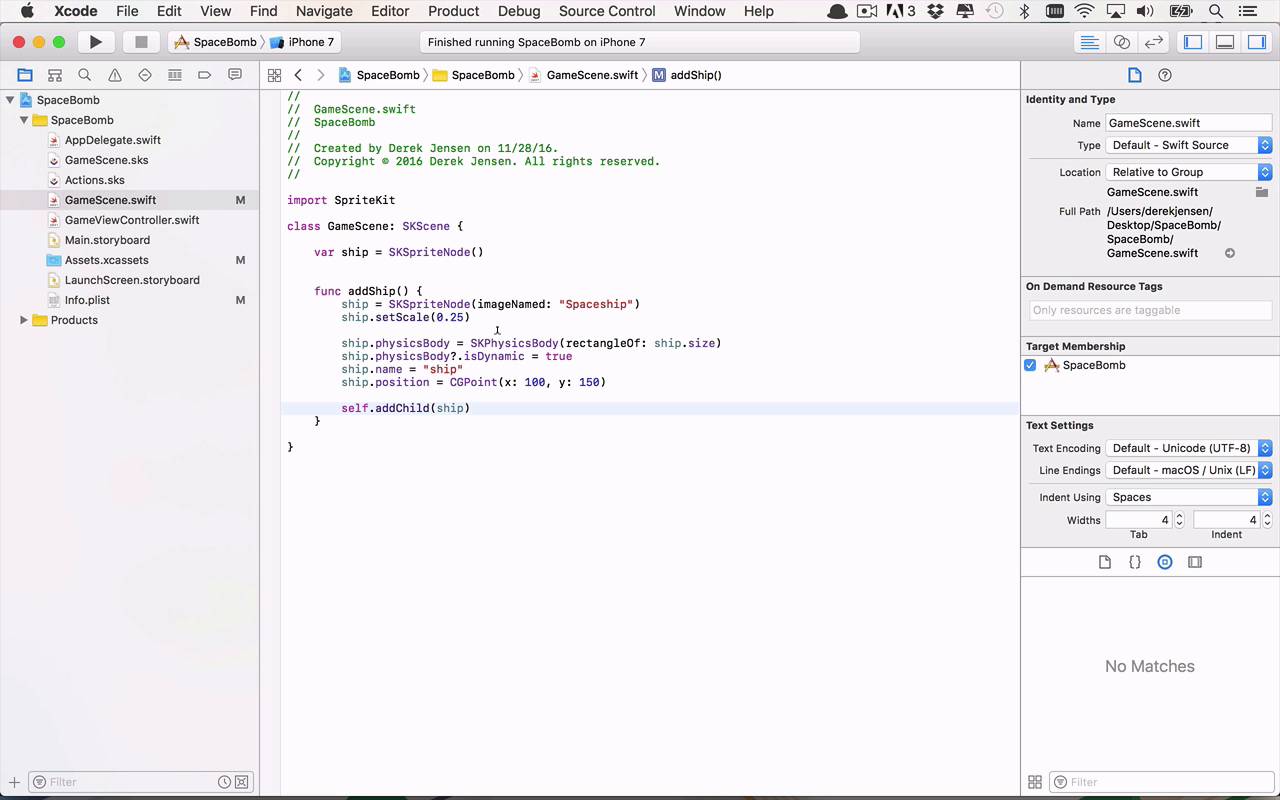
- Overview
- Transcript
2.2 Add the Spaceship to the Scene
The best thing we can do at this point is to put something on the screen. We'll start with the spaceship, as that will be the main focus of our development.
1.Introduction
1.1Introduction00:50
1.2Prerequisites02:33
2.Code the Game
2.1Create the Project04:57
2.2Add the Spaceship to the Scene09:31
2.3Handle Touches05:36
2.4Add the Background05:03
2.5Move the Background07:22
2.6Add Bombs10:10
2.7Detect Collisions08:24
2.8Add a Game Over Scene04:50
3.Conclusion
3.1Goodbye02:04
2.2 Add the Spaceship to the Scene
All right, so let's get started by simply being able to put our spaceship on the screen so that the user can see it. And the way that we're gonna do this is we're going to make some modifications to the gameseen.swift file. And the modifications that we're gonna start with are basically getting rid of everything. So let's highlight everything starting with the private var label and spiny node and let's take it all the way down to the bottom just after this update overridden function here. And that's what we wanna clear all that stuff out. And we don't really need this game play kit either. So all we wanna start with at this point is importing SpriteKit and we wanna have our class GameScene, which is inheriting or is derived from the SKScene which is from SpriteKit as well. So now what we wanna do is we wanna actually get our ship and present it to the end user. So there's a couple things that we need to do in order to do that. So one thing that I wanna do is I wanna create a variable property here that's called ship. And I wanna set that equal to an SKSpriteNode just like that. And then we're going to do some things with it, but we wanna do some things with it within the flow of SpriteKit. And we're gonna see how to do that right now. So what I'm wanna do is I'm gonna create a function here that is going to be called addShip. And really all addShip is going to do is when we call this, it's going to create this new ship. It's going to use the asset of that spaceship that's in our assets here. And it's going to create a new instance of this and it's gonna put it out of the screen. So, what we wanna do here is we want to start to initialize ship. And we wanna set that equal to a new SKSpriteNode. And we want to use a different constructor this time and we wanna use an imageNamed. And that imageNamed is going to be the Spaceship, you're gonna see we're gonna get a little help here cuz it's gonna look our assets and see that we have a space ship image within our assets. So that's the first step. Now I wanna do a little bit with it. Now based on the size of the screen, we're gonna mess around with the scale of this a little bit. So we're going to use setScale and we can use a float to determine this, you could cut it down by half. I find that about 0.25 does pretty good but you can definitely play around with it to make it fit nicely on your screen, that should be fine. Then we need to start to introduce this whole concept of a physics body. And the physics body is going to allow us to put this out on the screen and ultimately allow it to interact with other things on the screen. We'll get to that in an upcoming lesson but this is something that I introduced in a previous course. So like I said, if you're unfamiliar with the physics body and how to use it, then you can refer back to that course or look up the documentation. So we're gonna set this equal to a new SKPhysicsBody. And we are going to set this a couple of different ways. So what you could do here is you can use a rectangleOf, or you could use the circle of radius and that's going to basically create a physics body around your object. To keep things simple, in this case, I'm going to actually use a rectangle. And I'm using a rectangleOf and I wanna use the ship.size. And that's what's going to create this imaginary rectangle around this object that we can use for doing collision detection and stuff like that a little later on. And we want to make sure that the ship is dynamic. So we're going to set the physics body property of isDynamic = true, like that. Then we're going to give the ship a name. This is going to be called ship, and then we're gonna set its initial position, so we're gonna say its position is gonna be equal to CGPoint. And we're going to give it an x and a y. And let's just kind of pick a spot on the screen here, we'll say at x = 100 and we'll say y = 150, something like that. So you can definitely play around with it to give it a first location on the screen. And then we actually wanna add this as a child object to our scene. So to do that we're gonna say self.addChild and we want to add our ship as a child to our scene. So we'll go ahead and save that. Now that's great but we actually have to call this. Now where within the world of a SpriteKit are we able to call this function to be able to actually put our ship on the screen. Well, there is a function that we can override and this function is called didMove. So this is going to basically get called every time our scene is put into view onto the screen and the user can actually see it. So this is where we wanna do things with the screen. So let's do a couple things with it. Let's set the background color to start with here. Just so we can kind of see what's going on here. We're gonna set the background color to white. And then we're going to add our ship just like that. And then finally, there's two little things we wanna do. Now by default, when you're using physics bodies, they're going to be affected by things that we're affected by, like gravity. And in this particular game, we don't want to care about gravity. Gravity is not going to affect this. We want our ship to fly across the screen and we don't want it to go down at a certain rate of gravity. So we want to negate those things. So let's go ahead and set that now. So we're gonna say self.physicsworld because this is the world that's going to govern our game. And we wanna set the gravity property equal to a CGVector and we want to change the direction of gravity to be 0 in the x direction, 0 in the y direction. So there should be 0 gravity. So nothing should actually be affecting our Sprites or our physics bodies that we put on the screen to go either and in the up and down direction, it should stay where it's at. So let's go ahead and save that. So, if all of this works correctly when I run my application and the simulator starts up, we should now see my spaceship on the screen. Now we do see our spaceship on the screen but a couple things are a little bit screwy to start with. Our spaceship is facing up. We don't want that. We want it to facing to the right. We can fix it. We can probably do a better job of placing it initially here. So let's move it a little bit further over to the left here and let's have it facing the proper direction. So the way that we're gonna do that is we're actually going to set the z rotation of our ship in our addShip down here. So we're gonna set the scale and then we're going to actually set the zRotation. And we're gonna set that equal to CGFloat. And we're going to move this in the clockwise direction. So we're going to do -M_Pi. And we're gonna divide that by 2. So this calculation is going to shift it 90 degrees to the right. And then we wanna change the starting coordinates here a little bit. So let's change this to 120 in the x and let's say 160 in the y. So let's go ahead and save that. Let's go ahead and stop and rerun this and see if this makes things look a little bit better. So that's looking a little bit better in that we finally have our ship turned to the right. But we do have to make another adjustment here and that other adjustments going to come in our game view controller in the way that we're actually doing our ViewDidLoad here. So let's go ahead and get rid of the If block here in ViewDidLoad and let's make a little bit of a tweak here. So we're gonna say let our view be equal to our self.view and I want to cast that as an SKView like so. Then I wanna get my scene, so I'm gonna call this myScene is gonna be equal to the GameScene. And the size of that is going to be of SKView or actually view.frame.size. And then once I have that, I can say view.presentScene. And I want to present my scene, so let's go and save that. So there is definitely a little bit of a difference in the way that we were doing the initial setup of the scene through the controller, so let's go ahead and rerun this. We'll fire back up our simulator and there we go. So now we see that we have our ship over to the left here just a little bit and it is pointing in the correct direction. So now we have our first node up on the screen. So now we can start to interact with this a little bit and continue to create our scene.


