- Overview
- Transcript
2.1 Implementing `v-model`
The v-model directive is extremely useful, especially in forms. In this lesson, you'll learn how it works and how to implement it in your own components.
1.Introduction1 lesson, 01:47
1.1Introduction01:47
2.Advanced Basics2 lessons, 23:38
2.1Implementing `v-model`11:05
2.2Vue-ifying JavaScript Code12:33
3.Customizing and Extending Components4 lessons, 34:53
3.1Using Slots to Facilitate Customization07:18
3.2Conditionally Displaying Slots03:28
3.3Extending Components11:47
3.4Improving Decorated Components12:20
4.Just Plain Cool Stuff3 lessons, 29:49
4.1Using Scoped Slots08:56
4.2Using the `render()` Method12:27
4.3Creating a Data Provider Component08:26
5.Conclusion1 lesson, 00:57
5.1Conclusion00:57
2.1 Implementing `v-model`
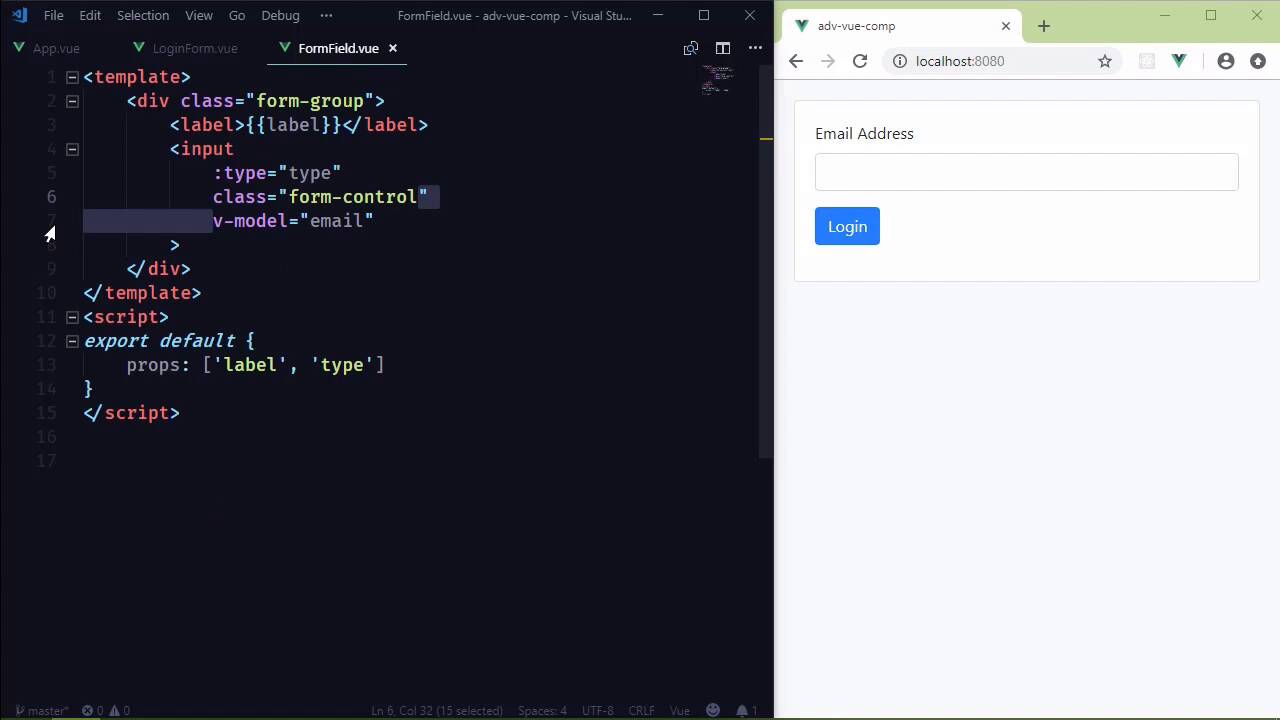
In this session, we're going to look at how v-model works and how we can use it in our own custom components. And it's really quite simple. In fact, we're going to spend much more time setting up the whole thing than actually implementing v-model. But the exercise is good for us, so that's what we're going to do. And we're going to do this within the context of a form because that's arguably the most useful place that we can use v-model. And so we're going to have a login form. Now one thing I like to do is write the code that I want to write, and then I implement it. And that might seem backwards, but I find that I end up with cleaner code and cleaner components in that way. So we are going to see some errors on the right-hand side of the screen, but that's okay. We will eventually make it work. So I'm going to go ahead and just set up the code for our app component, so that we can use this LoginForm component. So we, of course, want to pull that in from an external file. And lets add that to our components as well, and then we will create that file. So as far as the template is concerned, the root element is going to be form. It just makes sense to me. We don't need an action because this is going to be submitted through JavaScript. So we do need to listen for the submit event, but, of course, we want to prevent the default action from occurring. And we will execute a method called submit. So let's go ahead and let's add that method, because I would forget to do that later. So we have our submit method. And then our form fields, let's put them inside of a card. So we have a card, then we have a card-body. And then, finally, we have our fields. And we're going to wrap our fields with the form-group. So there's nothing out of the ordinary as far as our form is concerned. If you use Bootstrap, then this is going to look very familiar to you. So we have our label, Email Address. We have our input elements. And as far the type, let's use the email type because that give us a lot more functionality for working with email addresses. There was a time that we couldn't use that, but that's passed. We can use it now. And this is a form field that we would want to bind to our LoginForm component. So we will say v-model, and we will have a data property called email. It just makes sense. So let's go ahead and do that. And we will initialize email as an empty string. Later on, we will put in an actual value, so that we can do some testing, but an empty string is what we want to start with. And as far as our submits, let's do this. Let's write a message to the console that includes the value from our email field. And that should be fine, but of course, we do need a button to execute the submit. So let's go ahead and let's add that in. There's nothing special about the button. It's just a normal button. Let's make it primary, and we will have the text of Login. So hopefully on the right-hand side, we're not seeing anything. Let's refresh, we have our form field. Let's look at the Console, and let's make sure that it's working. So we will submit voila, we have our message. So what I want to do then is take our form field and make a custom component with this because that's a lot of typing. We have to create the div element, the label, and then the input element. Instead, what I want to do is this. form-field and then we would have a label prop that we have the text for the label, then we would have the type of field that we wanted. In this case it’s email, but if it was a password, we could say password as well. But then we also want to bind this to our email data prompt, so let's go ahead and do that. And of course, that's not going to work, but we will make it work. So that we can get rid of this plain-Jane normal HTML, and we have something that's a lot easier to type. So let's go ahead and write the code that is going to import this, and we will call that FormField and and the file name will be FormField.vue. And of course, we want to specify that in our components. And then we will create that file, FormField.vue. The template is going to use the HTML that we just cut out. Of course, there are going to be some changes, because we have some props that we need to use, like label. And then the type needs to be set as well, so we will just do that. Now we do need to specify those props, so let's go ahead and add our script and props. We have label and type. Okay, so of course, this isn't going to work. We have said v-model here, we've said v-model here, but really that means nothing. If we wanted to see if that works, it won't. Just believe me, it won't. So let's go ahead and delete v-model from our form-field component because we don't need that. And instead, let's think of this in two ways. Let's think of what v-model does from the parent component and what it does from the child component. So from the parent component's perspective, what we're really saying is that okay, form-field component, here is the value that I want you to have. And so in a lot of ways that's just like saying that here is a value prop and here's the value for that prop. And in actuality that is exactly what happens. Now we don't specify that here from the parent component. Instead, what we do is we just simply say that, hey, there is a value prop. We don't have to specify that anywhere else. Well, actually, we do, and we will see that here in a few moments. But that's really all that we have to do, at least as far as setting a value is concerned. So now let's look at it from the child component's perspective. Well, the child says, okay, I've got your value, but I need to update you whenever that value updates. And the way that we do that is with an event. So as far as an input element is concerned, and I'm just talking about the HTML input element, we have several events that we could listen for. We can listen for the focus, the blur, things like that. But really, when we type something into the text box, that input event is firing for every keystroke or every time it changes. So let's start with that, because that is when the value is going to change, when the input event on our HTML input element fires. But now we need to think of this from a Vue component perspective. What is the event that the parent component is listening for? Well, we, of course, need to emit that. And the event name is rather simple, it's input. Now this is a Vue thing. It's not that this is input because we are listening for the input event. No, it is called input, and then we simply pass in the data that has been updated. So in this case, we're going to take the target of the event, which in this case is this input element, and we're going to take its value. And that's basically it. So let's look at our dev tools. Let's do refresh. And let's go down to the LoginForm, okay? So we have our email data. And as we start typing in here, we see that the data is being updated. That's great, that's what we would expect to see. Now if we look at the FormField, we don't have really any state. We do have the props, and I guess we could say props or state. It's a mutable state, but we do see that the value is the same thing that we typed into the field. But notice that as we update it, the value changes, as well as the email field on the LoginForm. So if we click on the Login button, well, the browser is going to say that this isn't valid. But if we put in a valid email address and then we submit, we see the values that we would expect. So no matter what we type in here, as long as it is a valid email address, we are going to see that. So we have successfully implemented v-model for a custom component, except for one thing. Let's go back to our LoginForm. And for the email data property, let's give it a default value. Let's say foo@foo.com. Now whenever we view this in the Vue dev tools, if we look at LoginForm, we see that the data is what we would expect to see, foo@foo.com. If we look at the FormField, we can see that the value is foo@foo.com. But notice that we don't actually see that value here in the browser. But we have to do then is inside of our component, simply bind the value. So that's now whatever value is passed is going to be displayed. Once again, if we look at the LoginForm component, the email data prompt is what we hard-coded it to be. If we look at the FormField, the value is that same value. And if we change this, we can see that the value updates for both the FormField and for the email data field as well. So once again, if we attempt to submit this, we see our message in the console. So when it comes to implementing v-model, the child component really does all of the work. We specify the value prop. We emit the input event, and we pass the updated value with that event. It's really nothing more complicated than that.


