
This two-part tutorial will cover creating a multi-state car using a finite state machine. We will start with Procedural FSM and progress into the State Pattern design pattern. Concept and creation will be our main focus during this first part; we will then proceed into application and extension during the second part.
Final Result Preview
Let's take a look at the final result we will be working towards:
What Is a Finite State Machine?
Wikipedia defines an FSM (Finite State Machine) as a mathematical abstraction sometimes used to design digital logic or computer programs. It is a behavior model composed of a finite number of states, transitions between those states, and actions, similar to a flow graph in which one can inspect the way logic runs when certain conditions are met.
It has finite internal memory; an input feature that reads symbols in a sequence, one at a time, without going backward; and an output feature, which may be in the form of a user interface, once the model is implemented. The operation of an FSM begins from one of the states (called a start state), goes through transitions (depending on the inputs) to different states, and can end in any of those available - however, only a certain set of states mark a successful flow of operation.
In my own words, an FSM is a device used by developers to create objects that have different behaviors determined by the current state they are in. Depending on the input, the object can react and/or transition to a different state.
One good example would be a 1970 HK VP70Z machine pistol, which has three firing modes: safety, single shot, and semi-automatic three-round burst. Depending on the current mode you have it set to (state), the result (output) is different when you pull the trigger (input).
Tools: When conceptualizing an idea (the multi-state object you're trying to create), it's best to use a State Transition Table to know what states and actions for those states you will need to add.
Step 1: Setup
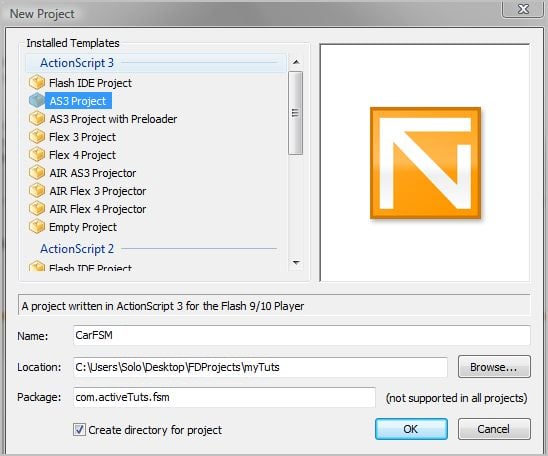
It's time to start a new project. With FlashDevelop, create a new AS3 project. For the name, put CarFSM. Click "Browse..." and save it to your desired location. Go into the Package slot and enter "com.activeTuts.fsm". Make sure the "Create directory for project" checkbox is selected then click "OK" to finish.
Once the project is loaded in FlashDevelop, click "View" and select "Project Manager". See the "src" folder? Right-click that and choose "Explore".


When you have that folder open, you should see the "com" folder you created earlier. Open the sourcecode I've included with this tutorial and drag the "assets" folder into "src"; make sure you don't drop it into the "com" folder.
Next, go inside the sourcecode "com" folder and drag the "bit101" folder into the "com" folder inside "src". You can also download minimalComps here if you prefer getting it straight from the source.
Finally, drill down inside the "com" folder (within "src") all the way into "fsm" and double-click Main.as. This should now be open inside FlashDevelop (assuming you have FD as your default .as extension application).
Step 2: Warm Up
We'll start by considering the two states of an even more simple example: MinimalComps's Checkbox.
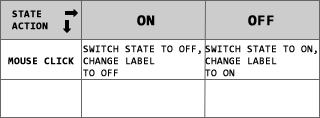
Let's say we want a Checkbox that will reflect its current state by changing its label. Below is the Transition Table for the Checkbox.
Now for the code. Inside Main.as, one line below the class imports, add the metadata shown below.
1 |
|
2 |
[SWF (width = 500, height = 350, frameRate = 60, backgroundColor = 0xFFFFFF)] |
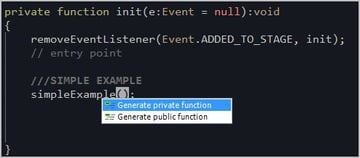
Next, go inside the init() method and set your cursor below where it says "entry point". Then add a method call simpleExample(). Next, make sure you have the cursor active somewhere inside the method call, and press the "CTRL + SHIFT + 1" keys. A prompt will show; pick "Generate private function" and hit the "Enter" key.

Now just copy and paste the code below inside the newly created method. Next, put your cursor inside the word "CheckBox" and press "CTRL + SHIFT + 1" to automatically import the required class. Once done, hit "CTRL + ENTER" to run the application.
From here on, if you run into any errors, please compare your classes with the ones I've included with the source download.
1 |
|
2 |
var checkBox:CheckBox = new CheckBox (this, 240, 160, 'false', showValue); |
3 |
checkBox.scaleX = checkBox.scaleY = 2; |
4 |
|
5 |
function showValue (e:Event):void |
6 |
{
|
7 |
CheckBox (e.target).label = Boolean (e.target.selected).toString (); |
8 |
}
|
You should have something similar to what you see above this line. There are your two states, ON and OFF. Every time you click , the checkbox toggles states and also changes its label as a form of output.
On to the real "Car" FSM project. Make sure you have the project set to run in "debug" mode to enable trace() statements.
Step 3: The Procedural Car FSM
Okay, let's forget the preview at the top of the page and start the Car FSM from scratch. In Main.as, highlight the init() method along with the simpleExample() method and hit the "BACK" key to remove them.
Go one line above the constructor and add the variables below.
1 |
|
2 |
private var _past:Number; |
3 |
private var _present:Number; |
4 |
|
5 |
private var _tick:Number; |
6 |
|
7 |
private var _car:Car; |
8 |
|
9 |
private var _initiatedTest1:Boolean; |
10 |
private var _initiatedTest2:Boolean; |
11 |
private var _initiatedTest3:Boolean; |
12 |
private var _initiatedTest4:Boolean; |
13 |
private var _initiatedTest5:Boolean; |
14 |
private var _initiatedTest6:Boolean; |
15 |
|
16 |
private var _finalActions:Boolean; |
17 |
|
18 |
private var _counter:Number = 0; |
The variables _past, _present, _tick, and _counter will all be used for timed execution. I'll explain more about that soon. The _car variable will hold reference for the Car class that will encapsulate the procedural Car FSM actions. The rest are Boolean properties used for triggering timed actions.
Let's work on the timed execution. Add the code below inside the constructor.
1 |
|
2 |
_present = getTimer (); |
3 |
|
4 |
trace ('Start of constructor = ' + _present * 0.001 + ' seconds\n'); |
5 |
|
6 |
_past = _present; |
7 |
|
8 |
addEventListener (Event.ENTER_FRAME, update); |
Get your cursor inside the word "update" and press "CTRL + SHIFT + 1" and choose "Generate Event handler". When you test the application, you'll see a print out similar to "Start of constructor = 2.119 seconds" (it could be less if you have a faster PC). It's the same as dividing the value of getTimer() with 1000 but they say multiplication is faster.
Let's proceed to the update() method. Add the code below into it.
1 |
|
2 |
_present = getTimer (); |
3 |
_tick = (_present - _past) * .001; ///converted to 1/1000 milliseconds |
4 |
_past = _present; |
5 |
|
6 |
_counter += _tick; ///used for tests with timed execution. |
7 |
|
8 |
if (_counter >= 2)//2 seconds |
9 |
{
|
10 |
_counter -= 2; |
11 |
trace (_counter + ' 2 seconds'); |
12 |
}
|
Now, when you test it again, you'll notice a trace() statement pop-out every two seconds. The _counter is then reset to whatever overlap it had to maintain timing accuracy.
Try using a different value other than two seconds and run it a couple more times.
On to the Car class. Before proceeding, go ahead and remove that if() statement inside the update() method.
Step 4: The Car Class
As I mentioned earlier, we're starting with a fresh idea of creating a multi-state car. Let's say we decided to have a car that can be turned on and off, also driven forward and can run out of gas. That would give us four different states - ON, OFF, DRIVE_FORWARD, and OUT_OF_FUEL.
The very first thing to do is work out the different states and actions for those states in a State Transition Table. You can use a pencil and a blank piece of paper to quickly jot down all the states and actions the Car object would need. See the image below.

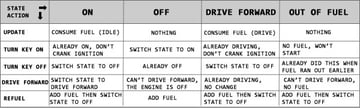
Always have an " update()" method to have real time control over your states. Like consume a higher amount of fuel when driving than when the engine's idling at park.
It's easy to tell how each state should respond for each of the actions. It seems simple because we (being human) all think of objects to be in one state or another.
Now we're ready to code the class.
Inside the constructor method in Main.as, go one line before the ENTER_FRAME event listener and add the code below.
1 |
|
2 |
_car = new Car; |
3 |
addChild (_car); |
Now since there is no Car class, get your cursor inside the "Car" word and press "CTRL + SHIFT + 1", select "Create new class" and hit the "ENTER" key.
Use the same information as shown below. Click "OK" to finish.
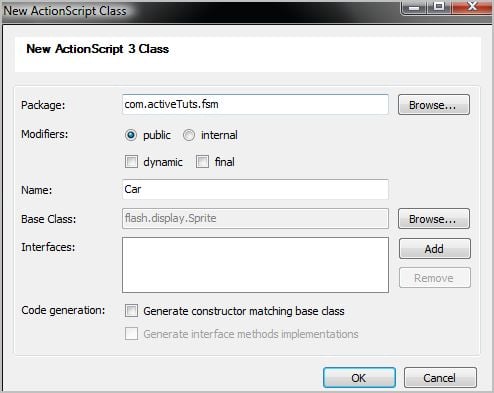

You should now have the Car class open in FlashDevelop.
Step 5: Car Variables
Add the code below one line above the class constructor.
1 |
|
2 |
public static const ONE_SIXTH_SECONDS:Number = 1 / 6; //6 times per second |
3 |
|
4 |
private const IDLE_FUEL_CONSUMPTION:Number = .0055; |
5 |
private const DRIVE_FUEL_CONSUMPTION:Number = .011; |
6 |
|
7 |
///CAR STATES
|
8 |
private static const ENGINE_OFF:String = 'off'; |
9 |
private static const ENGINE_ON:String = 'on'; |
10 |
private static const ENGINE_DRIVE_FORWARD:String = 'driving forward'; |
11 |
private static const ENGINE_OUT_OF_FUEL:String = 'out of fuel'; |
12 |
|
13 |
private var _currentState:String = ENGINE_OFF; |
14 |
|
15 |
private var _engineTimer:Number = 0; |
16 |
private var _fullCapacity:Number = 1; |
17 |
private var _fuelSupply:Number = _fullCapacity; //in gallons |
The Car is setup to only consume fuel 6 times per second. This is represented by the class constant ONE_SIXTH_SECONDS. In addition, the consumption amount depends if the car is on idle or driving forward. We'll use IDLE_FUEL_CONSUMPTION and DRIVE_FUEL_CONSUMPTION for those purposes.
The four states are represented by String constants with ENGINE_OFF set as default.
The _engineTimer property will be used to trigger consumeFuel() every 1/6 seconds but only if the state is either ENGINE_ON or ENGINE_DRIVE_FORWARD.
Finally, _fuelSupply (which is what consumeFuel() will slowly take away) takes in the value of _fuelCapacity for a full tank.
Step 6: Methods From the State Transition Table
Leave the Car constructor empty for now. Go below it and add the update() method shown below.
1 |
|
2 |
public function update ($tick:Number):void |
3 |
{
|
4 |
|
5 |
switch (_currentState) |
6 |
{
|
7 |
case ENGINE_OFF: |
8 |
//nothing
|
9 |
break; |
10 |
|
11 |
case ENGINE_ON: |
12 |
_engineTimer += $tick; |
13 |
|
14 |
//gas consumption and trace statement
|
15 |
if (_engineTimer >= ONE_SIXTH_SECONDS) //6 times per second interval |
16 |
{
|
17 |
trace ('vm');//you may comment this out if you like |
18 |
_engineTimer -= ONE_SIXTH_SECONDS; // 0 + overlap |
19 |
|
20 |
consumeFuel (IDLE_FUEL_CONSUMPTION);///30 seconds gas supply |
21 |
}
|
22 |
break; |
23 |
|
24 |
case ENGINE_DRIVE_FORWARD: |
25 |
_engineTimer += $tick; |
26 |
|
27 |
if (_engineTimer >= ONE_SIXTH_SECONDS) |
28 |
{
|
29 |
trace ('vroomm');//you may comment this out if you like |
30 |
_engineTimer -= ONE_SIXTH_SECONDS; |
31 |
|
32 |
consumeFuel (DRIVE_FUEL_CONSUMPTION);///15 seconds gas supply |
33 |
}
|
34 |
break; |
35 |
|
36 |
case ENGINE_OUT_OF_FUEL: |
37 |
//nothing
|
38 |
break; |
39 |
}
|
40 |
}
|
We'll have Main.as call this method at every ENTER_FRAME event passing in the elapsed time between frames. Once called, it checks the Car's current state and runs the appropriate action.
If left alone, state transition can only occur through consumeFuel() which sets it to OUT_OF_FUEL when _fuelSupply runs out.
Note: Actions that are on your State Transition Table will always be public access used as input controls. This holds true whether you're using Procedural FSM or the State Pattern.
Step 7: Turning the Car On
Add the code below after the update() method.
1 |
|
2 |
public function turnKeyOn ():void |
3 |
{
|
4 |
trace ("attempting to turn the car on..."); |
5 |
|
6 |
switch (_currentState) |
7 |
{
|
8 |
case ENGINE_OFF: |
9 |
trace ("Turning the car on...the engine is now running!"); |
10 |
_currentState = ENGINE_ON; |
11 |
break; |
12 |
|
13 |
case ENGINE_ON: |
14 |
trace ("the engine's already running you didn't have to crank the ignition!"); |
15 |
break; |
16 |
|
17 |
case ENGINE_DRIVE_FORWARD: |
18 |
trace ("you're driving so don't crank the ignition!"); |
19 |
break; |
20 |
|
21 |
case ENGINE_OUT_OF_FUEL: |
22 |
trace ("no fuel - the car will not start, get some fuel before anything. Returning the key to the off position."); |
23 |
break; |
24 |
}
|
25 |
}
|
Just like the update() method, _currentState is checked and the appropriate action is run. It pretty much explains itself.
Step 8: Turning the Car Off.
The same goes for turning the Car off. Add it next.
1 |
|
2 |
public function turnKeyOff ():void |
3 |
{
|
4 |
trace ("attempting to turn the car off..."); |
5 |
|
6 |
switch (_currentState) |
7 |
{
|
8 |
case ENGINE_OFF: |
9 |
trace ("The car's already off, you can't turn the key counter-clockwise any further..."); |
10 |
break; |
11 |
|
12 |
case ENGINE_ON: |
13 |
trace ("click... the engine has been turned off from park."); |
14 |
_currentState = ENGINE_OFF; |
15 |
break; |
16 |
|
17 |
case ENGINE_DRIVE_FORWARD: |
18 |
trace ("nvrm...click... rolling to a stop...the engine has been turned off."); |
19 |
|
20 |
_currentState = ENGINE_OFF; |
21 |
break; |
22 |
|
23 |
case ENGINE_OUT_OF_FUEL: |
24 |
trace ("you already did this when the fuel ran out earlier..."); |
25 |
break; |
26 |
}
|
27 |
}
|
It becomes very easy to create the methods. Just copy and paste the previous one, then make a few changes here and there.
Step 9: Driving Forward
Always go back to your State Transition Table to see what needs to happen for each state when you call the input method you're currently working on.
Add the code below the turnKeyOff() method.
1 |
|
2 |
public function driveForward ():void |
3 |
{
|
4 |
trace ("attempting to drive forward..."); |
5 |
switch (_currentState) |
6 |
{
|
7 |
case ENGINE_OFF: |
8 |
trace ("click, changing the gear to drive doesn't do anything...the car is not running, returning the gear to park..."); |
9 |
break; |
10 |
|
11 |
case ENGINE_ON: |
12 |
trace ("click, changing gears to drive ...now were going somewhere..."); |
13 |
_currentState = ENGINE_DRIVE_FORWARD; |
14 |
break; |
15 |
|
16 |
case ENGINE_DRIVE_FORWARD: |
17 |
trace ("already driving - no need to change anything..."); |
18 |
break; |
19 |
|
20 |
case ENGINE_OUT_OF_FUEL: |
21 |
trace ("click, changing the gear to drive won't do anything...the car has no fuel, returning the gear to park..."); |
22 |
break; |
23 |
}
|
24 |
}
|
Step 10: Consuming Fuel
This method is private since only the Car needs access to it. It's called six times per second from update().
Put the code next after the driveForward() method.
1 |
|
2 |
private function consumeFuel ($consumption:Number):void |
3 |
{
|
4 |
|
5 |
if ((_fuelSupply -= $consumption) <= 0) |
6 |
{
|
7 |
_fuelSupply = 0; |
8 |
trace ("phit...phit - the engine has stopped, no more fuel to run, returning the gear to park..."); |
9 |
_currentState = ENGINE_OUT_OF_FUEL; |
10 |
}
|
11 |
}
|
Now you see how the code goes as explained earlier at the Class variables section.
Step 11: Refueling the Car
This method is private since only the Car needs access to it.
Put the code next.
1 |
|
2 |
public function reFuel ():void |
3 |
{
|
4 |
trace ("attempting to refuel..."); |
5 |
|
6 |
if (_fuelSupply == 1) |
7 |
{
|
8 |
trace ("no need to refuel right now, the tank is full."); |
9 |
return; |
10 |
}
|
11 |
|
12 |
switch (_currentState) |
13 |
{
|
14 |
case ENGINE_OFF: |
15 |
trace ("getting out of the car and..."); |
16 |
break; |
17 |
|
18 |
case ENGINE_ON: |
19 |
trace ("turning the key to off position, getting out of the car and..."); |
20 |
_currentState = ENGINE_OFF; |
21 |
break; |
22 |
|
23 |
case ENGINE_DRIVE_FORWARD: |
24 |
trace ("changing gear from drive to park and turning the key to off position, getting out of the car and..."); |
25 |
_currentState = ENGINE_OFF; |
26 |
break; |
27 |
|
28 |
case ENGINE_OUT_OF_FUEL: |
29 |
trace ("turning the key to the off position, getting out of the car and..."); |
30 |
_currentState = ENGINE_OFF; |
31 |
break; |
32 |
}
|
33 |
|
34 |
var neededSupply:Number = _fullCapacity - _fuelSupply; |
35 |
|
36 |
_fuelSupply += neededSupply; |
37 |
trace ("filling up to " + _fuelSupply + " gallon(s) of fuel."); |
38 |
}
|
The method first checks to see if the Car has a full tank. If so, it tells you it has a full tank and exits the method.
If the Car doesn't have a full tank on the other hand, it goes through the familiar case/switch statement and runs the proper trace() statement.
The last bit of code calculates the amount of consumed fuel and replenishes only that to keep a full tank. It then prints the value of a full tank.
Step 12: Using toString() to Help trace() Statements
This method had to be overridden since the Car inherits from Sprite which in turn inherits from EventDispatcher.
All it does is return a String statement shown below. Add it as the last method for the Car class.
1 |
|
2 |
override public function toString ():String |
3 |
{
|
4 |
return "The car is currently " + _currentState + " with a fuel amount of " + _fuelSupply.toFixed (2) + " gallon(s)."; |
5 |
}
|
So now, whenever you call trace(_car) from Main.as, instead of getting "[object Car]", you get a statement like "The car is currently off with a fuel amount of 1.00 gallon(s)."
Let's go back to Main.as for testing. Be sure to save your work before moving forward.
Step 13: Stress Testing
Inside Main's constructor, right after where you added the ENTER_FRAME event listener. Enter the code below.
1 |
|
2 |
///test 0
|
3 |
_car.turnKeyOff (); |
4 |
trace (_car); |
5 |
_car.driveForward (); |
6 |
trace (_car); |
7 |
_car.turnKeyOn (); |
8 |
trace (_car); |
At this point the Car will perform all six actions without any time lapse. The ENTER_FRAME event has not started yet.
Next, get inside the update() method just below where _tick is added to _counter and paste the code shown next.
1 |
|
2 |
_car.update (_tick); |
3 |
|
4 |
//test 1 after 5 seconds of running the car and
|
5 |
//only if _initiatedTest1 has a value of false.
|
6 |
if (_counter >= 5 && ! _initiatedTest1) |
7 |
{
|
8 |
_initiatedTest1 = true; |
9 |
|
10 |
_car.reFuel (); |
11 |
_car.reFuel (); |
12 |
_car.driveForward (); |
13 |
_car.turnKeyOff (); |
14 |
_car.turnKeyOff (); |
15 |
_car.driveForward (); |
16 |
_car.turnKeyOn (); |
17 |
_car.driveForward (); |
18 |
trace (_car); |
19 |
}
|
20 |
|
21 |
//test 2 after 11 seconds
|
22 |
if (_counter >= 11 && ! _initiatedTest2) |
23 |
{
|
24 |
_initiatedTest2 = true; |
25 |
|
26 |
_car.turnKeyOff (); |
27 |
_car.turnKeyOn (); |
28 |
_car.driveForward (); |
29 |
trace (_car); |
30 |
}
|
31 |
|
32 |
//test 3 after 30 seconds
|
33 |
if (_counter >= 30 && ! _initiatedTest3) |
34 |
{
|
35 |
_initiatedTest3 = true; |
36 |
|
37 |
_car.turnKeyOn (); |
38 |
_car.turnKeyOff (); |
39 |
_car.turnKeyOn (); |
40 |
_car.driveForward (); |
41 |
_car.turnKeyOn (); |
42 |
_car.turnKeyOff (); |
43 |
_car.turnKeyOn (); |
44 |
trace (_car); |
45 |
}
|
46 |
|
47 |
//test 4 after 35 seconds
|
48 |
if (_counter >= 35 && ! _initiatedTest4) |
49 |
{
|
50 |
_initiatedTest4 = true; |
51 |
|
52 |
_car.reFuel (); |
53 |
_car.reFuel (); |
54 |
trace (_car); |
55 |
|
56 |
_car.turnKeyOff (); |
57 |
_car.driveForward (); |
58 |
_car.turnKeyOff (); |
59 |
_car.turnKeyOff (); |
60 |
_car.turnKeyOn (); |
61 |
trace (_car); |
62 |
}
|
63 |
|
64 |
//test 5 after 42 seconds
|
65 |
if (_counter >= 42 && ! _initiatedTest5) |
66 |
{
|
67 |
_initiatedTest5 = true; |
68 |
|
69 |
_car.driveForward (); |
70 |
trace (_car); |
71 |
}
|
72 |
|
73 |
//test 6 after 45 seconds
|
74 |
if (_counter >= 45 && ! _initiatedTest6) |
75 |
{
|
76 |
_initiatedTest6 = true; |
77 |
|
78 |
_car.turnKeyOn (); |
79 |
_car.turnKeyOn (); |
80 |
_car.driveForward (); |
81 |
trace (_car); |
82 |
}
|
83 |
|
84 |
///stop the car after 60 seconds
|
85 |
if (_counter >= 60 && ! _finalActions) |
86 |
{
|
87 |
_finalActions = true; |
88 |
|
89 |
trace ('elapsed ' + getTimer () / 1000); |
90 |
|
91 |
_car.turnKeyOff (); |
92 |
trace (_car); |
93 |
}
|
I know it's a lot of code but again, it's self-explanatory. Run the application and check your output.
If you get errors, make sure to compare your code with the classes I've included with this tutorial.
Try changing _fuelCapacity in Car and mix-up the methods on some or all of the test sections and run it again. You'll see that the code is solid and this Procedural FSM is effective. And That's it! We're done.
Wait a minute. Since all is well, why don't we add the ability to drive backward and turbo? While at it, we might as well add animation and sound. Now, imagine just how bloated the Car class would get if you make it do all the things the car does at the top of page. We're looking at maybe 2000 lines of code - at least. LOL! I'd probably say, Ya, sure, I can hack that. But the code becomes very fragile and easy to break. So it might be a good idea to use a different technique.
If the FSM object has simple behavior, by all means, use this technique. But if you have a complex object that might need to add new features in the future. Maybe even add a few more states - well, that's where the State Pattern comes in.
Step 14: Introducing the State Pattern
Say hello to the "big brother" of Procedural FSM. Using this Design Pattern will make your states easy to maintain and make changes to, but the best part - other states can now be added without the risk of ruining the code.
To apply this pattern, we will again refer to our trusted State Transition Table. See Step 4. The State Pattern consists of three parts. First is the State Interface, this will contain all the actions you see in the State Transition Table. In addition, this State Interface may also contain methods that are shared by all State classes. Second, the State classes that correspond for each state shown in your State Transition Table. And third, the State Machine - which is normally your converted Procedural FSM object (the Car class). When converted, the Car will provide public accessors and modifiers to allow external control from all State classes. The Car will delegate actions to the currently active State.
Step 15: Beginning the Conversion
Click "View" and select "Project Manager". Within "src", drill down until you see the "fsm" folder. Right-click that and choose "Add > New Interface..." then hit "ENTER".
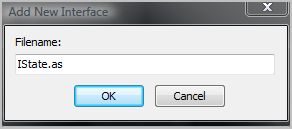
Name it "IState". Interfaces start with "I" for naming convention.
Once FlashDevelop opens the class, add the code below in it.
1 |
|
2 |
function turnKeyOff ():void; |
3 |
function turnKeyOn ():void; |
4 |
function driveForward ():void; |
5 |
function reFuel ():void; |
6 |
function update ($tick:Number):void; |
7 |
function toString ():String; |
This IState interface will be implemented by all the State classes. The last function toString() has nothing to do with controlling the Car but all the State classes use it.
For more info about Interfaces, see AS3 101: Introduction to Interfaces. Let's start adding the state classes.
Step 16: The EngineOff Class
Follow the same procedure when you created the IState Interface but instead, choose "Add new class".
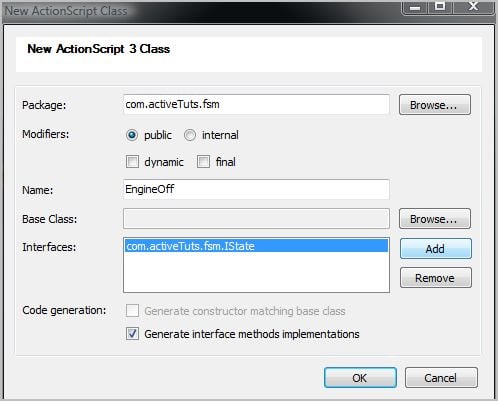

Name it "EngineOff". For the interface slot, click add and type "IState", this should find the IState class from within the same folder. Also, the checkbox for "Generate interface methods implementations" should be selected. Click "OK" to complete.
The new class comes out half-way finished. It should look very similar to what shows below.
1 |
|
2 |
package com.activeTuts.fsm |
3 |
{
|
4 |
public class EngineOff implements IState |
5 |
{
|
6 |
|
7 |
public function EngineOff() |
8 |
{
|
9 |
|
10 |
}
|
11 |
|
12 |
/* INTERFACE com.activeTuts.fsm.IState */
|
13 |
|
14 |
public function turnKeyOff():void |
15 |
{
|
16 |
|
17 |
}
|
18 |
|
19 |
public function turnKeyOn():void |
20 |
{
|
21 |
|
22 |
}
|
23 |
|
24 |
public function driveForward():void |
25 |
{
|
26 |
|
27 |
}
|
28 |
|
29 |
public function reFuel():void |
30 |
{
|
31 |
|
32 |
}
|
33 |
|
34 |
public function update($tick:Number):void |
35 |
{
|
36 |
|
37 |
}
|
38 |
|
39 |
public function toString():String |
40 |
{
|
41 |
|
42 |
}
|
43 |
|
44 |
}
|
45 |
|
46 |
}
|
These state classes won't need to extend Sprite since all Media assets (second part) will be added and controlled via the car. The states will be instantiated through the Car class passing itself as reference. A two-way composition structure will be used to allow communication between the Car and the state classes.
Step 17: Finishing Our EngineOff Class
Change the constructor method to match the code below.
1 |
|
2 |
private var _car:Car; |
3 |
|
4 |
public function EngineOff ($car:Car) |
5 |
{
|
6 |
_car = $car; |
7 |
}
|
I've included the _car variable above the modified constructor. Now we can control the Car class from within this state.
Let's move on to the interface method implementations.
Get inside the turnKeyOff() method. Check your State Transition Table to see what happens here. Next, compare that with the procedural turnKeyOff() method inside the Car class. Remember, we still have the Car class in Procedural FSM. Once you see the match. Copy the action for the ENGINE_OFF state into the empty method. The turnKeyOff() method should reflect what you see below.
1 |
|
2 |
public function turnKeyOff ():void |
3 |
{
|
4 |
_car.print ("The car's already off, you can't turn the key counter-clockwise any further..."); |
5 |
}
|
The trace() statement has been replaced by print() which we'll add to the Car class later.
Now go inside the turnKeyOn() method and add the code listed next.
1 |
|
2 |
_car.print ("Turning the car on...the engine is now running!"); |
3 |
_car.changeState (_car.getEngineOnState ()); |
Check it against you State Transition Table and procedural turnKeyOn() method for the ENGINE_OFF state to see if it's the same. The changeState() method is delegated back to the car passing in the retrieved state it needs to change to.
The rest of the methods are processed the same way. Copy the code below and replace the empty methods with it.
1 |
|
2 |
public function driveForward ():void |
3 |
{
|
4 |
_car.print ("click, changing the gear to drive doesn't do anything...the car is not running, returning the gear to park..."); |
5 |
}
|
6 |
|
7 |
public function reFuel ():void |
8 |
{
|
9 |
if (_car.hasFullTank () == false) |
10 |
{
|
11 |
_car.print ("getting out of the car and adding " + Number (_car.refillWithFuel ()).toFixed (2) + " gallon(s) of fuel."); |
12 |
}
|
13 |
}
|
14 |
|
15 |
public function update ($tick:Number):void { } |
16 |
|
17 |
public function toString ():String |
18 |
{
|
19 |
return 'off'; |
20 |
}
|
The driveForward() method does the same as the procedural driveForward() methods with _currentState set as ENGINE_OFF
reFuel() asks the car to see if the tank is not full. If not, the car will then refill with fuel. You'll see how those two methods work when we change the Car class later.
The update() method remains empty since the car won't be running.
toString() works the same as the car's toString() method.
This completes the EngineOff class.
Before creating the rest of the other state classes, let's modify the Car class and convert it into its own State Machine.
Step 18: The Car State Machine
Important: Create a duplicate Car class before following the procedure below. A text copy would suffice but make sure to save it as reference for later.
Instead of going through the changes item by item, just copy the code below then paste and replace the content of your Car class with it.
1 |
|
2 |
package com.activeTuts.fsm |
3 |
{
|
4 |
import flash.display.Sprite; |
5 |
import flash.events.Event; |
6 |
|
7 |
public class Car extends Sprite |
8 |
{
|
9 |
///CAR STATES
|
10 |
//engine off state
|
11 |
//engine on state
|
12 |
//drive state
|
13 |
//no gas state
|
14 |
|
15 |
public static const ONE_SIXTH_SECONDS:Number = 1 / 6; //6 times per second |
16 |
|
17 |
public static const IDLE_FUEL_CONSUMPTION:Number = .0055; |
18 |
public static const DRIVE_FUEL_CONSUMPTION:Number = .011; |
19 |
|
20 |
private var _engineOffState:IState; |
21 |
private var _engineOnState:IState; |
22 |
private var _engineDriveForwardState:IState; |
23 |
private var _engineOutOfFuelState:IState; |
24 |
|
25 |
private var _fuelCapacity:Number = 1; |
26 |
private var _fuelSupply:Number = _fuelCapacity; //starting on a full tank (in gallons) |
27 |
|
28 |
private var _engineTimer:Number = 0; |
29 |
|
30 |
private var _currentState:IState; |
31 |
|
32 |
public function Car () |
33 |
{
|
34 |
init (); |
35 |
}
|
36 |
|
37 |
private function init ():void |
38 |
{
|
39 |
initializeStates (); |
40 |
}
|
41 |
|
42 |
private function initializeStates ():void |
43 |
{
|
44 |
_engineOffState = new EngineOff (this); |
45 |
_engineOnState = new EngineOn (this); |
46 |
_engineDriveForwardState = new EngineDriveForward (this); |
47 |
_engineOutOfFuelState = new EngineOutOfFuel (this); |
48 |
|
49 |
_currentState = _engineOffState;//default state |
50 |
}
|
51 |
|
52 |
public function update ($tick:Number):void |
53 |
{
|
54 |
_currentState.update ($tick); |
55 |
}
|
56 |
|
57 |
///car functions
|
58 |
public function turnKeyOn (e:Event = null):void |
59 |
{
|
60 |
_currentState.turnKeyOn (); |
61 |
}
|
62 |
|
63 |
public function turnKeyOff (e:Event = null):void |
64 |
{
|
65 |
_currentState.turnKeyOff (); |
66 |
}
|
67 |
|
68 |
public function driveForward (e:Event = null):void |
69 |
{
|
70 |
_currentState.driveForward (); |
71 |
}
|
72 |
|
73 |
public function reFuel (e:Event = null):void |
74 |
{
|
75 |
_currentState.reFuel (); |
76 |
}
|
77 |
|
78 |
public function consumeFuel ($consumption:Number):void |
79 |
{
|
80 |
|
81 |
if ((_fuelSupply -= $consumption) <= 0) |
82 |
{
|
83 |
_fuelSupply = 0; |
84 |
print ("the engine has stopped, no more fuel to run..."); |
85 |
|
86 |
changeState (_engineOutOfFuelState); |
87 |
}
|
88 |
}
|
89 |
|
90 |
public function refillWithFuel ():Number |
91 |
{
|
92 |
var neededSupply:Number = _fuelCapacity - _fuelSupply; |
93 |
_fuelSupply += neededSupply; |
94 |
return neededSupply; |
95 |
}
|
96 |
|
97 |
public function hasFullTank ():Boolean |
98 |
{
|
99 |
var fullTank:Boolean = _fuelCapacity == _fuelSupply ? true : false; |
100 |
if (fullTank) print ("no need to refuel right now, the tank is full..."); |
101 |
return fullTank; |
102 |
}
|
103 |
|
104 |
public function getEngineOffState ():IState { return _engineOffState; } //explicit, you know you're calling a method |
105 |
|
106 |
public function getEngineOnState ():IState { return _engineOnState; } |
107 |
|
108 |
public function getEngineOutOfFuelState ():IState { return _engineOutOfFuelState; } |
109 |
|
110 |
public function getEngineDriveForwardState ():IState { return _engineDriveForwardState; } |
111 |
|
112 |
public function changeState ($state:IState):void |
113 |
{
|
114 |
_currentState = $state; |
115 |
}
|
116 |
|
117 |
public function get engineTimer ():Number { return _engineTimer; } //implicit, as if you're accessing a public variable |
118 |
|
119 |
public function set engineTimer ($value:Number):void { _engineTimer = $value; } |
120 |
|
121 |
public function print ($text:String):void |
122 |
{
|
123 |
trace ($text); |
124 |
}
|
125 |
|
126 |
override public function toString ():String |
127 |
{
|
128 |
return 'The car is currently ' + _currentState + ' with a fuel amount of ' + _fuelSupply + ' gallon(s).'; |
129 |
}
|
130 |
}
|
131 |
}
|
Let's go over the changes.
Starting at variable definition. You'll notice that the four states have changed type to IState and are no longer static constants.
Next, the constructor now calls init() which in turn calls initializeState(). All the state classes are instantiated through that method.
Then comes the easy part, no more switch statements. The car just delegates the actions to the current state. See turnKeyOff() down to reFuel()
The consumeFuel() method had to become public access for EngineOn and EngineDriveForward.
And then the two methods we used in EngineOff's reFuel() method - hasFullTank() and refillWithFuel().
Below them are the explicit getters that provide access for all four states. It may seem like it's weird protocol but it's just encapsulation at work.
The changeState() does exactly what it says, it changes the _currentState.
Again, following the strict rule of OOP, the _engineTimer property can be accessed and modified through these two methods: get engineTimer() and set engineTimer().
print() for now will just pass the String parameter to a trace() statement. And then the toString() method.
Step 19: Creating the Other Three States
To simplify creation of the three other classes, get inside the Car class from within the initialize() method. Place your cursor inside the "EngineOn" word and press "CTRL + SHIFT + 1" to generate a prompt. Select "Create new class" and hit "ENTER".
Match the information as shown in the image below then click "OK".


This is similar to Step 16 when you created the EngineOff class. Only this time, we used FD's shortcut keys. Also, you'll notice a refence to the car object in the constructor which was passed in at instantiation. Don't forget to add that "$" sign to the car parameter for your constructor and the only class variable _car on top.
Compare it with the code below.
1 |
|
2 |
package com.activeTuts.fsm |
3 |
{
|
4 |
public class EngineOn implements IState |
5 |
{
|
6 |
private var _car:Car; |
7 |
|
8 |
public function EngineOn($car:Car) |
9 |
{
|
10 |
_car = $car; |
11 |
}
|
12 |
|
13 |
/* INTERFACE com.activeTuts.fsm.IState */
|
14 |
|
15 |
public function turnKeyOff ():void |
16 |
{
|
17 |
|
18 |
}
|
19 |
|
20 |
public function turnKeyOn ():void |
21 |
{
|
22 |
|
23 |
}
|
24 |
|
25 |
public function driveForward ():void |
26 |
{
|
27 |
|
28 |
}
|
29 |
|
30 |
public function reFuel ():void |
31 |
{
|
32 |
|
33 |
}
|
34 |
|
35 |
public function update ($tick:Number):void |
36 |
{
|
37 |
|
38 |
}
|
39 |
|
40 |
public function toString ():String |
41 |
{
|
42 |
|
43 |
}
|
44 |
|
45 |
}
|
46 |
|
47 |
}
|
Now go back inside the initialize() method in Car and repeat the process for the last two remaining state classes.
Step 20: Completing the EngineOn Class
Do you think you can piece it together using the Car.txt (duplicate) and State Transition Table?
Give it a shot, just follow Step 17 and you'll do great. Just remember that you're working on action results for ENGINE_ON now.
Excellent! When you're done, compare your code with the classes inside the folder "StatePatternPartial1" included with the source download.
Step 21: Final Testing
Once you finish work with all your state classes, go back to Main.as and run your application.
Hopefully everything went well and you didn't get any errors. Information should start printing out of your output panel.
We'll end the first part of the tutorial here. For the second part, we'll start by adding the two other states "EngineDriveReallyFast" and "EngineDriveBackward". Then we'll add controls for animation and sound proving how easy it is to modify and scale.
Conclusion
Of all the design patterns I've played with, this one is by far the most important (for me), especially in the realm of game design. You'll see why when you start using it to build your next game object. Why don't you try creating the pistol I mentioned at the beginning of this tutorial. You'll enjoy creating it! Just remember to start small. Always build it from Procedural FSM then convert it to the State Pattern.
Here are the steps:
- Sketch up the State Transition Table for your Object.
- Create your Procedural FSM Object.
- Once Procedural FSM works, if you need to add a lot more feature and/or states, convert it to the State Pattern.
- Build your IState Interface first.
- Create the first/default State class (Consult State Transition Table and Procedural FSM actions).
- Duplicate a copy of your Procedural FSM Object, then allow public access to all properties the State classes need to control.
- Create the rest of the State classes.
- Add features/states as per your requirements. These usually present themselves while you're working on your State actions.
See you in the second part!
As always, for any comments, suggestions, or concerns, please post a note in the comments section.
Thanks for reading!
 By
By


