

The Raspberry Pi runs from an operating system stored on a Secure Digital (SD) card and many different operating systems may be employed. Storage is relatively inexpensive, can be created (flashed), recreated, written to and overwritten with ease.
On the one hand, this is an advantage of the Pi. On the other, the experimental nature of the Pi means more time flashing SD cards. This tutorial shows you how to clone any Raspberry Pi SD card which is particularly useful when you have your OS set up just as you want it.
Raspberry Pi
The Raspberry Pi is somewhat different to the computing, to which most of us have been accustomed, of the last two decades. It’s a bare-bones board of components and connectors that requires you to source a power supply, keyboard, monitor and mouse to get it up and running.
With almost two and a half million units sold–in little over a year since its launch–and with its focus on getting kids (adults?) coding and experimenting, it might not be an exaggeration to consider the Raspberry Pi to be a revolutionary device.
Being able to experiment, play and break things is all part of the fun. By cloning your SD cards, you can be up and running again with the minimum of downtime.
Set Up Your SD Card
Before embarking on cloning your SD card, install NOOBS or the OS of your choice, customise it and get it set up exactly how you like to use it.
Tip: To set up your SD card, read our tutorials How to Flash an SD Card for Raspberry Pi and How to Install NOOBS on a Raspberry Pi With a Mac.
These tutorials will get you up and running with an operating system, on an SD card, for use with your Raspberry Pi.
Cloning the SD Card With Windows
Cloning is the process of making an exact copy. The steps shown, below, will take you through the process of creating a disk image of your existing Raspberry Pi SD card, regardless of the exact operating system you have on it or how it has been set up.
The benefit of having a disk image of your SD card is that you have a backup of your data from which you can easily write a new SD card
Step 1. Download Win32DiskImager


Download Win32DiskImager from the Win32DiskImager SourceForge page.
Step 2. Set Up Your ‘Master’ SD Card
Once your RPi SD Card is all set up as you want it, remove it from RPi and insert into your Windows computer
Step 3. Cloning Your SD Card

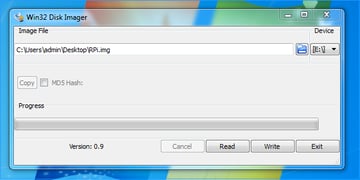
Launch Win32DiskImager. In the box marked Image File enter the path to, and a name, for the image file that you are about to create. In this example I have gone with C:\Users\admin\Desktop\RPi.img
Select the drive letter for your SD card in the Device box, in my example this is E:


Click the buttom marked Read
Wait for the imaging of the SD card to be completed. There is a progress bar that will give you an idea as to how long this will take.
Restoring an SD Card From a Clone
Step 1. Insert the SD Card to be Restored
Insert a blank (or used and nuked) SD card into the SD card reader on your Windows computer.
Step 2. Prepare the SD Card to be Restored


Click on the Start menu icon and type disk management and press the Return key to locate and open the Disk Management program.


Secondary-click on the volume to bring up the context-sensitive menu and delete all of the partitions on the SD card (if there are any).
Format the SD Card as FAT–32 or NTFS, as these filesystems are recognised by Windows computers, by secondary-clicking to bring up the context-sensitive menu and select Format….
Step 3. Restoring a Disk Image to an SD Card


Launch Win32DiskImager. Click on the blue folder icon and browse to the location where you previously saved your Raspberry Pi SD card image file, ending .img, in my example RPi.img
Under Device, select the drive letter of your SD card, in my example E:
Click the Write button.


You will see a warning dialogue box saying Writing to a physical device can corrupt the device. (Target device [E:] “RPI”) Are you sure you want to continue?
Double-check you have selected the correct destination for your SD card and click the Yes button.
Again, the progress bar will be shown to give you an indication of how long the process will take to complete.
When completed, eject the SD card from the SD card reader. This SD card should be an exact clone of your previously backed-up SD card.
This process makes it easier to get a Raspberry Pi up and running again.
Before Deploying Your Cloned SD Card


At any time you need to revert to a cloned SD card, don’t be hasty. Instead of swapping out the existing card with the clone, ensure that you re-clone the clone before using it.
This way, you will always have a version of your OS ready to go, just as you like it and without the need for a lengthy workflow in flashing, installing, upgrading and updating software.
Conclusion
In this tutorial I have shown you how to clone your Raspberry Pi SD card using Microsoft Windows and a program called Win32DiskImager.
Cloning your SD cards can save a lot of time meaning that you can spend more time enjoying and experimenting with your Raspberry Pi.
 By
By


