

With Google Play Games Services, you can build a range of features into your Android apps, including leaderboards, achievements, multiplayer gameplay, cloud storage, and Google+ sign-in.
In this tutorial we will work through the steps you need to take to add achievements to a simple Android game. We will prepare the development environment to use Google Play Game Services, define an achievement in the Developer Console and implement the achievement interaction in the game.
1. Prepare Your IDE
Step 1
To utilize the Google Play Game Services tools, we need to prepare our IDE. As well as using the Google Play Services library—which you need for all Google services—we will use the BaseGameUtils resource, which contains a number of classes that are particularly useful when developing games.
Start by creating a new app in your IDE. The sample code of this tutorial contains a simple game in which the user has to guess a number chosen at random. You can use that project to start developing with Google Play Game Services if you like. Create a new Android project and choose names and settings for it.
If you're not using the sample app in the download, you may wish to implement your gameplay at this point, bearing in mind what you are going to use an achievement for. For the sample app, we will simply award an achievement when the user chooses a correct answer.
Step 2
In this step, we get the IDE and our project ready to use Google Play Games Services and the utilities. Open your Android SDK Manager, which you can find under the Window menu in Eclipse. Scroll down until you see the Extras folder, expand it, and select Google Play Services and the Google Repository. You may also need the Google APIs Platform if you plan on testing on the emulator, so select that as well. You can find the latter in the directories for recent versions of the Android platform. Install the selected packages, accepting any licenses as necessary.
Step 3
We also need to include a couple of resources in the actual workspace so that we can reference them in the app, starting with the Google Play Services Library. You should find it at /extras/google/google_play_services/libproject/google-play-services_lib/ in your SDK folder. Make a copy of the library and paste it in another location on your computer.
Back in Eclipse, import the library by choosing Import > Android > Import Existing Android Code into Workspace from the File menu. Browse to the location you copied the library into, select the library, and import it. The library should appear as a project in your Eclipse Package Explorer and workspace.
Right-click the library project in Eclipse, select Properties and browse to the Android section. Select a Google APIs build target and ensure Is Library is checked. The library should now be ready to reference in your app.
Step 4
Let's now get the BaseGameUtils resource into your IDE as well. Download it from the Sample Games section of Google's developer portal. Since the code is hosted on GitHub, you can browse it and access its guides on GitHub.
Import the BaseGameUtils resource into Eclipse using the same technique you used for the Play Services Library by selecting Import > Android > Import Existing Android Code into Workspace from the File menu. Right-click the BaseGameUtils project in your Package Explorer and make sure Is Library is checked.
We can now reference both the Google Play Services Library and BaseGameUtils resources in our app.
Step 5
Select your game app in the Eclipse Package Explorer, right-click it, and choose Properties as you did for the imported resources. In the Android section, this time click Add in the Library area. Select both Google Play Services library and BaseGameUtils to add as libraries to your project.
That's the IDE set up for developing with Games Services.
2. Prepare Your Game in the Developer Console
Step 1
In order to use achievements in your game, your need to add the game to the Google Play Developer Console. Log into the Developer Console, click the Games Services button to the left of the console, and choose Set up Google Play game services if you haven't used them before.


Click to add a new game, select I don't use any Google APIs in my game yet, and choose a name and category for your game. Click Continue to go to the next step.


In the Game Details section, all you need to add to test your app is your game's title.
Step 2
Click Linked Apps to the left of your game listing in the Developer Console. Select Android from the Linked Apps list.


Enter your app details, including the package name you chose when you created it.


Click Save and continue at the top and choose Authorize your app now. You will be prompted to enter branding information. All you need for the moment is your app's name. In the Client ID Settings screen, select Installed application as the type, Android as the installed application type, and enter your package name.
You then need to generate a signing certificate fingerprint for authorization. You will need to run the keytool utility on your computer to do this. Open a terminal or command prompt and use the following command, but make sure to alter it to suit the location if necessary. You can use the debug certificate while testing.
keytool -exportcert -alias androiddebugkey -keystore ~/.android/debug.keystore -list -v
The keytool should write out the certificate fingerprint. Select and copy what appears after SHA1 and paste it into the Developer Console under Signing Certificate Fingerprint. Click Create Client and copy the application ID you see in the listing for your game in the Developer Console, which should be displayed next to the game name at the top of the page. Save the application ID for use later in your app.
3. Create an Achievement
Step 1
Still in the Developer Console, click the Achievements button on the left of the game listing and click Add achievement.
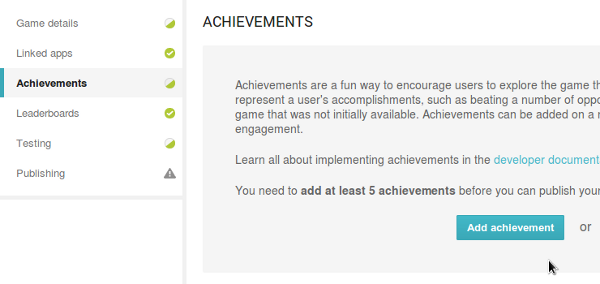

Before you continue, you may want to check out the Achievements page on the Developer Guide to ensure you understand the concept of an achievement in Google Play Games. Enter a name, a description, and an icon for your achievement and choose a state, points, and list order. For our sample game, we use Guessed Correctly as the name, Picked a correct number as the description, and a simple star image as the icon. Click Save to save the achievement.

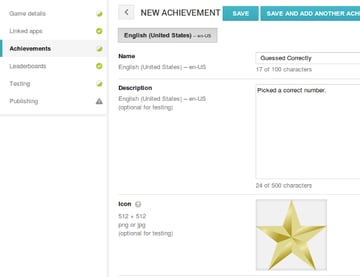
Copy the achievement ID, which you can see next to the achievement in the Developer Console.
Step 2
If you navigate to the Testing section for your game, you can set email addresses for people who will have test access to the game. By default, the Developer Console will insert your own Google account email, so you should be able to use that straight away. Add any other test emails you need, then you can log out of your Google account.
4. Prepare Your Game for Accessing Games Services
Step 1
In Eclipse, we can get the app ready to access Games Services. We are going to use the technique outlined in Implementing Sign-in on Android to handle getting users signed in and out of their Google accounts. This will involve using buttons to sign in and out, so add these to your app's layout as follows:
1 |
<!-- sign-in button -->
|
2 |
|
3 |
<com.google.android.gms.common.SignInButton
|
4 |
android:id="@+id/sign_in_button" |
5 |
android:layout_width="wrap_content" |
6 |
android:layout_height="wrap_content" /> |
7 |
|
8 |
<!-- sign-out button -->
|
9 |
|
10 |
<Button
|
11 |
android:id="@+id/sign_out_button" |
12 |
android:layout_width="wrap_content" |
13 |
android:layout_height="wrap_content" |
14 |
android:text="Sign Out" |
15 |
android:visibility="gone" /> |
Step 2
Alter your main Activity to extend BaseGameActivity. This will let us automate certain parts of the sign-in process for your users. Also make the Activity class handle clicks:
1 |
public class MainActivity extends BaseGameActivity implements View.OnClickListener |
You will need the following imports:
1 |
import com.google.android.gms.games.Games; |
2 |
import com.google.example.games.basegameutils.BaseGameActivity; |
Now retrieve references to the buttons in onCreate:
1 |
findViewById(R.id.sign_in_button).setOnClickListener(this); |
2 |
findViewById(R.id.sign_out_button).setOnClickListener(this); |
We will respond to button taps in onClick as you can see below:
1 |
@Override
|
2 |
public void onClick(View view) { |
3 |
if (view.getId() == R.id.sign_in_button) { |
4 |
beginUserInitiatedSignIn(); |
5 |
}
|
6 |
else if (view.getId() == R.id.sign_out_button) { |
7 |
signOut(); |
8 |
findViewById(R.id.sign_in_button).setVisibility(View.VISIBLE); |
9 |
findViewById(R.id.sign_out_button).setVisibility(View.GONE); |
10 |
}
|
11 |
}
|
We use methods from the BaseGameActivity class we are extending to handle sign-in (beginUserInitiatedSignIn and signOut), updating the user interface accordingly. When the app starts, it will attempt to automatically log in the user, but they will also be able to use the buttons to sign in and out.
We now need to add two callbacks to our Activity class:
1 |
public void onSignInSucceeded() { |
2 |
findViewById(R.id.sign_in_button).setVisibility(View.GONE); |
3 |
findViewById(R.id.sign_out_button).setVisibility(View.VISIBLE); |
4 |
}
|
5 |
|
6 |
@Override
|
7 |
public void onSignInFailed() { |
8 |
findViewById(R.id.sign_in_button).setVisibility(View.VISIBLE); |
9 |
findViewById(R.id.sign_out_button).setVisibility(View.GONE); |
10 |
}
|
You could add more code to these if necessary. You may also choose to save player progress even if they are not signed in, but this depends on your game. In the sample application, we take the simple approach of checking that we have a connection to Google Services before we attempt to work with the achievement.
Step 3
Before you start coding the detail of using achievements in your app, you need to add some data to it. Start by opening or creating your res/values/ids.xml file and add string resources for the app and achievement IDs you copied from the Developer Console:
1 |
<string name="app_id">abcdefghij</string> |
2 |
<string name="correct_guess_achievement">abcdefghijkl</string> |
Update the content to reflect your ID values. Now open the project's Manifest and add the following inside the application element:
1 |
<meta-data
|
2 |
android:name="com.google.android.gms.games.APP_ID" |
3 |
android:value="@string/app_id" /> |
4 |
<meta-data
|
5 |
android:name="com.google.android.gms.version" |
6 |
android:value="@integer/google_play_services_version" /> |
We reference the app ID we added to the ids file and the Play Services version. This is all you need to get started coding with your achievement.
5. Implement Your Achievement
Step 1
All that remains now is for you to unlock the achievement when the game player meets the achievement's requirements. Naturally this will depend on the purpose of your own game, but if you want to carry out the process using the sample app of this tutorial, then you can use the following code. We start with the main layout, which includes the sign-in and sign-out buttons we added earlier:
1 |
<RelativeLayout xmlns:android="https://schemas.android.com/apk/res/android" |
2 |
xmlns:tools="http://schemas.android.com/tools" |
3 |
android:layout_width="match_parent" |
4 |
android:layout_height="match_parent" |
5 |
android:paddingBottom="@dimen/activity_vertical_margin" |
6 |
android:paddingLeft="@dimen/activity_horizontal_margin" |
7 |
android:paddingRight="@dimen/activity_horizontal_margin" |
8 |
android:paddingTop="@dimen/activity_vertical_margin" |
9 |
tools:context="com.example.fungame.MainActivity" > |
10 |
|
11 |
<LinearLayout
|
12 |
android:id="@+id/sign_in_buttons" |
13 |
android:layout_width="fill_parent" |
14 |
android:layout_height="wrap_content" |
15 |
android:layout_alignParentTop="true" |
16 |
android:orientation="horizontal" > |
17 |
|
18 |
<!-- sign-in button -->
|
19 |
|
20 |
<com.google.android.gms.common.SignInButton
|
21 |
android:id="@+id/sign_in_button" |
22 |
android:layout_width="wrap_content" |
23 |
android:layout_height="wrap_content" /> |
24 |
|
25 |
<!-- sign-out button -->
|
26 |
|
27 |
<Button
|
28 |
android:id="@+id/sign_out_button" |
29 |
android:layout_width="wrap_content" |
30 |
android:layout_height="wrap_content" |
31 |
android:text="Sign Out" |
32 |
android:visibility="gone" /> |
33 |
|
34 |
<!-- show achievements -->
|
35 |
|
36 |
<Button
|
37 |
android:id="@+id/show_achievements" |
38 |
android:layout_width="wrap_content" |
39 |
android:layout_height="wrap_content" |
40 |
android:text="Achievements" /> |
41 |
|
42 |
</LinearLayout>
|
43 |
|
44 |
<RelativeLayout
|
45 |
android:layout_width="fill_parent" |
46 |
android:layout_height="wrap_content" |
47 |
android:layout_below="@id/sign_in_buttons" > |
48 |
|
49 |
<TextView
|
50 |
android:id="@+id/guess_text" |
51 |
android:layout_width="fill_parent" |
52 |
android:layout_height="wrap_content" |
53 |
android:layout_centerHorizontal="true" |
54 |
android:text="Guess the number!" |
55 |
android:textSize="30sp" |
56 |
android:textStyle="bold" /> |
57 |
|
58 |
<LinearLayout
|
59 |
android:layout_width="fill_parent" |
60 |
android:layout_height="wrap_content" |
61 |
android:layout_below="@id/guess_text" |
62 |
android:orientation="vertical" > |
63 |
|
64 |
<LinearLayout
|
65 |
android:layout_width="fill_parent" |
66 |
android:layout_height="wrap_content" |
67 |
android:orientation="horizontal" > |
68 |
|
69 |
<Button
|
70 |
android:id="@+id/btn7" |
71 |
android:layout_width="0dp" |
72 |
android:layout_height="match_parent" |
73 |
android:layout_margin="1dp" |
74 |
android:layout_weight="1" |
75 |
android:background="#ff000033" |
76 |
android:gravity="center" |
77 |
android:onClick="btnPressed" |
78 |
android:padding="5dp" |
79 |
android:tag="7" |
80 |
android:text="7" |
81 |
android:textColor="#ffffffff" |
82 |
android:textSize="30sp" |
83 |
android:textStyle="bold" /> |
84 |
|
85 |
<Button
|
86 |
android:id="@+id/btn8" |
87 |
android:layout_width="0dp" |
88 |
android:layout_height="match_parent" |
89 |
android:layout_margin="1dp" |
90 |
android:layout_weight="1" |
91 |
android:background="#ff000033" |
92 |
android:gravity="center" |
93 |
android:onClick="btnPressed" |
94 |
android:padding="5dp" |
95 |
android:tag="8" |
96 |
android:text="8" |
97 |
android:textColor="#ffffffff" |
98 |
android:textSize="30sp" |
99 |
android:textStyle="bold" /> |
100 |
|
101 |
<Button
|
102 |
android:id="@+id/btn9" |
103 |
android:layout_width="0dp" |
104 |
android:layout_height="match_parent" |
105 |
android:layout_margin="1dp" |
106 |
android:layout_weight="1" |
107 |
android:background="#ff000033" |
108 |
android:gravity="center" |
109 |
android:onClick="btnPressed" |
110 |
android:padding="5dp" |
111 |
android:tag="9" |
112 |
android:text="9" |
113 |
android:textColor="#ffffffff" |
114 |
android:textSize="30sp" |
115 |
android:textStyle="bold" /> |
116 |
</LinearLayout>
|
117 |
|
118 |
<LinearLayout
|
119 |
android:layout_width="fill_parent" |
120 |
android:layout_height="wrap_content" |
121 |
android:layout_weight="1" |
122 |
android:orientation="horizontal" > |
123 |
|
124 |
<Button
|
125 |
android:id="@+id/btn4" |
126 |
android:layout_width="0dp" |
127 |
android:layout_height="match_parent" |
128 |
android:layout_margin="1dp" |
129 |
android:layout_weight="1" |
130 |
android:background="#ff000033" |
131 |
android:gravity="center" |
132 |
android:onClick="btnPressed" |
133 |
android:padding="5dp" |
134 |
android:tag="4" |
135 |
android:text="4" |
136 |
android:textColor="#ffffffff" |
137 |
android:textSize="30sp" |
138 |
android:textStyle="bold" /> |
139 |
|
140 |
<Button
|
141 |
android:id="@+id/btn5" |
142 |
android:layout_width="0dp" |
143 |
android:layout_height="match_parent" |
144 |
android:layout_margin="1dp" |
145 |
android:layout_weight="1" |
146 |
android:background="#ff000033" |
147 |
android:gravity="center" |
148 |
android:onClick="btnPressed" |
149 |
android:padding="5dp" |
150 |
android:tag="5" |
151 |
android:text="5" |
152 |
android:textColor="#ffffffff" |
153 |
android:textSize="30sp" |
154 |
android:textStyle="bold" /> |
155 |
|
156 |
<Button
|
157 |
android:id="@+id/btn6" |
158 |
android:layout_width="0dp" |
159 |
android:layout_height="match_parent" |
160 |
android:layout_margin="1dp" |
161 |
android:layout_weight="1" |
162 |
android:background="#ff000033" |
163 |
android:gravity="center" |
164 |
android:onClick="btnPressed" |
165 |
android:padding="5dp" |
166 |
android:tag="6" |
167 |
android:text="6" |
168 |
android:textColor="#ffffffff" |
169 |
android:textSize="30sp" |
170 |
android:textStyle="bold" /> |
171 |
|
172 |
</LinearLayout>
|
173 |
|
174 |
<LinearLayout
|
175 |
android:layout_width="fill_parent" |
176 |
android:layout_height="wrap_content" |
177 |
android:layout_weight="1" |
178 |
android:orientation="horizontal" > |
179 |
|
180 |
<Button
|
181 |
android:id="@+id/btn1" |
182 |
android:layout_width="0dp" |
183 |
android:layout_height="match_parent" |
184 |
android:layout_margin="1dp" |
185 |
android:layout_weight="1" |
186 |
android:background="#ff000033" |
187 |
android:gravity="center" |
188 |
android:onClick="btnPressed" |
189 |
android:padding="5dp" |
190 |
android:tag="1" |
191 |
android:text="1" |
192 |
android:textColor="#ffffffff" |
193 |
android:textSize="30sp" |
194 |
android:textStyle="bold" /> |
195 |
|
196 |
<Button
|
197 |
android:id="@+id/btn2" |
198 |
android:layout_width="0dp" |
199 |
android:layout_height="match_parent" |
200 |
android:layout_margin="1dp" |
201 |
android:layout_weight="1" |
202 |
android:background="#ff000033" |
203 |
android:gravity="center" |
204 |
android:onClick="btnPressed" |
205 |
android:padding="5dp" |
206 |
android:tag="2" |
207 |
android:text="2" |
208 |
android:textColor="#ffffffff" |
209 |
android:textSize="30sp" |
210 |
android:textStyle="bold" /> |
211 |
|
212 |
<Button
|
213 |
android:id="@+id/btn3" |
214 |
android:layout_width="0dp" |
215 |
android:layout_height="match_parent" |
216 |
android:layout_margin="1dp" |
217 |
android:layout_weight="1" |
218 |
android:background="#ff000033" |
219 |
android:gravity="center" |
220 |
android:onClick="btnPressed" |
221 |
android:padding="5dp" |
222 |
android:tag="3" |
223 |
android:text="3" |
224 |
android:textColor="#ffffffff" |
225 |
android:textSize="30sp" |
226 |
android:textStyle="bold" /> |
227 |
|
228 |
</LinearLayout>
|
229 |
|
230 |
<LinearLayout
|
231 |
android:layout_width="fill_parent" |
232 |
android:layout_height="wrap_content" |
233 |
android:layout_weight="1" |
234 |
android:orientation="horizontal" > |
235 |
|
236 |
<Button
|
237 |
android:id="@+id/btn0" |
238 |
android:layout_width="0dp" |
239 |
android:layout_height="match_parent" |
240 |
android:layout_margin="1dp" |
241 |
android:layout_weight="1" |
242 |
android:background="#ff000033" |
243 |
android:gravity="center" |
244 |
android:onClick="btnPressed" |
245 |
android:padding="5dp" |
246 |
android:tag="0" |
247 |
android:text="0" |
248 |
android:textColor="#ffffffff" |
249 |
android:textSize="30sp" |
250 |
android:textStyle="bold" /> |
251 |
|
252 |
<Button
|
253 |
android:id="@+id/btnAgain" |
254 |
android:layout_width="0dp" |
255 |
android:layout_height="match_parent" |
256 |
android:layout_margin="1dp" |
257 |
android:layout_weight="1" |
258 |
android:background="#ffffff00" |
259 |
android:enabled="false" |
260 |
android:gravity="center" |
261 |
android:onClick="btnPressed" |
262 |
android:padding="5dp" |
263 |
android:tag="-1" |
264 |
android:text="Again" |
265 |
android:textColor="#ffffff00" |
266 |
android:textSize="30sp" |
267 |
android:textStyle="bold" /> |
268 |
|
269 |
</LinearLayout>
|
270 |
</LinearLayout>
|
271 |
</RelativeLayout>
|
272 |
|
273 |
</RelativeLayout>
|
Notice that we also include an Achievements button next to the buttons for signing in and out. We will implement that button later. We won't go into too much detail on the sample game, if you have completed even simple apps before, this shouldn't be too difficult.
The game selects a random number between 0 and 9, and the player can choose a number button to make a guess. The game updates the text field to reflect whether or not the user guessed correctly. If a correct guess is made, the achievement is unlocked.
Step 2
Switch back to your Activity class and add the following instance variables:
1 |
private Button button0, button1, button2, button3, button4, button5, |
2 |
button6, button7, button8, button9, buttonAgain; |
3 |
private int number; |
4 |
private Random rand; |
5 |
private TextView info; |
These represent the buttons, number, random number generator, and text field. Add the following to your onCreate method:
1 |
findViewById(R.id.show_achievements).setOnClickListener(this); |
2 |
|
3 |
button0=(Button)findViewById(R.id.btn0); |
4 |
button1=(Button)findViewById(R.id.btn1); |
5 |
button2=(Button)findViewById(R.id.btn2); |
6 |
button3=(Button)findViewById(R.id.btn3); |
7 |
button4=(Button)findViewById(R.id.btn4); |
8 |
button5=(Button)findViewById(R.id.btn5); |
9 |
button6=(Button)findViewById(R.id.btn6); |
10 |
button7=(Button)findViewById(R.id.btn7); |
11 |
button8=(Button)findViewById(R.id.btn8); |
12 |
button9=(Button)findViewById(R.id.btn9); |
13 |
buttonAgain=(Button)findViewById(R.id.btnAgain); |
14 |
|
15 |
info=(TextView)findViewById(R.id.guess_text); |
16 |
rand=new Random(); |
17 |
number=rand.nextInt(10); |
Now add a method named disableNumbers, which we will call when the user makes a number selection:
1 |
private void disableNumbers(){ |
2 |
button0.setEnabled(false); button0.setTextColor(Color.parseColor("#ff000033")); |
3 |
button1.setEnabled(false); button1.setTextColor(Color.parseColor("#ff000033")); |
4 |
button2.setEnabled(false); button2.setTextColor(Color.parseColor("#ff000033")); |
5 |
button3.setEnabled(false); button3.setTextColor(Color.parseColor("#ff000033")); |
6 |
button4.setEnabled(false); button4.setTextColor(Color.parseColor("#ff000033")); |
7 |
button5.setEnabled(false); button5.setTextColor(Color.parseColor("#ff000033")); |
8 |
button6.setEnabled(false); button6.setTextColor(Color.parseColor("#ff000033")); |
9 |
button7.setEnabled(false); button7.setTextColor(Color.parseColor("#ff000033")); |
10 |
button8.setEnabled(false); button8.setTextColor(Color.parseColor("#ff000033")); |
11 |
button9.setEnabled(false); button9.setTextColor(Color.parseColor("#ff000033")); |
12 |
buttonAgain.setEnabled(true); buttonAgain.setTextColor(Color.parseColor("#ff000033")); |
13 |
}
|
Implement another method, enableNumbers, which is invoked when the user has chosen to play again:
1 |
private void enableNumbers(){ |
2 |
button0.setEnabled(true); button0.setTextColor(Color.WHITE); |
3 |
button1.setEnabled(true); button1.setTextColor(Color.WHITE); |
4 |
button2.setEnabled(true); button2.setTextColor(Color.WHITE); |
5 |
button3.setEnabled(true); button3.setTextColor(Color.WHITE); |
6 |
button4.setEnabled(true); button4.setTextColor(Color.WHITE); |
7 |
button5.setEnabled(true); button5.setTextColor(Color.WHITE); |
8 |
button6.setEnabled(true); button6.setTextColor(Color.WHITE); |
9 |
button7.setEnabled(true); button7.setTextColor(Color.WHITE); |
10 |
button8.setEnabled(true); button8.setTextColor(Color.WHITE); |
11 |
button9.setEnabled(true); button9.setTextColor(Color.WHITE); |
12 |
buttonAgain.setEnabled(false); buttonAgain.setTextColor(Color.parseColor("#ffffff00")); |
13 |
}
|
Now add the method we set as onClick attribute for the buttons:
1 |
public void btnPressed(View v){ |
2 |
int btn = Integer.parseInt(v.getTag().toString()); |
3 |
if(btn<0){ |
4 |
//again btn
|
5 |
number=rand.nextInt(10); |
6 |
enableNumbers(); |
7 |
info.setText("Guess the number!"); |
8 |
}
|
9 |
else{ |
10 |
//number button
|
11 |
if(btn==number){ |
12 |
info.setText("Yes! It was "+number); |
13 |
if(getApiClient().isConnected()) |
14 |
Games.Achievements.unlock(getApiClient(), |
15 |
getString(R.string.correct_guess_achievement)); |
16 |
}
|
17 |
else{ |
18 |
info.setText("No! It was "+number); |
19 |
}
|
20 |
disableNumbers(); |
21 |
}
|
22 |
}
|
We call the Games Achievements utility to unlock the achievement if the user's guess was correct, first checking that we have a connection. We refer to the achievement using the string resource we created.
Last but not least, let's allow the user to view their achievements for the game. This will happen when they click the Achievements button we added. Extend the code in the onClick method, adding an additional else if:
1 |
else if (view.getId() == R.id.show_achievements){ |
2 |
startActivityForResult(Games.Achievements.getAchievementsIntent( |
3 |
getApiClient()), 1); |
4 |
}
|
We use the getAchievementsIntent method with an arbitrary integer to display the user achievements within the game. Hitting the back button will bring the player back to the game. For more on the achievements methods, see the Achievements in Android page on the Developer Guide.
Step 3
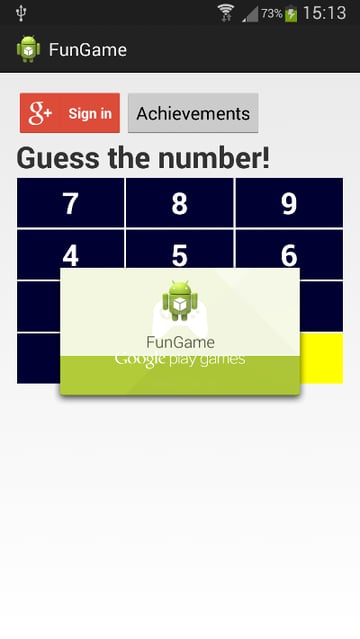
You should be able to run your app at this point. When the app runs, it will start the user authorization and sign-in process, prompting the user to grant the necessary permissions.

Once signed in, the user will see a confirmation.
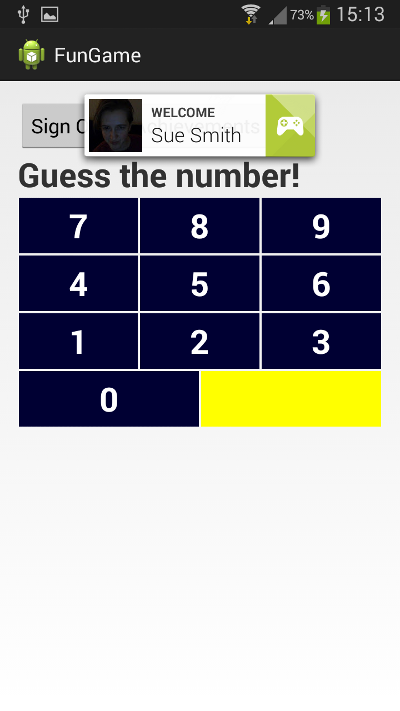
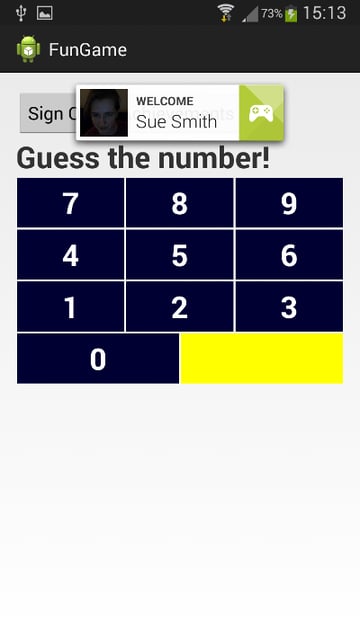
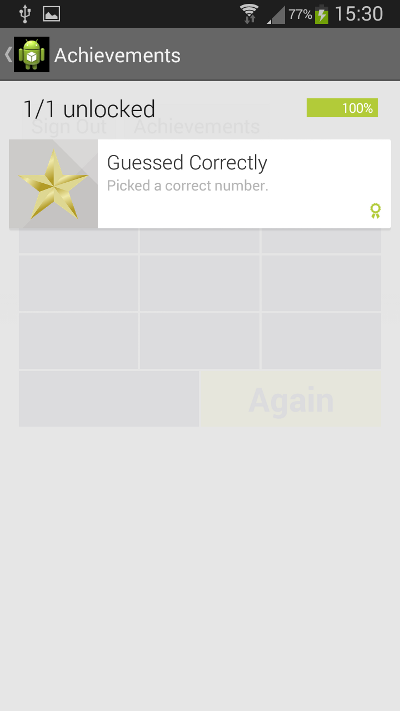
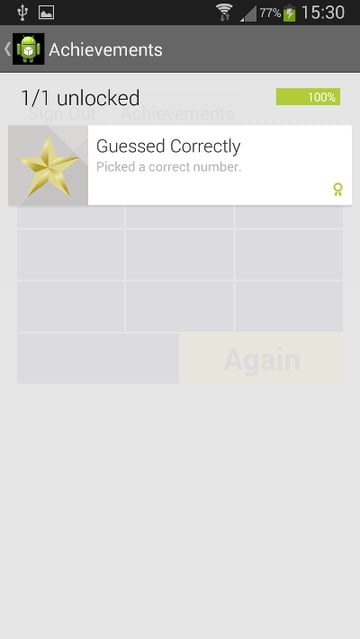
The user can choose to sign out and back in whenever they like. When the user selects a correct number, the achievement is unlocked and is displayed on top of the game screen.


The player can then continue as normal. Clicking the Achievements button will display their achievements. Tapping the back button will bring the player back to the game.
Conclusion
In this tutorial, we have explored a practical example of using achievements in an Android application. The sample app we used is simple, but the same principles apply to any game you are working with. Try adding another achievement to the Developer Console and implement it in your game to ensure you understand the concepts and processes.
 By
By


