


In this tutorial, I'll give you a broad overview of what you need to know to create isometric worlds. You'll learn what the isometric projection is, and how to represent isometric levels as 2D arrays. We'll formulate relationships between the view and the logic, so that we can easily manipulate objects on screen and handle tile-based collision detection. We'll also look at depth sorting and character animation.
To help speed your game development, you can find a range of isometric game assets on Envato Market, ready to use in your game.

Want even more tips on creating isometric worlds? Check out the follow-up post, Creating Isometric Worlds: A Primer for Gamedevs, Continued, and Juwal's book, Starling Game Development Essentials.


1. The Isometric World
Isometric view is a display method used to create an illusion of 3D for an otherwise 2D game - sometimes referred to as pseudo 3D or 2.5D. These images (taken from Diablo 2 and Age of Empires) illustrate what I mean:


Implementing an isometric view can be done in many ways, but for the sake of simplicity I'll focus on a tile-based approach, which is the most efficient and widely used method. I've overlaid each screenshot above with a diamond grid showing how the terrain is split up into tiles.
2. Tile-Based Games
In the tile-based approach, each visual element is broken down into smaller pieces, called tiles, of a standard size. These tiles will be arranged to form the game world according to pre-determined level data - usually a 2D array.
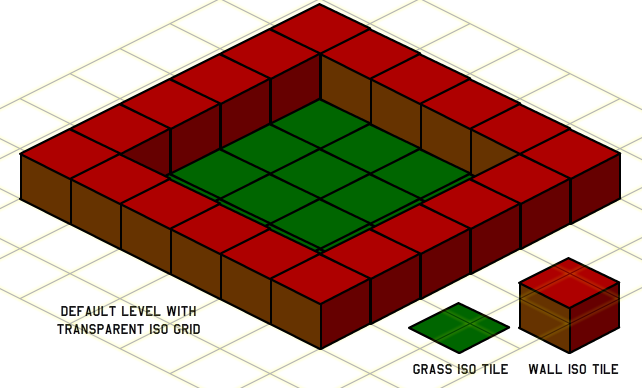
For example let us consider a standard top-down 2D view with two tiles - a grass tile and a wall tile - as shown here:

These tiles are each the same size as each other, and are each square, so the tile height and tile width are the same.
For a level with grassland enclosed on all sides by walls, the level data's 2D array will look like this:
1 |
[[1,1,1,1,1,1], |
2 |
[1,0,0,0,0,1], |
3 |
[1,0,0,0,0,1], |
4 |
[1,0,0,0,0,1], |
5 |
[1,0,0,0,0,1], |
6 |
[1,1,1,1,1,1]] |
Here, 0 denotes a grass tile and 1 denotes a wall tile. Arranging the tiles according to the level data will produce the below level image:

We can enhance this by adding corner tiles and separate vertical and horizontal wall tiles, requiring five additional tiles:
1 |
[[3,1,1,1,1,4], |
2 |
[2,0,0,0,0,2], |
3 |
[2,0,0,0,0,2], |
4 |
[2,0,0,0,0,2], |
5 |
[2,0,0,0,0,2], |
6 |
[6,1,1,1,1,5]] |

I hope the concept of the tile-based approach is now clear. This is a straightforward 2D grid implementation, which we could code like so:
1 |
for (i, loop through rows) |
2 |
for (j, loop through columns) |
3 |
x = j * tile width |
4 |
y = i * tile height |
5 |
tileType = levelData[i][j] |
6 |
placetile(tileType, x, y) |
Here we assume that tile width and tile height are equal (and the same for all tiles), and match the tile images' dimensions. So, the tile width and tile height for this example are both 50px, which makes up the total level size of 300x300px - that is, six rows and six columns of tiles measuring 50x50px each.
In a normal tile-based approach, we either implement a top-down view or a side view; for an isometric view we need to implement the isometric projection.
3. Isometric Projection
The best technical explanation of what "isometric projection" means, as far as I'm aware, is from this article by Clint Bellanger:
We angle our camera along two axes (swing the camera 45 degrees to one side, then 30 degrees down). This creates a diamond (rhombus) shaped grid where the grid spaces are twice as wide as they are tall. This style was popularized by strategy games and action RPGs. If we look at a cube in this view, three sides are visible (top and two facing sides).
Although it sounds a bit complicated, actually implementing this view is straightforward. What we need to understand is the relation between 2D space and the isometric space - that is, the relation between the level data and view; the transformation from top-down "Cartesian" coordinates to isometric coordinates.

(We are not considering a hexagonal tile based technique, which is another way of implementing isometric worlds.)
Placing Isometric Tiles
Let me try to simplify the relationship between level data stored as a 2D array and the isometric view - that is, how we transform Cartesian coordinates to isometric coordinates.
We will try to create the isometric view for our wall-enclosed grassland level data:
1 |
[[1,1,1,1,1,1], |
2 |
[1,0,0,0,0,1], |
3 |
[1,0,0,0,0,1], |
4 |
[1,0,0,0,0,1], |
5 |
[1,0,0,0,0,1], |
6 |
[1,1,1,1,1,1]] |
In this scenario we can determine a walkable area by checking whether the array element is 0 at that coordinate, thereby indicating grass. The 2D view implementation of the above level was a straightforward iteration with two loops, placing square tiles offsetting each with the fixed tile height and tile width values.
1 |
for (i, loop through rows) |
2 |
for (j, loop through columns) |
3 |
x = j * tile width |
4 |
y = i * tile height |
5 |
tileType = levelData[i][j] |
6 |
placetile(tileType, x, y) |
For the isometric view, the code remains the same, but the placeTile() function changes.
For an isometric view we need to calculate the corresponding isometric coordinates inside the loops.
The equations to do this are as follows, where isoX and isoY represent isometric x- and y-coordinates, and cartX and cartY represent Cartesian x- and y-coordinates:
1 |
//Cartesian to isometric:
|
2 |
|
3 |
isoX = cartX - cartY; |
4 |
isoY = (cartX + cartY) / 2; |
1 |
//Isometric to Cartesian:
|
2 |
|
3 |
cartX = (2 * isoY + isoX) / 2; |
4 |
cartY = (2 * isoY - isoX) / 2; |
These functions show how you can convert from one system to another:
1 |
function isoTo2D(pt:Point):Point{ |
2 |
var tempPt:Point = new Point(0, 0); |
3 |
tempPt.x = (2 * pt.y + pt.x) / 2; |
4 |
tempPt.y = (2 * pt.y - pt.x) / 2; |
5 |
return(tempPt); |
6 |
}
|
1 |
function twoDToIso(pt:Point):Point{ |
2 |
var tempPt:Point = new Point(0,0); |
3 |
tempPt.x = pt.x - pt.y; |
4 |
tempPt.y = (pt.x + pt.y) / 2; |
5 |
return(tempPt); |
6 |
}
|
The pseudocode for the loop then looks like this:
1 |
for(i, loop through rows) |
2 |
for(j, loop through columns) |
3 |
x = j * tile width |
4 |
y = i * tile height |
5 |
tileType = levelData[i][j] |
6 |
placetile(tileType, twoDToIso(new Point(x, y))) |
As an example, let's see how a typical 2D position gets converted to an isometric position:
1 |
2D point = [100, 100]; |
2 |
// twoDToIso(2D point) will be calculated as below |
3 |
isoX = 100 - 100; // = 0 |
4 |
isoY = (100 + 100) / 2; // = 100 |
5 |
Iso point == [0, 100]; |
Similarly, an input of [0, 0] will result in [0, 0], and [10, 5] will give [5, 7.5].
The above method enables us to create a direct correlation between the 2D level data and the isometric coordinates. We can find the tile's coordinates in the level data from its Cartesian coordinates using this function:
1 |
function getTileCoordinates(pt:Point, tileHeight:Number):Point{ |
2 |
var tempPt:Point = new Point(0, 0); |
3 |
tempPt.x = Math.floor(pt.x / tileHeight); |
4 |
tempPt.y = Math.floor(pt.y / tileHeight); |
5 |
return(tempPt); |
6 |
}
|
(Here, we essentially assume that tile height and tile width are equal, as in most cases.)
Hence, from a pair of screen (isometric) coordinates, we can find tile coordinates by calling:
1 |
getTileCoordinates(isoTo2D(screen point), tile height); |
This screen point could be, say, a mouse click position or a pick-up position.
Tip: Another method of placement is the Zigzag model, which takes a different approach altogether.
Moving in Isometric Coordinates
Movement is very easy: you manipulate your game world data in Cartesian coordinates and just use the above functions for updating it on the screen. For example, if you want to move a character forward in the positive y-direction, you can simply increment its y property and then convert its position to isometric coordinates:
1 |
y = y + speed; |
2 |
placetile(twoDToIso(new Point(x, y))) |
Depth Sorting
In addition to normal placement, we will need to take care of depth sorting for drawing the isometric world. This makes sure that items closer to the player are drawn on top of items farther away.
The simplest depth sorting method is simply to use the Cartesian y-coordinate value, as mentioned in this Quick Tip: the further up the screen the object is, the earlier it should be drawn. This work well as long as we do not have any sprites that occupy more than a single tile space.
The most efficient way of depth sorting for isometric worlds is to break all the tiles into standard single-tile dimensions and not to allow larger images. For example, here is a tile which does not fit into the standard tile size - see how we can split it into multiple tiles which each fit the tile dimensions:

4. Creating the Art
Isometric art can be pixel art, but it doesn't have to be. When dealing with isometric pixel art, RhysD's guide tells you almost everything you need to know. Some theory can be found on Wikipedia as well.
When creating isometric art, the general rules are
- Start with a blank isometric grid and adhere to pixel perfect precision.
- Try to break art into single isometric tile images.
- Try to make sure that each tile is either walkable or non-walkable. It will be complicated if we need to accommodate a single tile that contains both walkable and non-walkable areas.
- Most tiles will need to seamlessly tile in one or more directions.
- Shadows can be tricky to implement, unless we use a layered approach where we draw shadows on the ground layer and then draw the hero (or trees, or other objects) on the top layer. If the approach you use is not multi-layered, make sure shadows fall to the front so that they won't fall on, say, the hero when he stands behind a tree.
- In case you need to use a tile image larger than the standard isometric tile size, try to use a dimension which is a multiple of the iso tile size. It is better to have a layered approach in such cases, where we can split the art into different pieces based on its height. For example, a tree can be split into three pieces: the root, the trunk, and the foliage. This makes it easier to sort depths as we can draw pieces in corresponding layers which corresponds with their heights.
Isometric tiles that are larger than the single tile dimensions will create issues with depth sorting. Some of the issues are discussed in these links:
5. Isometric Characters
Implementing characters in isometric view is not complicated as it may sound. Character art needs to be created according to certain standards. First we will need to fix how many directions of motion are permitted in our game - usually games will provide four-way movement or eight-way movement.

For a top-down view, we could create a set of character animations facing in one direction, and simply rotate them for all the others. For isometric character art, we need to re-render each animation in each of the permitted directions - so for eight-way motion we need to create eight animations for each action. For ease of understanding we usually denote the directions as North, North-West, West, South-West, South, South-East, East, and North-East, anti-clockwise, in that order.
We place characters in the same way that we place tiles. The movement of a character is accomplished by calculating the movement in Cartesian coordinates and then converting to isometric coordinates. Let's assume we are using the keyboard to control the character.
We will set two variables, dX and dY, based on the directional keys pressed. By default these variables will be 0, and will be updated as per the chart below, where U, D, R and L denote the Up, Down, Right and Left arrow keys, respectively. A value of 1 under a key represents that key being pressed; 0 implies that the key is not being pressed.
1 |
Key Pos |
2 |
U D R L dX dY |
3 |
================ |
4 |
0 0 0 0 0 0 |
5 |
1 0 0 0 0 1 |
6 |
0 1 0 0 0 -1 |
7 |
0 0 1 0 1 0 |
8 |
0 0 0 1 -1 0 |
9 |
1 0 1 0 1 1 |
10 |
1 0 0 1 -1 1 |
11 |
0 1 1 0 1 -1 |
12 |
0 1 0 1 -1 -1 |
Now, using the values of dX and dY, we can update the Cartesian coordinates as so:
1 |
newX = currentX + (dX * speed); |
2 |
newY = currentY + (dY * speed); |
So dX and dY stand for the change in the x- and y-positions of the character, based on the keys pressed.
We can easily calculate the new isometric coordinates, as we've already discussed:
1 |
Iso = twoDToIso(new Point(newX, newY)) |
Once we have the new isometric position, we need to move the character to this position. Based on the values we have for dX and dY, we can decide which direction the character is facing and use the corresponding character art.
Collision Detection
Collision detection is done by checking whether the tile at the calculated new position is a non-walkable tile. So, once we find the new position, we don't immediately move the character there, but first check to see what tile occupies that space.
1 |
tile coordinate = getTileCoordinates(isoTo2D(iso point), tile height); |
2 |
if (isWalkable(tile coordinate)) {
|
3 |
moveCharacter(); |
4 |
} else {
|
5 |
//do nothing; |
6 |
} |
In the function isWalkable(), we check whether the level data array value at the given coordinate is a walkable tile or not. We must take care to update the direction in which the character is facing - even if he does not move, as in the case of him hitting a non-walkable tile.
Depth Sorting With Characters
Consider a character and a tree tile in the isometric world.
For properly understanding depth sorting, we must understand that whenever the character's x- and y-coordinates are less than those of the tree, the tree overlaps the character. Whenever the character's x- and y-coordinates are greater than that of the tree, the character overlaps the tree.
When they have the same x-coordinate, then we decide based on the y-coordinate alone: whichever has the higher y-coordinate overlaps the other. When they have same y-coordinate then we decide based on the x-coordinate alone: whichever has the higher x-coordinate overlaps the other.
A simplified version of this is to just sequentially draw the levels starting from the farthest tile - that is, tile[0][0] - then draw all the tiles in each row one by one. If a character occupies a tile, we draw the ground tile first and then render the character tile. This will work fine, because the character cannot occupy a wall tile.
Depth sorting must be done every time any tile changes position. For instance, we need to do it whenever characters move. We then update the displayed scene, after performing the depth sort, to reflect the depth changes.
6. Have a Go!
Now, put your new knowledge to good use by creating a working prototype, with keyboard controls and proper depth sorting and collision detection. Here's my demo:
Click to give the SWF focus, then use the arrow keys. Click here for the full-sized version.
You may find this utility class useful (I've written it in AS3, but you should be able to understand it in any other programming language):
1 |
package com.csharks.juwalbose |
2 |
{
|
3 |
import flash.display.Sprite; |
4 |
import flash.geom.Point; |
5 |
|
6 |
public class IsoHelper |
7 |
{
|
8 |
/**
|
9 |
* convert an isometric point to 2D
|
10 |
* */
|
11 |
public static function isoTo2D(pt:Point):Point{ |
12 |
//gx=(2*isoy+isox)/2;
|
13 |
//gy=(2*isoy-isox)/2
|
14 |
var tempPt:Point=new Point(0,0); |
15 |
tempPt.x=(2*pt.y+pt.x)/2; |
16 |
tempPt.y=(2*pt.y-pt.x)/2; |
17 |
return(tempPt); |
18 |
}
|
19 |
/**
|
20 |
* convert a 2d point to isometric
|
21 |
* */
|
22 |
public static function twoDToIso(pt:Point):Point{ |
23 |
//gx=(isox-isoxy;
|
24 |
//gy=(isoy+isox)/2
|
25 |
var tempPt:Point=new Point(0,0); |
26 |
tempPt.x=pt.x-pt.y; |
27 |
tempPt.y=(pt.x+pt.y)/2; |
28 |
return(tempPt); |
29 |
}
|
30 |
|
31 |
/**
|
32 |
* convert a 2d point to specific tile row/column
|
33 |
* */
|
34 |
public static function getTileCoordinates(pt:Point, tileHeight:Number):Point{ |
35 |
var tempPt:Point=new Point(0,0); |
36 |
tempPt.x=Math.floor(pt.x/tileHeight); |
37 |
tempPt.y=Math.floor(pt.y/tileHeight); |
38 |
|
39 |
return(tempPt); |
40 |
}
|
41 |
|
42 |
/**
|
43 |
* convert specific tile row/column to 2d point
|
44 |
* */
|
45 |
public static function get2dFromTileCoordinates(pt:Point, tileHeight:Number):Point{ |
46 |
var tempPt:Point=new Point(0,0); |
47 |
tempPt.x=pt.x*tileHeight; |
48 |
tempPt.y=pt.y*tileHeight; |
49 |
|
50 |
return(tempPt); |
51 |
}
|
52 |
|
53 |
}
|
54 |
}
|
If you get really stuck, here's the full code from my demo (in Flash and AS3 timeline code form):
1 |
// Uses senocular's KeyObject class
|
2 |
// http://www.senocular.com/flash/actionscript/?file=ActionScript_3.0/com/senocular/utils/KeyObject.as
|
3 |
|
4 |
import flash.display.Sprite; |
5 |
import com.csharks.juwalbose.IsoHelper; |
6 |
import flash.display.MovieClip; |
7 |
import flash.geom.Point; |
8 |
import flash.filters.GlowFilter; |
9 |
import flash.events.Event; |
10 |
import com.senocular.utils.KeyObject; |
11 |
import flash.ui.Keyboard; |
12 |
import flash.display.Bitmap; |
13 |
import flash.display.BitmapData; |
14 |
import flash.geom.Matrix; |
15 |
import flash.geom.Rectangle; |
16 |
|
17 |
var levelData=[[1,1,1,1,1,1], |
18 |
[1,0,0,2,0,1], |
19 |
[1,0,1,0,0,1], |
20 |
[1,0,0,0,0,1], |
21 |
[1,0,0,0,0,1], |
22 |
[1,1,1,1,1,1]]; |
23 |
|
24 |
var tileWidth:uint = 50; |
25 |
var borderOffsetY:uint = 70; |
26 |
var borderOffsetX:uint = 275; |
27 |
|
28 |
var facing:String = "south"; |
29 |
var currentFacing:String = "south"; |
30 |
var hero:MovieClip=new herotile(); |
31 |
hero.clip.gotoAndStop(facing); |
32 |
var heroPointer:Sprite; |
33 |
var key:KeyObject = new KeyObject(stage);//Senocular KeyObject Class |
34 |
var heroHalfSize:uint=20; |
35 |
|
36 |
//the tiles
|
37 |
var grassTile:MovieClip=new TileMc(); |
38 |
grassTile.gotoAndStop(1); |
39 |
var wallTile:MovieClip=new TileMc(); |
40 |
wallTile.gotoAndStop(2); |
41 |
|
42 |
//the canvas
|
43 |
var bg:Bitmap = new Bitmap(new BitmapData(650,450)); |
44 |
addChild(bg); |
45 |
var rect:Rectangle=bg.bitmapData.rect; |
46 |
|
47 |
//to handle depth
|
48 |
var overlayContainer:Sprite=new Sprite(); |
49 |
addChild(overlayContainer); |
50 |
|
51 |
//to handle direction movement
|
52 |
var dX:Number = 0; |
53 |
var dY:Number = 0; |
54 |
var idle:Boolean = true; |
55 |
var speed:uint = 5; |
56 |
var heroCartPos:Point=new Point(); |
57 |
var heroTile:Point=new Point(); |
58 |
|
59 |
//add items to start level, add game loop
|
60 |
function createLevel() |
61 |
{
|
62 |
var tileType:uint; |
63 |
for (var i:uint=0; i<levelData.length; i++) |
64 |
{
|
65 |
for (var j:uint=0; j<levelData[0].length; j++) |
66 |
{
|
67 |
tileType = levelData[i][j]; |
68 |
placeTile(tileType,i,j); |
69 |
if (tileType == 2) |
70 |
{
|
71 |
levelData[i][j] = 0; |
72 |
}
|
73 |
}
|
74 |
}
|
75 |
overlayContainer.addChild(heroPointer); |
76 |
overlayContainer.alpha=0.5; |
77 |
overlayContainer.scaleX=overlayContainer.scaleY=0.5; |
78 |
overlayContainer.y=290; |
79 |
overlayContainer.x=10; |
80 |
depthSort(); |
81 |
addEventListener(Event.ENTER_FRAME,loop); |
82 |
}
|
83 |
|
84 |
//place the tile based on coordinates
|
85 |
function placeTile(id:uint,i:uint,j:uint) |
86 |
{
|
87 |
var pos:Point=new Point(); |
88 |
if (id == 2) |
89 |
{
|
90 |
|
91 |
id = 0; |
92 |
pos.x = j * tileWidth; |
93 |
pos.y = i * tileWidth; |
94 |
pos = IsoHelper.twoDToIso(pos); |
95 |
hero.x = borderOffsetX + pos.x; |
96 |
hero.y = borderOffsetY + pos.y; |
97 |
//overlayContainer.addChild(hero);
|
98 |
heroCartPos.x = j * tileWidth; |
99 |
heroCartPos.y = i * tileWidth; |
100 |
heroTile.x=j; |
101 |
heroTile.y=i; |
102 |
heroPointer=new herodot(); |
103 |
heroPointer.x=heroCartPos.x; |
104 |
heroPointer.y=heroCartPos.y; |
105 |
|
106 |
}
|
107 |
var tile:MovieClip=new cartTile(); |
108 |
tile.gotoAndStop(id+1); |
109 |
tile.x = j * tileWidth; |
110 |
tile.y = i * tileWidth; |
111 |
overlayContainer.addChild(tile); |
112 |
}
|
113 |
|
114 |
//the game loop
|
115 |
function loop(e:Event) |
116 |
{
|
117 |
if (key.isDown(Keyboard.UP)) |
118 |
{
|
119 |
dY = -1; |
120 |
}
|
121 |
else if (key.isDown(Keyboard.DOWN)) |
122 |
{
|
123 |
dY = 1; |
124 |
}
|
125 |
else
|
126 |
{
|
127 |
dY = 0; |
128 |
}
|
129 |
if (key.isDown(Keyboard.RIGHT)) |
130 |
{
|
131 |
dX = 1; |
132 |
if (dY == 0) |
133 |
{
|
134 |
facing = "east"; |
135 |
}
|
136 |
else if (dY==1) |
137 |
{
|
138 |
facing = "southeast"; |
139 |
dX = dY=0.5; |
140 |
}
|
141 |
else
|
142 |
{
|
143 |
facing = "northeast"; |
144 |
dX=0.5; |
145 |
dY=-0.5; |
146 |
}
|
147 |
}
|
148 |
else if (key.isDown(Keyboard.LEFT)) |
149 |
{
|
150 |
dX = -1; |
151 |
if (dY == 0) |
152 |
{
|
153 |
facing = "west"; |
154 |
}
|
155 |
else if (dY==1) |
156 |
{
|
157 |
facing = "southwest"; |
158 |
dY=0.5; |
159 |
dX=-0.5; |
160 |
}
|
161 |
else
|
162 |
{
|
163 |
facing = "northwest"; |
164 |
dX = dY=-0.5; |
165 |
}
|
166 |
}
|
167 |
else
|
168 |
{
|
169 |
dX = 0; |
170 |
if (dY == 0) |
171 |
{
|
172 |
//facing="west";
|
173 |
}
|
174 |
else if (dY==1) |
175 |
{
|
176 |
facing = "south"; |
177 |
}
|
178 |
else
|
179 |
{
|
180 |
facing = "north"; |
181 |
}
|
182 |
}
|
183 |
if (dY == 0 && dX == 0) |
184 |
{
|
185 |
hero.clip.gotoAndStop(facing); |
186 |
idle = true; |
187 |
}
|
188 |
else if (idle||currentFacing!=facing) |
189 |
{
|
190 |
idle = false; |
191 |
currentFacing = facing; |
192 |
hero.clip.gotoAndPlay(facing); |
193 |
}
|
194 |
if (! idle && isWalkable()) |
195 |
{
|
196 |
heroCartPos.x += speed * dX; |
197 |
heroCartPos.y += speed * dY; |
198 |
heroPointer.x=heroCartPos.x; |
199 |
heroPointer.y=heroCartPos.y; |
200 |
|
201 |
var newPos:Point = IsoHelper.twoDToIso(heroCartPos); |
202 |
//collision check
|
203 |
hero.x = borderOffsetX + newPos.x; |
204 |
hero.y = borderOffsetY + newPos.y; |
205 |
heroTile=IsoHelper.getTileCoordinates(heroCartPos,tileWidth); |
206 |
depthSort(); |
207 |
//trace(heroTile);
|
208 |
}
|
209 |
tileTxt.text="Hero is on x: "+heroTile.x +" & y: "+heroTile.y; |
210 |
}
|
211 |
|
212 |
//check for collision tile
|
213 |
function isWalkable():Boolean{ |
214 |
var able:Boolean=true; |
215 |
var newPos:Point =new Point(); |
216 |
newPos.x=heroCartPos.x + (speed * dX); |
217 |
newPos.y=heroCartPos.y + (speed * dY); |
218 |
switch (facing){ |
219 |
case "north": |
220 |
newPos.y-=heroHalfSize; |
221 |
break; |
222 |
case "south": |
223 |
newPos.y+=heroHalfSize; |
224 |
break; |
225 |
case "east": |
226 |
newPos.x+=heroHalfSize; |
227 |
break; |
228 |
case "west": |
229 |
newPos.x-=heroHalfSize; |
230 |
break; |
231 |
case "northeast": |
232 |
newPos.y-=heroHalfSize; |
233 |
newPos.x+=heroHalfSize; |
234 |
break; |
235 |
case "southeast": |
236 |
newPos.y+=heroHalfSize; |
237 |
newPos.x+=heroHalfSize; |
238 |
break; |
239 |
case "northwest": |
240 |
newPos.y-=heroHalfSize; |
241 |
newPos.x-=heroHalfSize; |
242 |
break; |
243 |
case "southwest": |
244 |
newPos.y+=heroHalfSize; |
245 |
newPos.x-=heroHalfSize; |
246 |
break; |
247 |
}
|
248 |
newPos=IsoHelper.getTileCoordinates(newPos,tileWidth); |
249 |
if(levelData[newPos.y][newPos.x]==1){ |
250 |
able=false; |
251 |
}else{ |
252 |
//trace("new",newPos);
|
253 |
}
|
254 |
return able; |
255 |
}
|
256 |
|
257 |
//sort depth & draw to canvas
|
258 |
function depthSort() |
259 |
{
|
260 |
bg.bitmapData.lock(); |
261 |
bg.bitmapData.fillRect(rect,0xffffff); |
262 |
var tileType:uint; |
263 |
var mat:Matrix=new Matrix(); |
264 |
var pos:Point=new Point(); |
265 |
for (var i:uint=0; i<levelData.length; i++) |
266 |
{
|
267 |
for (var j:uint=0; j<levelData[0].length; j++) |
268 |
{
|
269 |
tileType = levelData[i][j]; |
270 |
//placeTile(tileType,i,j);
|
271 |
|
272 |
pos.x = j * tileWidth; |
273 |
pos.y = i * tileWidth; |
274 |
pos = IsoHelper.twoDToIso(pos); |
275 |
mat.tx = borderOffsetX + pos.x; |
276 |
mat.ty = borderOffsetY + pos.y; |
277 |
if(tileType==0){ |
278 |
bg.bitmapData.draw(grassTile,mat); |
279 |
}else{ |
280 |
bg.bitmapData.draw(wallTile,mat); |
281 |
}
|
282 |
if(heroTile.x==j&&heroTile.y==i){ |
283 |
mat.tx=hero.x; |
284 |
mat.ty=hero.y; |
285 |
bg.bitmapData.draw(hero,mat); |
286 |
}
|
287 |
|
288 |
}
|
289 |
}
|
290 |
bg.bitmapData.unlock(); |
291 |
//add character rectangle
|
292 |
}
|
293 |
createLevel(); |
Registration Points
Give special consideration to the registration points of the tiles and the hero. (Registration points can be thought of as the origin points for each particular sprite.) These generally won't fall inside the image, but rather will be the top left corner of the sprite's bounding box.
We will have to alter our drawing code to fix the registration points correctly, mainly for the hero.
Collision Detection
Another interesting point to note is that we calculate collision detection based on the point where the hero is.
But the hero has volume, and cannot be accurately represented by a single point, so we need to represent the hero as a rectangle and check for collisions against each corner of this rectangle so that there are no overlaps with other tiles and hence no depth artifacts.
Shortcuts
In the demo, I simply redraw the scene again each frame based on the new position of the hero. We find the tile which the hero occupies and draw the hero on top of the ground tile when the rendering loops reach those tiles.
But if we look closer, we will find that there is no need to loop through all the tiles in this case. The grass tiles and the top and left wall tiles are always drawn before the hero is drawn, so we don't ever need to redraw them at all. Also, the bottom and right wall tiles are always in front of the hero and hence drawn after the hero is drawn.
Essentially, then, we only need to perform depth sorting between the wall inside the active area and the hero - that is, two tiles. Noticing these kinds of shortcuts will help you save a lot of processing time, which can be crucial for performance.
Conclusion
By now, you should have a great basis for building isometric games of your own: you can render the world and the objects in it, represent level data in simple 2D arrays, convert between Cartesian and isometric coordiates, and deal with concepts like depth sorting and character animation. Enjoy creating isometric worlds!
 By
By


