
This is the second installment in our Corona SDK Unblock Puzzle game tutorial. In today's tutorial, we'll add to our interface by creating the interactive elements of the unblock game. Read on!
Where We Left Off. . .
Please be sure to check part 1 of the series to fully understand and prepare for this tutorial.
Step 1: Start Button Listeners
This function adds the necesary listeners to the TitleView buttons.
1 |
|
2 |
|
3 |
function startButtonListeners(action) |
4 |
if(action == 'add') then |
5 |
playBtn:addEventListener('tap', showGameView)
|
6 |
creditsBtn:addEventListener('tap', showCredits)
|
7 |
else |
8 |
playBtn:removeEventListener('tap', showGameView)
|
9 |
creditsBtn:removeEventListener('tap', showCredits)
|
10 |
end |
11 |
end |
Step 2: Show Credits
The credits screen is shown when the user taps the about button, a tap listener is added to the credits view to remove it.
1 |
|
2 |
function showCredits:tap(e) |
3 |
playBtn.isVisible = false |
4 |
creditsBtn.isVisible = false |
5 |
creditsView = display.newImage('credits.png', 0, display.contentHeight)
|
6 |
|
7 |
lastY = titleBg.y |
8 |
transition.to(titleBg, {time = 300, y = (display.contentHeight * 0.5) - (titleBg.height + 40)})
|
9 |
transition.to(creditsView, {time = 300, y = (display.contentHeight * 0.5) + 35, onComplete = function() creditsView:addEventListener('tap', hideCredits) end})
|
10 |
end |
Step 3: Hide Credits
When the credits screen is tapped, it'll be tweened out of the stage and removed.
1 |
|
2 |
function hideCredits:tap(e) |
3 |
transition.to(creditsView, {time = 300, y = display.contentHeight + 25, onComplete = function() creditsBtn.isVisible = true playBtn.isVisible = true creditsView:removeEventListener('tap', hideCredits) display.remove(creditsView) creditsView = nil end})
|
4 |
transition.to(titleBg, {time = 300, y = lastY});
|
5 |
end |
Step 4: Show Game View
When the Start button is tapped, the title view is tweened and removed revealing the game view. There are many parts involved in this view so we'll split them in the next steps.
1 |
|
2 |
function showGameView:tap(e) |
3 |
transition.to(titleView, {time = 300, x = -titleView.height, onComplete = function() startButtonListeners('rmv') display.remove(titleView) titleView = nil end})
|
Step 5: Game Background
This code places the game background image on the stage:
1 |
|
2 |
-- Game BG |
3 |
|
4 |
gameBg = display.newImage('gameBg.png', 10, 10)
|
Step 6: Movements TextField
Next we add the movements textfield to the stage. This will count the number of moves done by the player.
1 |
|
2 |
-- Movements Textfield |
3 |
|
4 |
movements = display.newText('0', 211, 66, display.systemFont, 16)
|
5 |
movements:setTextColor(224, 180, 120) |
Step 7: Create Level
This part creates the blocks defined in the Level variable using a double for statement.
1 |
|
2 |
-- Create Level |
3 |
|
4 |
hblocks = display.newGroup() |
5 |
vblocks = display.newGroup() |
6 |
|
7 |
for i = 1, #l1 do |
8 |
for j = 1, #l1[1] do |
9 |
if(l1[i][j] == 1) then |
10 |
local v = display.newImage('vrect.png', 10 + (j * 50)-50, 120 + (i * 50)-50)
|
11 |
v:addEventListener('touch', dragV)
|
12 |
vblocks:insert(v) |
13 |
elseif(l1[i][j] == 2) then |
14 |
local h = display.newImage('hrect.png', 10 + (j * 50)-50, 120 + (i * 50)-50)
|
15 |
h:addEventListener('touch', dragH)
|
16 |
hblocks:insert(h) |
17 |
elseif(l1[i][j] == 3) then |
18 |
s = display.newImage('square.png', 10 + (j * 50)-50, 120 + (i * 50)-49)
|
19 |
s:addEventListener('touch', dragH)
|
20 |
end |
21 |
end |
22 |
end |
23 |
|
24 |
gameListeners('add')
|
25 |
end |
Step 8: Game Listeners
This function adds the necessary listeners to start the game logic.
1 |
|
2 |
function gameListeners(action) |
3 |
if(action == 'add') then |
4 |
Runtime:addEventListener('enterFrame', update)
|
5 |
else |
6 |
Runtime:removeEventListener('enterFrame', update)
|
7 |
end |
8 |
end |
Step 9: Horizontal Drag
The next function handles the horizontal drag of the blocks.
1 |
|
2 |
function dragH(e) |
3 |
e.target.lastX = 0 |
4 |
local currentX = 0 |
5 |
local initX = 0 |
6 |
if(e.phase == 'began') then |
7 |
e.target.lastX = e.x - e.target.x |
8 |
initX = e.target.x |
9 |
movements.text = tostring(tonumber(movements.text) + 1) |
10 |
elseif(e.phase == 'moved') then |
11 |
e.target.x = e.x - e.target.lastX |
12 |
currentX = e.target.x |
13 |
-- Calculate direction |
14 |
if(initX < currentX) then |
15 |
dir = 'hl' --horizontal-left |
16 |
elseif(initX > currentX) then |
17 |
dir = 'hr' --horizontal-right |
18 |
end |
19 |
end |
20 |
end |
Step 10: Vertical Drag
Now we create the vertical drag function.
1 |
|
2 |
function dragV(e) |
3 |
e.target.lastY = 0 |
4 |
local currentY = 0 |
5 |
local initY = 0 |
6 |
if(e.phase == 'began') then |
7 |
e.target.lastY = e.y - e.target.y |
8 |
initY = e.target.y |
9 |
movements.text = tostring(tonumber(movements.text) + 1) |
10 |
elseif(e.phase == 'moved') then |
11 |
e.target.y = e.y - e.target.lastY |
12 |
currentY = e.target.y |
13 |
-- Calculate direction |
14 |
if(initY < currentY) then |
15 |
dir = 'vu' --Vertical-upwards |
16 |
elseif(initY > currentY) then |
17 |
dir = 'vd' --Vertical-downwards |
18 |
end |
19 |
end |
20 |
end |
Step 11: Hit Test Function
We'll use an excellent and useful function for collision detection without physics. You can find the original example and source at the CoronaLabs Code Exchange web site.
1 |
|
2 |
function hitTestObjects(obj1, obj2) |
3 |
local left = obj1.contentBounds.xMin <= obj2.contentBounds.xMin and obj1.contentBounds.xMax >= obj2.contentBounds.xMin |
4 |
local right = obj1.contentBounds.xMin >= obj2.contentBounds.xMin and obj1.contentBounds.xMin <= obj2.contentBounds.xMax |
5 |
local up = obj1.contentBounds.yMin <= obj2.contentBounds.yMin and obj1.contentBounds.yMax >= obj2.contentBounds.yMin |
6 |
local down = obj1.contentBounds.yMin >= obj2.contentBounds.yMin and obj1.contentBounds.yMin <= obj2.contentBounds.yMax |
7 |
return (left or right) and (up or down) |
8 |
end |
Step 12: Vertical Borders
This code limits the movement by creating virtual borders.
1 |
|
2 |
function update(e) |
3 |
-- Vertical Borders |
4 |
|
5 |
for i = 1, vblocks.numChildren do |
6 |
if(vblocks[i].y >= 370) then |
7 |
vblocks[i].y = 370 |
8 |
elseif(vblocks[i].y <= 170) then |
9 |
vblocks[i].y = 170 |
10 |
end |
Step 13: Collisions
Here we handle the collisions between the vertical and horizontal blocks.
1 |
|
2 |
-- Hit Test |
3 |
|
4 |
if(hitTestObjects(vblocks[i], hblocks[i]) and dir == 'vu') then |
5 |
vblocks[i].y = hblocks[i].y + 75 |
6 |
elseif(hitTestObjects(vblocks[i], hblocks[i]) and dir == 'vd') then |
7 |
vblocks[i].y = hblocks[i].y - 75 |
8 |
end |
9 |
|
10 |
if(hitTestObjects(vblocks[i], hblocks[i]) and dir == 'hr') then |
11 |
hblocks[i].x = vblocks[i].x + 75 |
12 |
elseif(hitTestObjects(vblocks[i], hblocks[i]) and dir == 'hl') then |
13 |
hblocks[i].x = vblocks[i].x - 75 |
14 |
end |
15 |
|
16 |
if(hitTestObjects(s, vblocks[i])) then |
17 |
s.x = vblocks[i].x - 50 |
18 |
end |
19 |
end |
Step 14: Horizontal Borders
This code limits the movement horizontally by creating virtual borders.
1 |
|
2 |
-- Horizontal Borders |
3 |
|
4 |
for j = 1, hblocks.numChildren do |
5 |
if(hblocks[j].x >= 260) then |
6 |
hblocks[j].x = 260 |
7 |
elseif(hblocks[j].x <= 60) then |
8 |
hblocks[j].x = 60 |
9 |
end |
10 |
end |
11 |
|
12 |
-- Square |
13 |
|
14 |
if(s.x >= 320) then |
15 |
display.remove(s) |
16 |
display.remove(vblocks) |
17 |
display.remove(hblocks) |
18 |
alert() |
19 |
elseif(s.x <= 35) then |
20 |
s.x = 35 |
21 |
end |
22 |
end |
Step 15: Alert
The alert function stops the game, displays a message and removes the active listeners.
1 |
|
2 |
function alert() |
3 |
gameListeners('rmv')
|
4 |
|
5 |
local alertView = display.newImage('alert.png', 80, display.contentHeight * 0.5 - 41)
|
6 |
transition.from(alertView, {time = 300, y = -82})
|
7 |
endend |
8 |
end |
Step 16: Call Main Function
In order to start the game, the Main function needs to be called. With the above code in place, we'll do that here:
1 |
|
2 |
Main() |
Step 17: Loading Screen

The Default.png file is an image that will be displayed right when you start the application while the iOS loads the basic data to show the Main Screen. Add this image to your project source folder, it will be automatically added by the Corona compiler.
Step 18: Icon

Using the graphics you created before, you can now create a nice and good looking icon. The icon size for the non-retina iPhone icon is 57x57px, but the retina version is 114x114px and the iTunes store requires a 512x512px version. I suggest creating the 512x512 version first and then scaling down for the other sizes.
It doesn't need to have the rounded corners or the transparent glare; iTunes and the iPhone will do that for you.
Step 19: Testing in the Simulator
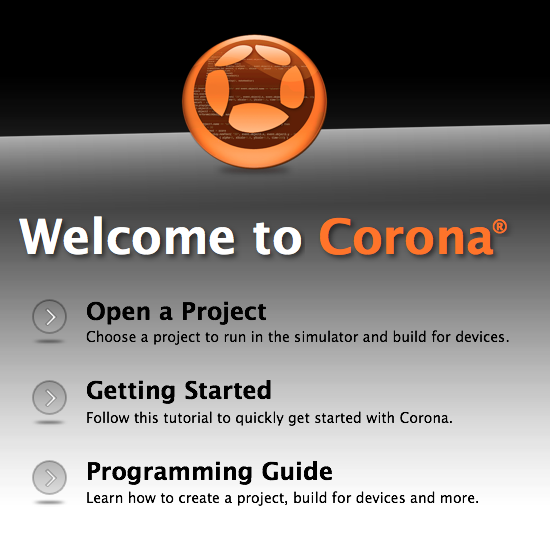
It's time to do the final test. Open the Corona Simulator, browse to your project folder, and then click open. If everything works as expected, you are ready for the final step!
Step 20: Build
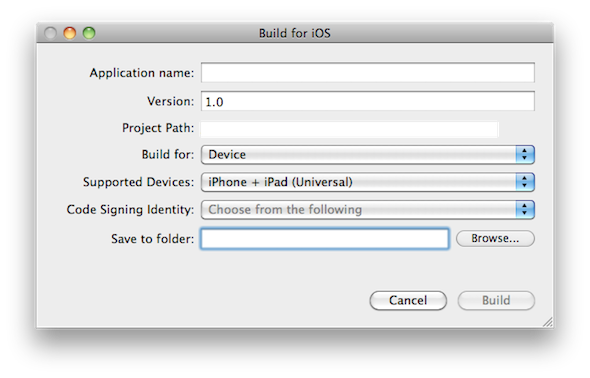
In the Corona Simulator go to File > Build and select your target device. Fill the required data and click build. Wait a few seconds and your app will be ready for device testing and/or submission for distribution!
Conclusion
In this tutorial you learned how to make our interface come to life by allowing the user to interact with the game's pieces. Experiment with the final result and try to make your own custom version of the game! I hope you liked this tutorial series and found it helpful. Thank you for reading!
 By
By


