
This is the second installment in our Corona SDK Cut the Rope Inspired tutorial. In today’s tutorial, we’ll add to our interface and code the game interaction. Read on!
Where We Left Off. . .
Please be sure to check part 1 of the series to fully understand and prepare for this tutorial.
Step 1: Start Button Listeners
This function adds the necesary listeners to the TitleView buttons.
1 |
|
2 |
function startButtonListeners(action) |
3 |
if(action == 'add') then |
4 |
playBtn:addEventListener('tap', showGameView)
|
5 |
creditsBtn:addEventListener('tap', showCredits)
|
6 |
else |
7 |
playBtn:removeEventListener('tap', showGameView)
|
8 |
creditsBtn:removeEventListener('tap', showCredits)
|
9 |
end |
10 |
end |
Step 2: Show Credits
The credits screen is shown when the user taps the about button. A tap listener is added to the credits view to remove it.
1 |
|
2 |
function showCredits:tap(e) |
3 |
playBtn.isVisible = false |
4 |
creditsBtn.isVisible = false |
5 |
creditsView = display.newImage('credits.png', 0, display.contentHeight)
|
6 |
|
7 |
lastY = titleBg.y |
8 |
transition.to(titleBg, {time = 300, y = (display.contentHeight * 0.5) - (titleBg.height + 50)})
|
9 |
transition.to(creditsView, {time = 300, y = (display.contentHeight * 0.5) + 35, onComplete = function() creditsView:addEventListener('tap', hideCredits) end})
|
10 |
end |
Step 3: Hide Credits
When the credits screen is tapped, it'll be tweened out of the stage and removed.
1 |
|
2 |
function hideCredits:tap(e) |
3 |
transition.to(creditsView, {time = 300, y = display.contentHeight + 25, onComplete = function() creditsBtn.isVisible = true playBtn.isVisible = true creditsView:removeEventListener('tap', hideCredits) display.remove(creditsView) creditsView = nil end})
|
4 |
transition.to(titleBg, {time = 300, y = lastY});
|
5 |
end |
Step 4: Show Game View
When the Start button is tapped, the title view is tweened and removed revealing the game view. There are many parts involved in this view, so we'll split them in the next steps.
1 |
|
2 |
function showGameView:tap(e) |
3 |
transition.to(titleView, {time = 300, x = -titleView.height, onComplete = function() startButtonListeners('rmv') display.remove(titleView) titleView = nil end})
|
Step 5: Add Instructions
This code places the instructions image in the stage.
1 |
|
2 |
-- Instructions |
3 |
|
4 |
ins = display.newImage('instructions.png', 205, 360)
|
Step 6: Dog
Next we add the Dog image and place it in the center of the stage.
1 |
|
2 |
-- Dog |
3 |
|
4 |
dog = display.newImage('dog.png', 128, 408)
|
5 |
dog.name = 'dog' |
Step 7: Shadow Stars
This part creates the stars in the left corner.
1 |
|
2 |
-- Shadow Stars |
3 |
|
4 |
s1 = display.newImage('starShadow.png', 3, 3)
|
5 |
s2 = display.newImage('starShadow.png', 33, 3)
|
6 |
s3 = display.newImage('starShadow.png', 63, 3)
|
Step 8: Physics
Now we add physics to the Dog and call the functions that will load the level and add the game listeners.
1 |
|
2 |
-- [Set Dog Physics] |
3 |
|
4 |
physics.addBody(dog, 'static', {radius = 14})
|
5 |
dog.isSensor = true |
6 |
|
7 |
loadLevel(1) |
8 |
gameListeners('add')
|
Step 9: Load Level
The following code uses a double for and a two dimensional table to place the level in the stage. First we check every item in the table to see if it's a 1 which represents the hanger. Next we chek for 2's which represents the stars. In true, a variable is created and physics is added to the body.
1 |
|
2 |
function loadLevel(n) |
3 |
for i = 1, 10 do |
4 |
for j = 1, 10 do |
5 |
if(l1[j][i] == 1) then |
6 |
hang = display.newImage('hang.png', i*31, j*32)
|
7 |
physics.addBody(hang, 'static', {radius = 8})
|
8 |
|
9 |
bone = display.newImage('bone.png', i*29.5, j*32 + (90))
|
10 |
physics.addBody(bone, 'dynamic', {shape = {-21.5, -5.5, 18.5, -12.5, 20.5, 2.5, -18.5, 11.5}})
|
11 |
elseif(l1[j][i] == 2) then |
12 |
local star = display.newImage('star.png', i*29, j*28)
|
13 |
star.name = 'star' |
14 |
physics.addBody(star, 'static', {radius = 15})
|
15 |
star.isSensor = true |
16 |
end |
17 |
end |
18 |
end |
Step 10: Add Rope
Another for is used to add the rope. It is composed of 8 parts that are stored in a display Group.
1 |
|
2 |
-- Add Rope |
3 |
|
4 |
for k = 1, 8 do |
5 |
local ropePart = display.newImage('rope.png', hang.x - 3, (hang.y-3) + k*10) --10 = rope part height
|
6 |
ropePart.name = 'rope' |
7 |
|
8 |
physics.addBody(ropePart) |
9 |
ropeParts:insert(ropePart) |
Step 11: Joints
In this part we use physics joints to "glue" the parts of the rope, the rope to the hanger and the rope to the bone.
1 |
|
2 |
-- Hang joint |
3 |
|
4 |
if(k == 1) then |
5 |
local hangJoint = physics.newJoint('pivot', hang, ropePart, hang.x - 3, hang.y)
|
6 |
end |
7 |
|
8 |
-- Rope Joints |
9 |
|
10 |
if(k > 1) then |
11 |
local joint = physics.newJoint('pivot', ropeParts[k-1], ropeParts[k], hang.x - 3, ropePart.y)
|
12 |
end |
13 |
|
14 |
-- Bone joint |
15 |
|
16 |
if(k == 8) then |
17 |
local boneJoint = physics.newJoint('pivot', ropePart, bone, hang.x - 3, ropePart.y)
|
18 |
end |
19 |
end |
20 |
end |
Step 12: Game Listeners
This function adds the necessary listeners to start the game logic.
1 |
|
2 |
function gameListeners(action) |
3 |
if(action == 'add') then |
4 |
bone:addEventListener('collision', starBoneCollision)
|
5 |
bg:addEventListener('touch', drawLine)
|
6 |
else |
7 |
bone:removeEventListener('collision', starBoneCollision)
|
8 |
bg:removeEventListener('touch', drawLine)
|
9 |
end |
10 |
end |
Step 13: Draw Line
This function uses the touch event and its phases to create a line in the stage when its swiped. It calculates the starting points in the began phase, draws when the finger is moved, and stops when it is lifted.
1 |
|
2 |
function drawLine(e) |
3 |
if(e.phase == 'began') then |
4 |
initX = e.x |
5 |
initY = e.y |
6 |
elseif(e.phase == 'moved') then |
7 |
line = display.newLine(initX, initY, e.x, e.y) |
8 |
physics.addBody(line, 'static') |
9 |
line.isSensor = true |
10 |
line:addEventListener('collision', ropeCollision)
|
11 |
line.width = 5 |
12 |
lines:insert(line) |
13 |
elseif(e.phase == 'ended') then |
14 |
display.remove(lines) |
15 |
lines = nil |
16 |
lines = display.newGroup() |
17 |
end |
18 |
end |
Step 14: Rope Collision
When the line collides with the rope, a part is removed, breaking the joint and making the bone fall.
1 |
|
2 |
function ropeCollision(e) |
3 |
if(e.other.name == 'rope') then |
4 |
display.remove(e.other) |
5 |
end |
6 |
end |
Step 15: Star-Bone Collision
This function checks if the bone touches a star, fills a shadow star and plays a sound when true.
1 |
|
2 |
function starBoneCollision(e) |
3 |
if(e.other.name == 'star') then |
4 |
display.remove(e.other) |
5 |
audio.play(starSnd) |
6 |
collected = collected + 1 |
7 |
|
8 |
if(collected == 1) then |
9 |
local s1 = display.newImage('star.png', -10, -10)
|
10 |
elseif(collected == 2) then |
11 |
local s2 = display.newImage('star.png', 21, -10)
|
12 |
elseif(collected == 3) then |
13 |
local s3 = display.newImage('star.png', 51, -10)
|
14 |
end |
Step 16: Bone-Dog Collision
A sound plays and an alert is called when the dog catches the bone.
1 |
|
2 |
elseif(e.other.name == 'dog') then |
3 |
display.remove(e.target) |
4 |
audio.play(bite) |
5 |
|
6 |
alert() |
7 |
end |
8 |
end |
Step 17: Alert
This function will stop the game and display the Level Complete message by using the alert background and tweening it.
1 |
|
2 |
function alert() |
3 |
gameListeners('rmv')
|
4 |
alert = display.newImage('alert.png', (display.contentWidth * 0.5) - 105, (display.contentHeight * 0.5) - 55)
|
5 |
transition.from(alert, {time = 300, xScale = 0.5, yScale = 0.5})
|
6 |
|
7 |
-- Wait 1 second to stop physics |
8 |
timer.performWithDelay(1000, function() physics.stop() end, 1) |
9 |
end |
Step 18: Call Main Function
In order to start the game, the Main function needs to be called. With the above code in place, we'll do that here:
1 |
|
2 |
Main() |
Step 19: Loading Screen

The Default.png file is an image that will be displayed right when you start the application while the iOS loads the basic data to show the Main Screen. Add this image to your project source folder, it will be automatically added by the Corona compliler.
Step 20: Icon

Using the graphics you created before, you can now create a nice and good looking icon. The icon size for the non-retina iPhone icon is 57x57px, but the retina version is 114x114px and the iTunes store requires a 512x512px version. I suggest creating the 512x512 version first and then scaling down for the other sizes.
It doesn't need to have the rounded corners or the transparent glare; iTunes and the iPhone will do that for you.
Step 21: Testing in the Simulator

It's time to do the final test. Open the Corona Simulator, browse to your project folder, and then click open. If everything works as expected, you are ready for the final step!
Step 22: Build
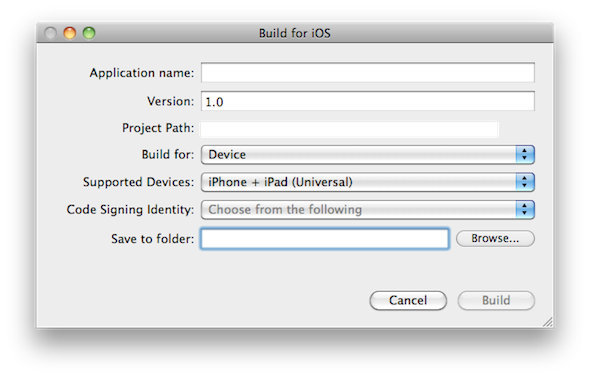

In the Corona Simulator, go to File > Build and select your target device. Fill the required data and click build. Wait a few seconds and your app will be ready for device testing and/or submission for distribution!
Conclusion
Experiment with the final result and try to make your custom version of the game!
I hope you liked this tutorial series and find it helpful. Thank you for reading!
 By
By


