- Overview
- Transcript
2.9 Package Control
Will bond's package control is a required install for all Sublime Text 2 users. I'll show you why in this lesson.
Related Links
Note
Package Control provides slightly different versions of the installation command for Sublime Text versions 2 and 3. Be sure to use the right one for your editor.
1.Introduction1 lesson, 02:05
1.1Welcome02:05
2.Getting Started9 lessons, 35:20
2.1Installation and Base Settings04:54
2.2Services and Opening Sublime From the Terminal02:20
2.3Multiple Cursors and Incremental Search06:54
2.4The Command Palette04:13
2.5Instant File Changing03:19
2.6Symbols04:17
2.7Key Bindings02:33
2.8Installing Plugins Without Package Control02:54
2.9Package Control03:56
3.Snippets3 lessons, 14:40
3.1Your First Snippet09:04
3.2Adding Snippets Through Package Control02:32
3.3Easier Testing With Snippets03:04
4.Essential Plugins12 lessons, 46:58
4.1Zen Coding07:09
4.2Emmet06:52
4.3Cross-Browser CSS With Prefixr02:17
4.4Fetch Files With Ease 04:22
4.5Lightning Fast Folder and File Creation 02:12
4.6Sidebar Enhancements03:09
4.7Sublime Linter02:01
4.8Sexy Code Snippet Management With Gists07:50
4.9DocBlockr03:49
4.10Pretty Task Management02:42
4.11HTTP Requests Within Sublime02:29
4.12LiveReload02:06
5.Tips, Techniques and Modifications8 lessons, 49:09
5.1Regular Expressions in Sublime05:49
5.2Vintage Mode10:46
5.3Quicker Stylesheet References02:30
5.4Joining Lines04:40
5.5Sublime and Markdown with Marked03:10
5.6All About Projects 05:54
5.7Configuring and Mastering Split Windows07:19
5.8Custom Builds09:01
6.Closing1 lesson, 00:49
6.1Conclusion00:49
2.9 Package Control
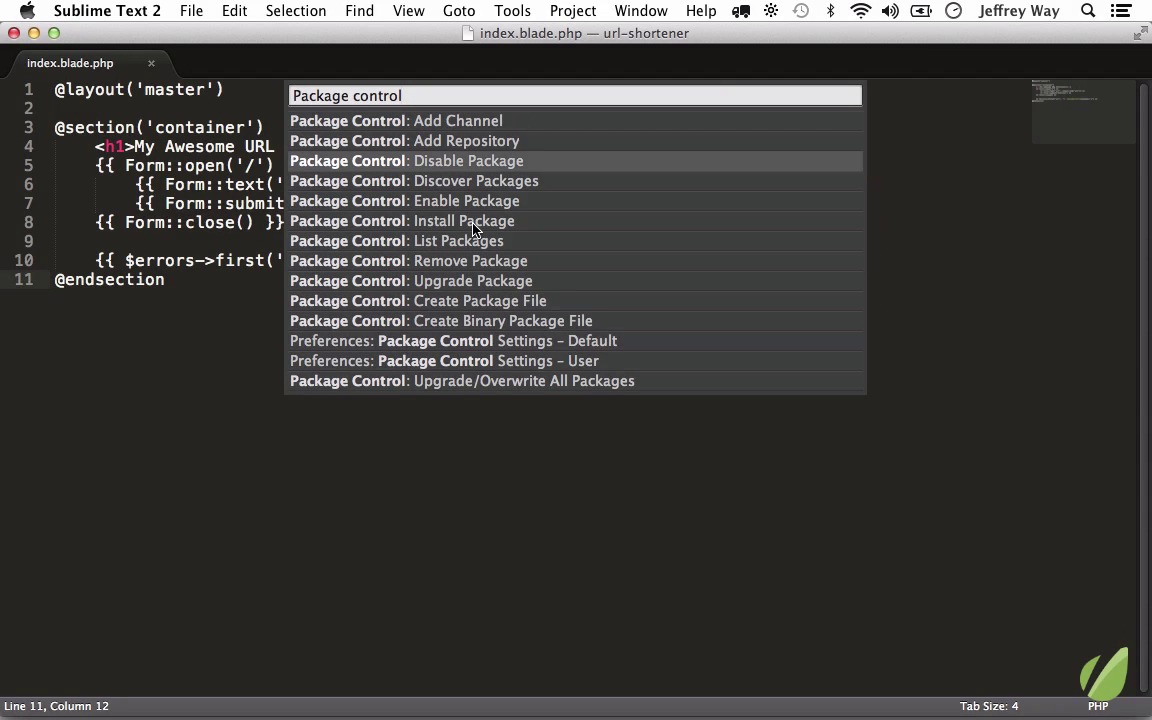
In one of the previous lessons, I made a note that this file uses a PHP templating engine called Blade. But the problem is that Sublime doesn't have any Blade syntax highlighting support. So I noted that in the future, I would show you how you could set that up in around five seconds. So let's tackle that in this lesson. Now I should note that I mean five seconds as soon as you've installed the necessary tools. So the tool we need was created by Will Bond. It's called Package Control, and this is a necessity for every Sublime Text user. Whether you're a simple, occasional or you're a power user. To download Package Control, we need to go to Will Bond's site. There will be a link to this below the video. And what this is, is it's essentially a package manager. So any packages or plugins created by the community, can be added to this repository. And then, when you need to download them, you can do so directly from your editor. You can probably imagine with some of your old editors, you would find something you wanted to use, it would be on somebody's website. You would download the zip file and you'd have to figure out where am I supposed to drag these files? Ir was all very complicated. But in Sublime Text with Package Control, it's four or five seconds and you're done. So the first step, we need to install it, and all we have to do is copy this line right here and we're going to paste this into Sublime's console. So I'll go back to Sublime and I will hit Ctrl + tilde, and I'm gonna paste in that text right there and hit Return. Now it's done, so we see, please restart Sublime. So let's close that out. Open it up one more time, and now package control is available to us. So we can access that in two ways. We can go to Sublime > Preferences > Package Control, or once again let's just search for it. Package control. And now you see all of the options that are available to you. So nine times outta ten, what you're going to be most interested in is installing a package. But there's also upgrade packages, as well as disable package. So in our case, we want install. So I will click that. But an easier way, because you will be doing this all the time, is to bring up the command pallet and just type install. Install > Enter and now we have a list of all of the items in that repo that are available and there is a lot. In this course we are going to be going over a handful of the ones that I find to be most convenient in my daily workflow. So in our case. I don't even know what the package is that I need, I just know I need syntax highlighting for Blade, so let's figure it out. Shift command p install, and I'm gonna look for Blade. And take a look here's four of them. We have blade snippets and those will be shortcuts, I'm not gonna worry about that. Laravel blade, blade syntax highlighting support and that's exactly what we need. So I'm gonna hit enter and take a look at the bottom of the screen. Laravel successfully installed Blade, and we don't even have to restart. Now if I hit Shift+Cmd+B to bring up all the syntaxes, and I type blade, now we have that option. So when I said five seconds, I literally meant five seconds. Hit Enter, and now we have Blade support. Let's try another one just to see the workflow. We're gonna create a new file and we'll save it as module.coffee. WIthin the public directory, just put it in the JS folder for now. Coffee script is a language on top of JavaScript. So we can say name equals Jeff without using semicolons or var, and I could say console.log great if name equals Jeff. You can do stuff like that. But without syntax highlighting support, this is very difficult to read. So let's see if it's built-in. Coffee script, nope, I don't see that there. I can browse through syntax. Nope, it's not there. Well let's install it. Shift+Cmd+P, install, coffee scripts and there is a couple here but what I want is the syntax highlighting version. That's installed. Now we can add coffee script, and now we have support for coffee script syntax highlighting. So cool.


