
 Lessons: 33Length: 4.8 hours
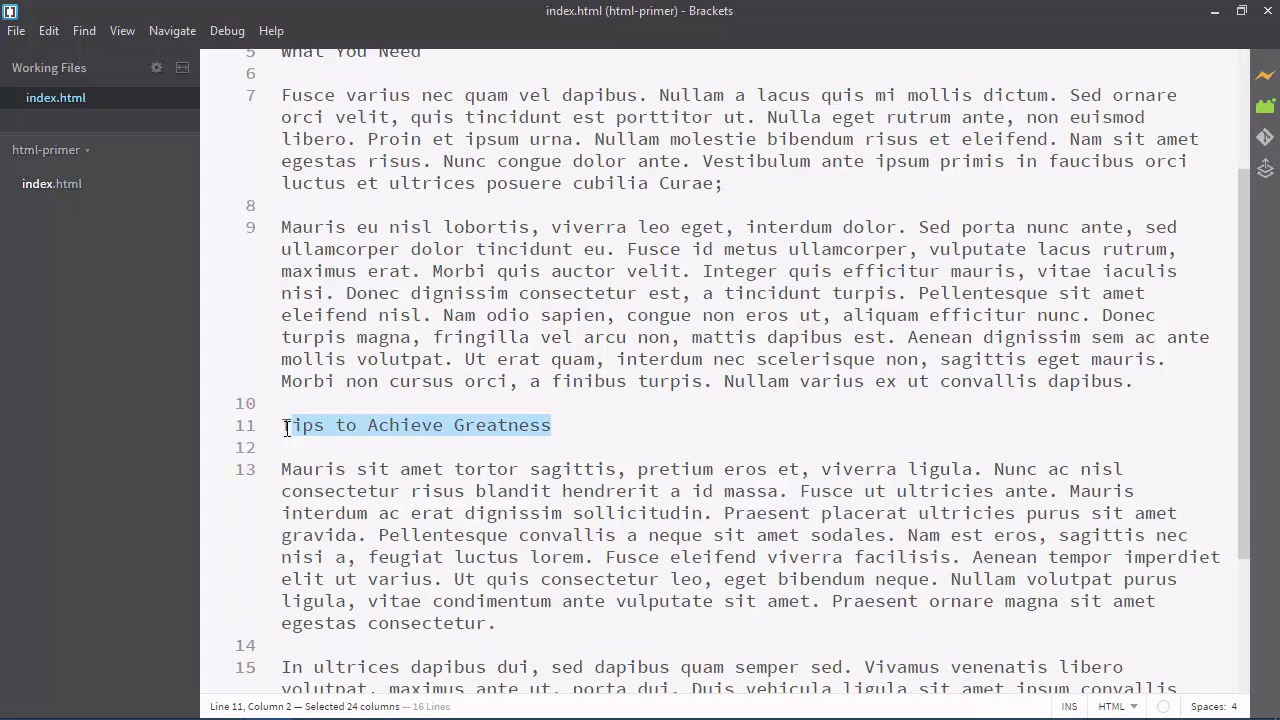
- Overview
- Transcript
3.1 Marking Up a Document
An HTML document is more than just ordinary text—it's text that we "mark up" with HTML elements. We'll mark up a simple document in this lesson.
Related Links
1.Introduction
1.1Introduction01:51
1.2What You Need04:34
2.How the Web Works
2.1Networks and DNS09:20
2.2HTTP and the Web Server06:43
3.Creating Documents
3.1Marking Up a Document09:38
3.2Making Our Document Valid06:22
3.3Semantic and Generic Elements11:13
4.Styling Documents
4.1Adding Style08:17
4.2CSS Selectors16:15
4.3Modifying Layout09:35
5.Scripting Documents
5.1Variables and Functions09:06
5.2Writing Your Own Functions05:34
5.3Objects07:56
6.The Document Object Model
6.1DOM Basics08:58
6.2Finding Elements07:40
6.3Working With `NodeLists`04:30
6.4Manipulating an Element's CSS Classes04:29
6.5Listening for Events08:42
6.6Practicing the Concepts08:26
7.HTTP Requests With JavaScript
7.1The fetch() API09:16
8.Introduction to Server-Side Development
8.1Introduction to Server-Side Development10:31
8.2Your First Line of PHP Code06:57
8.3Functions and Variables08:00
8.4Parameters and Decisions08:13
8.5Getting Data From the User09:43
9.Getting Started With Databases
9.1Create a Users Table12:00
9.2Create a Posts Table10:20
9.3Inserting Data08:41
10.Using PHP to Interact With MySQL
10.1Reading and Displaying Data12:34
10.2Passing and Validating Data11:58
10.3Updating Data14:52
10.4Joining Data (And Deleting Posts)12:35
11.Conclusion
11.1Conclusion01:47
3.1 Marking Up a Document
HTML stands for hypertext markup language. It is the language that we use to well, mark up our documents. And that is the terminology that we use. We are working with HTML documents. Yes, they are web pages, but technically they are documents. So you can think of it to like a document that you would edit within a word processor. All of the markup is still there. It's just usually hidden from you. And it's a different type of markup. It's not HTML.. But whenever you set certain text as a heading or you bold something or telesis it or change the font size. You are marking up that document. And the same is true for HTML. So while this document that I have open here has some structure to it. Whenever we view this in the browser in a few moments. We're going to see that all of the structure is gone because it is not marked up. But before we do that, let's briefly go over brackets. Because this is the first lesson where we are actually working with this code editor. So with brackets, the idea is that you are working with a project. And a project is basically all of the folders and files inside of another folder. So if we go to my documents and I have a folder called web dev. And this is where I'm going to put all of the source files for this course. And then I have another folder called HTML primer. That is the project for this lesson. So if we go inside of this folder, we see that I just have this index HTML. And if I had other files, they would of course be listed here. So whenever I opened up brackets, I went to file Open Folder. And then I navigated to the HTML primer folder, because this is the project that I want to work with inside of brackets. So whenever I selected that folder, we see up here HTML primer. That's the name of this project and then all of the files inside of this folder. And that is just this one file called index HTML. Now, if I go back and open up the web dev folder, then we're going to see that things change. web dev is now the project. And then inside of that is a folder called HTML primer. And we know that it's a folder because you can expand it and see the other files that are inside of there. But I'm going to change this back to open folder. And then HTML primer. And then once you open up your folder, you can go to File ,New. And then you would create a new document. Just save it and then name it. In this case, I called it index HTML and you should do the same. So create that file. And then you will have something that you can start with for this lesson. Now, this file is going to be available in the code, download. So feel free to download it and use that if you want to. I don't expect you to write all of this. Most of this is just lorem ipsum text. Now the HTML extension is very important that tells the operating system what to do with the file. It also tells the web server what to do with the file. If it sees that it needs to serve an HTML file, then it knows how to do that. The extension also tells the code editor how to display the text here. Now right now all we see is just plain text. And that's because we don't have any HTML in this file. But whenever we start adding HTML, you will see the difference between HTML and just normal text. Because brackets will know how to color code, the HTML. So before we get into that, let's go ahead and go over to this lightning bolt, in the top right corner. If you click on that, that's going to fire up The Live Preview so that we can see this document in the browser. Now notice that all the text is jumbled together. And if we view the source code of this webpage, we're going to see that we still have the formatting here. But here's the thing. Without any HTML, the browser is just going to take all of the text. And it's going to replace all of the white space with just a single space. So all of these line breaks it removed, and replaced it with just a single space. That's why we have this jumbled mess of text. So what we are going to do is add markup, so that the browser will know how to display our document. So let's go back to our code editor and we're going to start with the headings. Because there are some things inside of this text that stick out as headings. First is this Introduction to Web Development, that could also serve as the title for this document. Then there is what you need, and then tips to achieve greatness. So as we are marking up this document, we can think of this introduction to web development as a large size heading. And then, for what you need. And then for tips to achieve greatness, then we would have a smaller size headings. So that introduction to web development is the most important heading. So we'll start by adding what are called opening and closing tags. That is what we have in HTML. A tag begins with a less than sign. And then there is specific names for the tags. Now for headings, we have h1, and then h2. And we can see from this code completion window here that we have several options. We have h1 that is the highest or the largest heading in all list. And the smallest heading that we have is h6. So since this is the most important heading, we're going to go with h1. So we have our less than sign, then the tag name h1 and then a greater than sign and brackets already created. What we call a closing tag. So in between the opening and closing tags, we have our text. So basically we have marked this up as the largest heading that we can have. And we did so with an opening h1 tag and in a closing h1 tag. Now this is closing simply because it has that slash, otherwise it would be an opening. Now most tags have opening and closing tags. There are some that have just an opening tag, there are others that can be self closing. And we'll get into that later on. But for now, we're just going to go over the process of marking up this document with some very simple tags. So we have our big heading. Now we want a smaller heading for what you need. Because this is a heading but it's less important than our first heading. So we can go with something like h2. But I'm going to go with h3 and then I'm going to put what you need inside of these opening and closing tags. So we have marked up this heading and we will essentially do the same thing for this other headings. So we will have h3 there, and we will put our heading text in between the opening and closing tags. Now I don't want to confuse you, but we call these tags, but the opening and closing tags together are called an element. So if we have h3 and then closing h3, this is the h3 element. And an element is made up of an opening and closing tag. So we have our headings and if we go back to the browser, let's refresh. We see our headings now. So we're getting somewhere. But notice how the paragraphs are a little different. This first paragraph looks fine. But once again, if we view the source, we have two paragraphs for the heading of what you need. And whenever it's rendered in the browser, we just have one. So, we need to mark up our paragraphs so that the browser knows where a paragraph begins and ends. We do that with an element called P. So we have an opening tag of P, and a closing tag of P. And when we put the paragraph inside of the opening and closing P tags. So we will basically do this for all of our paragraphs. And this is telling the browser that we have headings, and then we also have paragraphs. So whenever we go back to the browser, we are going to see the distinction between especially these two paragraphs. And these two paragraphs. So let's go back to the browser. We will refresh and now we have our marked up document. Now I fully understand if this looks completely weird to you. Because we have all been in your shoes, but this is how we create webpages. We have our documents and we've been, mark it up with what are called elements. An element is made up of an opening tag and a closing tag. And there are some exceptions to that rule. But for right now just think of it that way. These elements have have special names. H1 tells the browser to display a heading, h3 tells the browser to display a heading but it is a smaller sized heading than h1. The P element tells the browser to display the text inside of the opening and closing tags as a paragraph. And there are of course, many, many more elements. And we will be going over quite a few of them within the next few lessons.


