

This tutorial is the first of three which discuss how to give some Artificial Intelligence (AI) to games and apps you create. In this first tutorial we are going to learn about path finding.
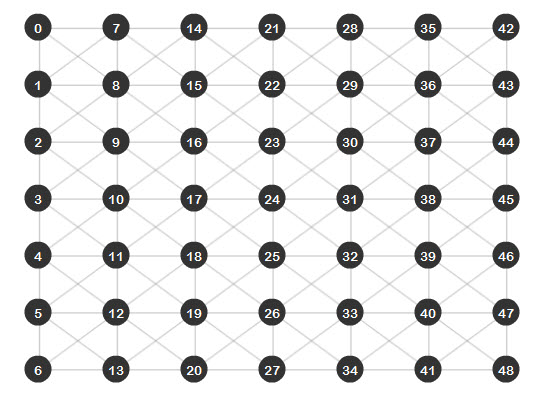
Final Result Preview
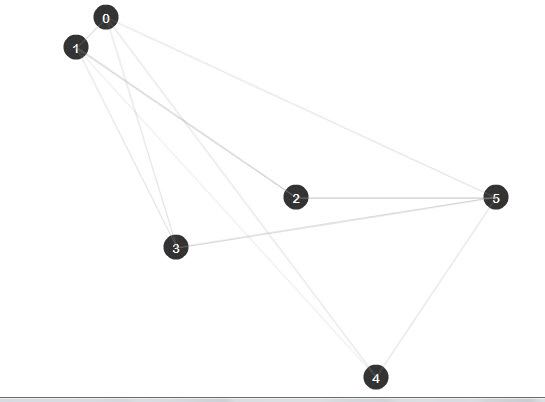
Let's take a look at the final result we will be working towards:
Click a point, then another point and the AI will figure out a shortest possible path to get between them. You can use the drop-down list to select the AI algorithm to use.
Step 1: AI Series Overview
This tutorial will be the first of three which will discuss giving Artificial Intelligence (AI) to games and apps you create. You might think that this sounds just too hard, but it is actually pretty simple! I will explain two key aspects of the AI in games and then create a cool game using what we learn. I hope you enjoy following this short series!
Step 2: Introduction
In games, one of the most important aspects is to make it very efficient, to do what it has to do using minimal resources. There's a whole science just for that.
In this tutorial we are going to cover a key aspect in game development: pathfinding. We will discuss the 2 best methods, how they work, how we make them work in AS3, then last but not least, when to use them. Let's start..
Step 3: So What's Pathfinding About?
Suppose you are in the middle of a forest with 50 different potential routes in front of you, you have almost no energy and need to find the best way out, how would you do it?
One option would be to follow each of the 50 routes; a trial and error method. You will certainly get out but that would take too much time. This isn't a new problem and many people have come up with ideas of how to solve it. One of them was Edsger W. Dijkstra who developed an algorithm to get the shortest path given a graph, a source and a target.
Before we can start solving the problem, we must create those elements, the graph which contains all the information, the nodes which are the waypoint of the graph, and the edges that connect the nodes. Think of it as the graph being a map: the nodes are the cities and the edges the highways that connect them.
Step 4: Setting up the Project
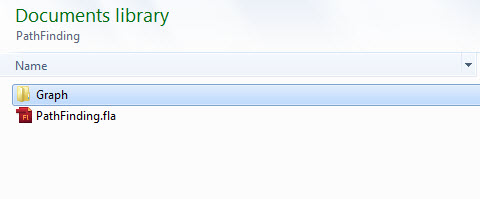
Before we start coding, let's first set up our workspace. Create a new folder and name it "PathFinding". Inside it create another folder and name it "Graph". Then in the PathFinding folder create a new Flash (AS3) FLA file and call it "PathFinding".
Step 5: Creating the Node Symbol
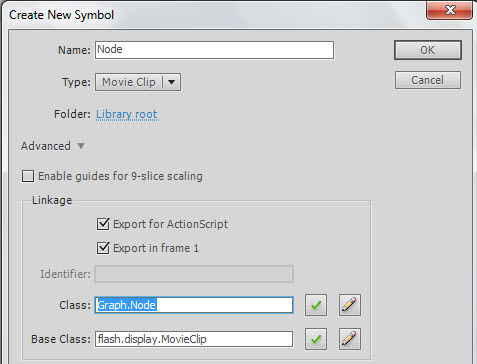
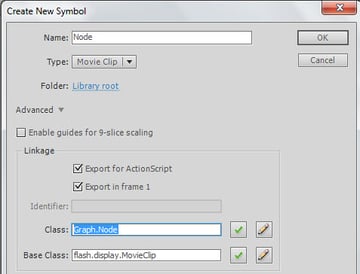
In the "PathFinding.fla" file, go to Insert > New Symbol and create a new MovieClip called Node. Select "export for actionscript" and as the class write "Graph.Node"
Step 6: Drawing the Node
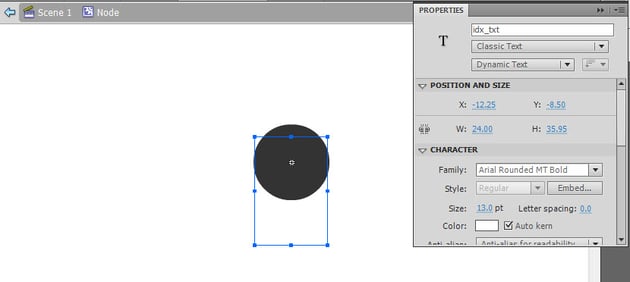
Inside the Node Movieclip, create a new Circle with a radius of 25 and place it in the center. Then add a new text box, make it Dynamic and give it an instance name of "idx_txt" and position it at the center of the stage.


Step 7: Creating the Node
Each node is composed of 2 main elements; an index in order to identify it, and its position on the graph. With this in mind create a new class inside the Graph folder/package and name it "Node". Make it extend the sprite class, then just add two variables: one int for the index, and a Vector3D for the position. Also, add their corresponding set and get methods:
1 |
|
2 |
package Graph |
3 |
{
|
4 |
import flash.display.Sprite; |
5 |
import flash.geom.Vector3D; |
6 |
|
7 |
public class Node extends Sprite |
8 |
{
|
9 |
private var pos:Vector3D; |
10 |
private var index:int; |
11 |
public function Node(idx:int,n_Pos:Vector3D) |
12 |
{
|
13 |
index=idx; |
14 |
pos=n_Pos; |
15 |
this.x=n_Pos.x; |
16 |
this.y=n_Pos.y; |
17 |
idx_txt.text=String(idx) |
18 |
}
|
19 |
|
20 |
public function getIndex():int |
21 |
{
|
22 |
return index; |
23 |
}
|
24 |
public function setPos(n_Pos:Vector3D):void |
25 |
{
|
26 |
pos=n_Pos; |
27 |
}
|
28 |
|
29 |
public function getPos():Vector3D |
30 |
{
|
31 |
return pos; |
32 |
}
|
33 |
}
|
34 |
}
|
Step 8: Creating the Edge
The edge contains three elements: the indices of the two nodes that it connects, and its "cost" (or distance between nodes in this case). Again in the Graph package/folder create a new class and call it "Edge"; make it extend the Sprite class again.
Now add two ints for the nodes, and one Number for the cost, then add the corresponding set and get methods:
1 |
|
2 |
package Graph |
3 |
{
|
4 |
import flash.display.Sprite; |
5 |
import flash.geom.Vector3D; |
6 |
|
7 |
public class Edge extends Sprite |
8 |
{
|
9 |
private var from:int; //The index of the node from which this edge departs |
10 |
private var to:int; //The index of the node from which this edge arrives |
11 |
private var cost:Number; //The cost of crossing through this node (i.e. the distance) |
12 |
|
13 |
public function Edge(n_From:int,n_To:int,n_Cost:Number=1.0) |
14 |
{
|
15 |
from=n_From; |
16 |
to=n_To; |
17 |
cost=n_Cost; |
18 |
this.z=1; |
19 |
}
|
20 |
|
21 |
public function getFrom():int |
22 |
{
|
23 |
return from; |
24 |
}
|
25 |
|
26 |
public function setFrom(n_From:int):void |
27 |
{
|
28 |
from=n_From; |
29 |
}
|
30 |
|
31 |
public function getTo():int |
32 |
{
|
33 |
return to; |
34 |
}
|
35 |
|
36 |
public function setTo(n_To:int):void |
37 |
{
|
38 |
to=n_To; |
39 |
}
|
40 |
|
41 |
public function setCost(n_Cost:Number):void |
42 |
{
|
43 |
cost=n_Cost; |
44 |
}
|
45 |
|
46 |
public function getCost():Number |
47 |
{
|
48 |
return cost; |
49 |
}
|
50 |
/*
|
51 |
Since the edge is just a line that connects the nodes,
|
52 |
we will use this method to draw the edge, the style refers to how we will
|
53 |
want the edge to be
|
54 |
*/
|
55 |
public function drawEdge(fromPos:Vector3D,toPos:Vector3D,style:String="normal") |
56 |
{
|
57 |
switch(style) |
58 |
{
|
59 |
case "normal": |
60 |
//If it is normal, create a gray line
|
61 |
this.graphics.clear(); |
62 |
this.graphics.lineStyle(1, 0x999999, .3); |
63 |
this.graphics.moveTo(fromPos.x,fromPos.y); |
64 |
this.graphics.lineTo(toPos.x,toPos.y); |
65 |
break; |
66 |
case "path": |
67 |
//If it is a line from the path, create a black line
|
68 |
this.graphics.clear(); |
69 |
this.graphics.lineStyle(2, 0x000000,1); |
70 |
this.graphics.moveTo(fromPos.x,fromPos.y); |
71 |
this.graphics.lineTo(toPos.x,toPos.y); |
72 |
break; |
73 |
case "visited": |
74 |
//If it is a line used by the algorithm, create a red line
|
75 |
this.graphics.clear(); |
76 |
this.graphics.lineStyle(1, 0xFF0000,1); |
77 |
this.graphics.moveTo(fromPos.x,fromPos.y); |
78 |
this.graphics.lineTo(toPos.x,toPos.y); |
79 |
break; |
80 |
}
|
81 |
}
|
82 |
}
|
83 |
}
|
Step 9: Creating the Graph
The Graph is a more complex element since it must store all the information. In the Graph folder, create a new class and name it "Graph". Since it just contains data, there's no need to extend the Sprite class.
The graph will contain a Vector with all the nodes on the graph, another Vector with the edges that each node has and a static int in order to get the next index available for a node. This way, it will be easier to access all the elements in the graph, since the node index is the key of the edges vector, meaning that if you want to get the edges of a node with index 3, you access the edges vector at position 3 and you will get the edges for that node.
Now let's create these variables:
1 |
|
2 |
package Graph |
3 |
{
|
4 |
public class Graph |
5 |
{
|
6 |
private static var nextIndex:int=0; |
7 |
private var nodes:Vector.<Node>; |
8 |
private var edges:Vector.<Array>; |
9 |
|
10 |
public function Graph() |
11 |
{
|
12 |
nodes=new Vector.<Node>(); |
13 |
edges=new Vector.<Array>(); |
14 |
}
|
15 |
}
|
16 |
}
|
The graph also needs methods to add and get nodes, and edges:
1 |
|
2 |
package Graph |
3 |
{
|
4 |
public class Graph |
5 |
{
|
6 |
private static var nextIndex:int=0; |
7 |
private var nodes:Vector.<Node>; |
8 |
private var edges:Vector.<Array>; |
9 |
|
10 |
public function Graph() |
11 |
{
|
12 |
nodes=new Vector.<Node>(); |
13 |
edges=new Vector.<Array>(); |
14 |
}
|
15 |
//In order to get the node, we just ask for the index of it, and access the nodes vector with that key
|
16 |
public function getNode(idx:int):Node |
17 |
{
|
18 |
return nodes[idx]; |
19 |
}
|
20 |
|
21 |
//To get an edge, we ask for the two nodes that it connects,
|
22 |
//then we retrieve all the edges of the from node and search if one of them
|
23 |
//goes to the same node as the edge we are looking for, if it does, that's our edge.
|
24 |
public function getEdge(from:int,to:int):Edge |
25 |
{
|
26 |
var from_Edges:Array = edges[from] as Array; |
27 |
for(var a:int=0;a<from_Edges.length;a++) |
28 |
{
|
29 |
if(from_Edges[a].getTo()==to) |
30 |
{
|
31 |
return from_Edges[a]; |
32 |
}
|
33 |
}
|
34 |
return null; |
35 |
}
|
36 |
|
37 |
//To add a node to the graph, we first look if it already exist on it,
|
38 |
//if it doesn't, then we add it to the nodes vector, and add an array to the
|
39 |
//edges vector where we will store the edges of that node, finally we increase
|
40 |
//the next valid index int in order to give the next available index in the graph
|
41 |
public function addNode(node:Node):int |
42 |
{
|
43 |
if(validIndex(node.getIndex())) |
44 |
{
|
45 |
nodes.push(node); |
46 |
edges.push(new Array()); |
47 |
nextIndex++; |
48 |
}
|
49 |
return 0; |
50 |
}
|
51 |
//To add an edge we must first look if both nodes it connects actually exist,
|
52 |
//then we must see if this edge already exist on the graph, finally we add it
|
53 |
//to the array of edges of the node from where it comes
|
54 |
public function addEdge(edge:Edge):void |
55 |
{
|
56 |
if(validIndex(edge.getTo())&&validIndex(edge.getFrom())) |
57 |
{
|
58 |
if(getEdge(edge.getFrom(),edge.getTo())==null) |
59 |
{
|
60 |
(edges[edge.getFrom()]as Array).push(edge); |
61 |
}
|
62 |
}
|
63 |
}
|
64 |
|
65 |
//To get the edges of a node, just return the array given by the edges vector
|
66 |
//at node's index position
|
67 |
public function getEdges(node:int):Array |
68 |
{
|
69 |
return edges[node]; |
70 |
}
|
71 |
|
72 |
//This function checks if the node index is between the range of already added nodes
|
73 |
//which is form 0 to the next valid index of the graph
|
74 |
public function validIndex(idx:int):Boolean |
75 |
{
|
76 |
return (idx>=0&&idx<=nextIndex) |
77 |
}
|
78 |
|
79 |
//Just returns the amount of nodes already added to the graph
|
80 |
public function numNodes():int |
81 |
{
|
82 |
return nodes.length; |
83 |
}
|
84 |
|
85 |
//This is to redraw all the edges on the graph to get them to the normal style
|
86 |
public function redraw():void |
87 |
{
|
88 |
for each(var a_edges:Array in edges) |
89 |
{
|
90 |
for each(var edge:Edge in a_edges) |
91 |
{
|
92 |
edge.drawEdge(getNode(edge.getFrom()).getPos(),getNode(edge.getTo()).getPos()); |
93 |
}
|
94 |
}
|
95 |
}
|
96 |
|
97 |
//This function return the next valid node index to be added
|
98 |
public static function getNextIndex():int |
99 |
{
|
100 |
return nextIndex; |
101 |
}
|
102 |
}
|
103 |
}
|
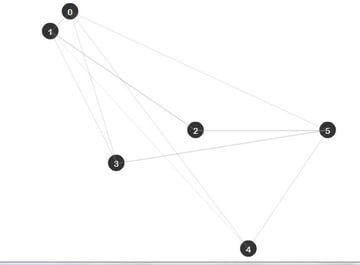
Step 10: Building a Graph
So now that we have all the elements needed, let's go ahead and build a graph.
In the PathFinding folder, create a new class and call it "Main", this will be our main class:
1 |
|
2 |
package{ |
3 |
import flash.display.Sprite; |
4 |
|
5 |
public class Main extends Sprite |
6 |
{
|
7 |
public function Main() |
8 |
{
|
9 |
|
10 |
}
|
11 |
}
|
12 |
}
|
Now we need to import the classes we just created since they are in the Graph folder. Then create two variables: one for the graph and another that is an array of the position of the nodes we want to add. After that just add those nodes and their edges:
1 |
|
2 |
package{ |
3 |
import flash.display.Sprite; |
4 |
import Graph.*; |
5 |
import flash.geom.Vector3D; |
6 |
|
7 |
public class Main extends Sprite |
8 |
{
|
9 |
var graph:Graph = new Graph(); |
10 |
//This array contains the position of the different nodes in the graph (x,y)
|
11 |
var nodes:Array =new Array( |
12 |
[110,20], |
13 |
[80,50], |
14 |
[300,200], |
15 |
[180,250], |
16 |
[380,380], |
17 |
[500,200] |
18 |
); |
19 |
//This array contains the edges that connects the different nodes (from,to)
|
20 |
var edges:Array = new Array( |
21 |
[0,1],[0,5],[0,3], |
22 |
[1,2],[1,0],[1,4], |
23 |
[2,1],[2,5], |
24 |
[3,1],[3,5], |
25 |
[4,0],[4,5], |
26 |
[5,2],[5,3] |
27 |
); |
28 |
public function Main() |
29 |
{
|
30 |
//A loop in order to create all the nodes
|
31 |
for(var a:int=0;a<nodes.length;a++) |
32 |
{
|
33 |
var node:Node = new Node(Graph.Graph.getNextIndex(), new Vector3D(nodes[a][0],nodes[a][1])); |
34 |
graph.addNode(node); |
35 |
addChild(node); |
36 |
}
|
37 |
//Another loop to create all the edges between nodes
|
38 |
for(var b:int=0;b<edges.length;b++) |
39 |
{
|
40 |
var from:int = edges[b][0]; |
41 |
var to:int = edges[b][1]; |
42 |
|
43 |
var edge:Edge = new Edge(from,to,Vector3D.distance(graph.getNode(from).getPos(),graph.getNode(to).getPos())); |
44 |
graph.addEdge(edge); |
45 |
//Since the drawEdge method requires the position vectors, we get the nodes
|
46 |
//from the graph with their index and then get their position with getPos()
|
47 |
edge.drawEdge(graph.getNode(from).getPos(),graph.getNode(to).getPos()); |
48 |
addChild(edge); |
49 |
}
|
50 |
}
|
51 |
}
|
52 |
}
|
Step 11: How to Choose the Right Path?
As I told you before there are many methods to obtain a path between two nodes, like the DFS(Deep First Search), or BFS(Broad First Search), but sometimes you don't just want to get a path that connect the nodes, you also want to get the "best" path, which most of the time will mean the one that takes less time or the closest, depending on what you want.
During this tutorial I will just refer to it as the one that costs less to follow. (In our case, remember "cost" means distance. In a game, you may wish to find the least dangerous path, or the one that uses least fuel, or the least visible...)
There are algorithms that work depending on the cost, the most important ones being the Dijkstra Algorithm and the A* (A-Star) Algorithm. Lets talk first about the Dijkstra Algorithm
Step 12: Introduction to Dijkstra Algorithm
This algorithm was created by Edsger Dijkstra in 1959. It advances depending on the cost that each edge represents, the edges with lower cost will always be chosen first so when you reach the target, you will be sure that the path is the lowest costing path available.
Step 13: How the Dijkstra Algorithm Works
Because this algorithm works with costs, we must have a place where we will be storing the cost of moving to each node from the source (the starting node); call this a cost vector.
For example if the source is the node 0, when we access the cost vector at position 3, this will return the lowest cost until now of moving from 0 to 3. We will also need a way of storing the shortest path: I'll explain the Shortest Path Tree in the next step.
The basic steps of the algorithm are the following:
- Take the closest node not yet analyzed.
- Add its best edge to the Shortest Path Tree.
- If it is the target node, finish the search.
- Retrieve all the edges of this node.
- For each edge calculate the cost of moving from the source node to the arrival Node.
- If the total cost of this edge is less than the cost of the arrival node until now, then update the node cost with the new one.
- Take the next closest node not yet analyzed.
- Repeat this until the target is reached, or there are no more nodes available.
An animation will make more sense. Here we are trying to get from 1 to 6:
Step 14: Algorithm's Main Elements
This algorithm is composed of different vectors that will store all the information needed, for example the costs of the nodes, or the best path until now. I will explain this better:
- The costs vector : Here we will store the best cost until now of reaching a certain node from the source. For example if the source node is 3 and we access element 6 of the cost vector, we will obtain the best cost found so far of moving from 3, the source node, to the node 6.
- The Shortest Path Tree (SPT): This vector contains the lowest cost edge to get to a specific node. This means that if we access the element 7 of the SPT, it will return the best edge to access that node.
- The Search Frontier (SF): This vector will store the best edge to get to a specific node, almost the same as the SPT, but this will have all the nodes that are not yet in the SPT. This means that the SF will work as a test area where we will test all the edges for one node, when all the edges are analyzed we will be sure that the SF contains the best one, so we can then add it to the SPT.
- The Indexed Priority Queue (pq): A priority queue is a data structure which always keep its elements in an ordered way. As the algorithm needs to first get the lowest cost node, this structure will keep the nodes in a descending order depending on their cost, but because we want to retrieve the index of the node and not the cost itself, we use an indexed priority queue. For example, if the first element of the pq is node 4, this will mean that it is the one with the lowest cost.
Note: AS3 doesn't contain many data structures including the Indexed Priority Queue, so I coded one to use in this tutorial. To get it just download the source files and import the utils folder to the PathFinding folder. The class is utils.IndexPriorityQ.
Step 15: Create an Algorithm Folder
Before we start coding, in the PathFinding folder, create a new Folder and call it "Algorithms".
In this new folder, create a new AS3 class named "Dijkstra":
1 |
|
2 |
package Algorithms { |
3 |
|
4 |
public class Dijkstra { |
5 |
|
6 |
public function Dijkstra() { |
7 |
|
8 |
}
|
9 |
|
10 |
}
|
11 |
|
12 |
}
|
Step 16: The Dijkstra Algorithm in AS3
Now let's code the Algorithm. It will need three basic things: the graph itself, the source node and the target node; but we must also create the vectors we just talked about (Cost,SPT,SF). Remember to import the Graph classes:
1 |
|
2 |
package Algorithms { |
3 |
|
4 |
import Graph.Edge; |
5 |
import Graph.Graph; |
6 |
import utils.IndexedPriorityQ; |
7 |
|
8 |
public class Dijkstra { |
9 |
|
10 |
private var graph:Graph //The graph where the search will be made |
11 |
private var SPT:Vector.<Edge>; //The Shortest path tree containing edges |
12 |
private var cost2Node:Vector.<Number>; //The Cost vector containing numbers |
13 |
private var SF:Vector.<Edge>; //The Search Frontier containing edges |
14 |
private var source:int; //Where will the search start |
15 |
private var target:int; //Where will the search end |
16 |
|
17 |
public function Dijkstra(g:Graph) { |
18 |
|
19 |
}
|
20 |
|
21 |
}
|
22 |
|
23 |
}
|
Step 17: The Search Function
Once we have set up the class, we can start coding the algorithm which will be in the "Search" function. I will explain the code with comments, so If you still have some questions return to Steps 12 and 13 to remind yourself how this algorithm works:
1 |
|
2 |
private function search():void |
3 |
{
|
4 |
//This will be the indexed priority Queue that will sort the nodes
|
5 |
var pq:IndexedPriorityQ = new IndexedPriorityQ(cost2Node) |
6 |
//To start the algorithm we first add the source to the pq
|
7 |
pq.insert(source); |
8 |
//With this we make sure that we will continue the search until there are no more nodes on the pq
|
9 |
while(!pq.isEmpty()) |
10 |
{
|
11 |
|
12 |
/* 1.- Take the closest node not yet analyzed */
|
13 |
|
14 |
//We get the Next Closest Node (NCN) which is the first element of the pq
|
15 |
var NCN:int = pq.pop(); |
16 |
|
17 |
/* 2.-Add its best edge to the Shortest Path Tree (Its best edge is stored on the SF) */
|
18 |
|
19 |
SPT[NCN]=SF[NCN]; |
20 |
|
21 |
//This will color the actual edge red in order to see which edges the algorithm has analyzed
|
22 |
if(SPT[NCN]) |
23 |
{
|
24 |
SPT[NCN].drawEdge( |
25 |
graph.getNode(SPT[NCN].getFrom()).getPos(), |
26 |
graph.getNode(SPT[NCN].getTo()).getPos(), |
27 |
"visited"
|
28 |
); |
29 |
}
|
30 |
|
31 |
/* 3.- If it is the target node, finish the search */
|
32 |
|
33 |
if(NCN==target)return; |
34 |
|
35 |
/* 4.- Retrieve all the edges of this node */
|
36 |
|
37 |
var edges:Array=graph.getEdges(NCN); |
38 |
|
39 |
//With this loop we will analyze each of the edges of the array
|
40 |
for each(var edge:Edge in edges) |
41 |
{
|
42 |
/* 5.- For each edge calculate the cost of moving from the source node to the arrival Node */
|
43 |
|
44 |
//The total cost is calculated by: Cost of the node + Cost of the edge
|
45 |
var nCost:Number = cost2Node[NCN]+edge.getCost(); |
46 |
|
47 |
//If the arrival node has no edge on the SF, then add its cost to the
|
48 |
//Cost vector, the arrival node to the pq, and add the edge to the SF
|
49 |
if(SF[edge.getTo()]==null) |
50 |
{
|
51 |
cost2Node[edge.getTo()]=nCost; |
52 |
pq.insert(edge.getTo()); |
53 |
SF[edge.getTo()]=edge; |
54 |
}
|
55 |
|
56 |
/* 6.- If the cost of this edge is less than the cost of the arrival node until now, then update the node cost with the new one */
|
57 |
|
58 |
else if((nCost<cost2Node[edge.getTo()])&&(SPT[edge.getTo()]==null)) |
59 |
{
|
60 |
cost2Node[edge.getTo()]= nCost; |
61 |
//Since the cost of the node has changed, we need to reorder again the pq to reflect the changes
|
62 |
pq.reorderUp(); |
63 |
//Because this edge is better, we update the SF with this edge
|
64 |
SF[edge.getTo()]=edge; |
65 |
}
|
66 |
}
|
67 |
}
|
68 |
}
|
Step 18: Getting the Path
When the function finishes searching we will have the path all messes up on the SPT, so it is up to us to retrieve it. Since the SPT has the best edge to get to a node, we can work backwards to obtain the best path. Take as a reference the following image which comes from the previous animation:
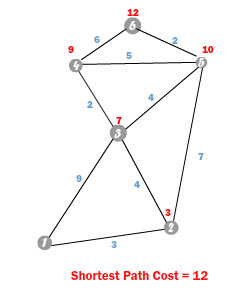
If we access the SPT at the target node, which in this case is 6, it will return the best edge to get there. That would be the 6 - 5 edge. Now if we repeat this process with the new node that comes with the edge, the 5 we would obtain the best edge to get to that node, which is the 5 - 2 edge. Repeating this process once again with the node 2, will give us the edge 2 - 1, so we finally get to the beginning, now joining al those edges we get the best path: 6 > 5 > 2 >1.
As you see we have to work backwards starting on the target and moving to the source to get the best path.
Step 19: The getPath Function
Create a new function that will return an Array with the nodes of the path, call it "getPath":
1 |
|
2 |
public function getPath():Array |
3 |
{
|
4 |
var path:Array = new Array(); |
5 |
if(target<0) return path; |
6 |
var nd:int = target; |
7 |
path.push(nd); |
8 |
while((nd!=source)&&(SPT[nd]!=null)) |
9 |
{
|
10 |
SPT[nd].drawEdge( |
11 |
graph.getNode(SPT[nd].getFrom()).getPos(), |
12 |
graph.getNode(SPT[nd].getTo()).getPos(), |
13 |
"path"
|
14 |
); |
15 |
nd = SPT[nd].getFrom(); |
16 |
path.push(nd); |
17 |
}
|
18 |
path=path.reverse(); |
19 |
return path; |
20 |
}
|
Step 20: The Complete Dijkstra Class
We have finished almost everything, we just now have to fill the constructor and call the search function, so the class will look like this:
1 |
|
2 |
package Algorithms{ |
3 |
|
4 |
import Graph.Edge; |
5 |
import Graph.Graph; |
6 |
import utils.IndexedPriorityQ; |
7 |
|
8 |
public class Dijkstra { |
9 |
|
10 |
private var graph:Graph |
11 |
private var SPT:Vector.<Edge> |
12 |
private var cost2Node:Vector.<Number> |
13 |
private var SF:Vector.<Edge> |
14 |
private var source:int; |
15 |
private var target:int; |
16 |
|
17 |
public function Dijkstra(n_graph:Graph,src:int,tar=int) { |
18 |
graph=n_graph; |
19 |
source=src; |
20 |
target=tar; |
21 |
SPT= new Vector.<Edge>(graph.numNodes()); |
22 |
cost2Node = new Vector.<Number>(graph.numNodes()); |
23 |
SF = new Vector.<Edge>(graph.numNodes()); |
24 |
search(); |
25 |
}
|
26 |
private function search():void |
27 |
{
|
28 |
var pq:IndexedPriorityQ = new IndexedPriorityQ(cost2Node) |
29 |
pq.insert(source); |
30 |
while(!pq.isEmpty()) |
31 |
{
|
32 |
|
33 |
var NCN:int = pq.pop(); |
34 |
|
35 |
SPT[NCN]=SF[NCN]; |
36 |
|
37 |
if(SPT[NCN]) |
38 |
{
|
39 |
SPT[NCN].drawEdge( |
40 |
graph.getNode(SPT[NCN].getFrom()).getPos(), |
41 |
graph.getNode(SPT[NCN].getTo()).getPos(), |
42 |
"visited"
|
43 |
); |
44 |
}
|
45 |
|
46 |
if(NCN==target)return; |
47 |
|
48 |
var edges:Array=graph.getEdges(NCN); |
49 |
|
50 |
for each(var edge:Edge in edges) |
51 |
{
|
52 |
var nCost:Number = cost2Node[NCN]+edge.getCost(); |
53 |
|
54 |
if(SF[edge.getTo()]==null) |
55 |
{
|
56 |
cost2Node[edge.getTo()]=nCost; |
57 |
pq.insert(edge.getTo()); |
58 |
SF[edge.getTo()]=edge; |
59 |
}
|
60 |
|
61 |
else if((nCost<cost2Node[edge.getTo()])&&(SPT[edge.getTo()]==null)) |
62 |
{
|
63 |
cost2Node[edge.getTo()]= nCost; |
64 |
pq.reorderUp(); |
65 |
SF[edge.getTo()]=edge; |
66 |
}
|
67 |
}
|
68 |
}
|
69 |
}
|
70 |
|
71 |
public function getPath():Array |
72 |
{
|
73 |
var path:Array = new Array(); |
74 |
if((target<0)||(SPT[target]==null)) return path; |
75 |
var nd:int=target; |
76 |
path.push(nd); |
77 |
while((nd!=source)&&(SPT[nd]!=null)) |
78 |
{
|
79 |
SPT[nd].drawEdge( |
80 |
graph.getNode(SPT[nd].getFrom()).getPos(), |
81 |
graph.getNode(SPT[nd].getTo()).getPos(), |
82 |
"path"
|
83 |
); |
84 |
nd = SPT[nd].getFrom() |
85 |
path.push(nd); |
86 |
}
|
87 |
path = path.reverse(); |
88 |
|
89 |
return path; |
90 |
}
|
91 |
}
|
92 |
}
|
Step 21: Creating a New Graph
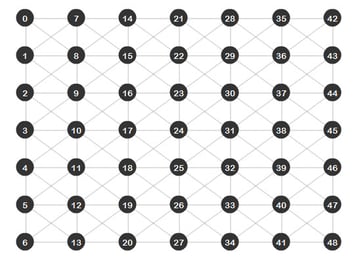
In order to see a better result of the algorithm, I wrote a class that helps with the creating of graphs. It's called Grapher and can be found inside the utils folder that comes with the source files. This class creates a grid of nodes from where we can observe how the algorithm is moving through the graph.
With this class, open again the "Main.as" file and modify it. We will now have the following code:
1 |
|
2 |
package{ |
3 |
import flash.display.Sprite; |
4 |
import Graph.*; |
5 |
import utils.Grapher; |
6 |
|
7 |
public class Main extends Sprite |
8 |
{
|
9 |
var graph:Graph = new Graph(); |
10 |
|
11 |
public function Main() |
12 |
{
|
13 |
//The parameters of the Grapher class are the width and height of the stage
|
14 |
//the number of columns and rows, and then the graph for storing the data
|
15 |
//After this we just add the grapher to the stage and we are done.
|
16 |
//This will create a grid of nodes of 7*7
|
17 |
var grapher:Grapher = new Grapher(550,400,7,7,graph); |
18 |
addChild(grapher); |
19 |
}
|
20 |
}
|
21 |
}
|
Save and run the file and you will obtain this result:
Step 22: Using the Dijkstra Algorithm
Now let's go ahead and perform a search with the new algorithm we have just done. Import the Dijkstra class, create an instance of it and call the getPath function:
1 |
|
2 |
package{ |
3 |
import flash.display.Sprite; |
4 |
import Graph.*; |
5 |
import utils.Grapher; |
6 |
import Algorithms.Dijkstra; |
7 |
|
8 |
public class Main extends Sprite |
9 |
{
|
10 |
var graph:Graph = new Graph(); |
11 |
|
12 |
public function Main() |
13 |
{
|
14 |
var grapher:Grapher = new Grapher(550,400,7,7,graph); |
15 |
addChild(grapher); |
16 |
|
17 |
//We create a new Dijkstra search that will look a path from node 24 to node 35
|
18 |
var dijkstra:Dijkstra = new Dijkstra(graph,24,35); |
19 |
dijkstra.getPath(); |
20 |
}
|
21 |
}
|
22 |
}
|
Save and run the file. You will see the edges that the algorithm analyzed as red lines, the best path found (from node 24 to node 35) appearing as a black line:
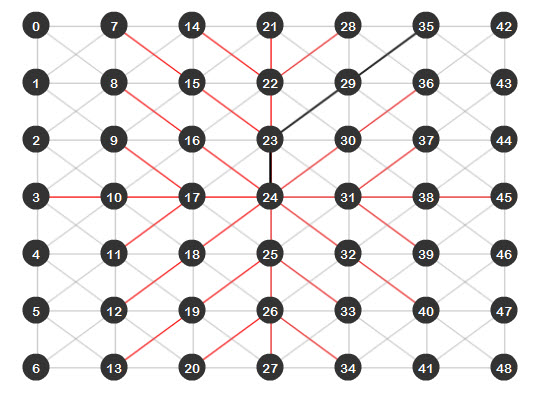
Step 23: Isn't There Something Better?
As we can see, the Dijkstra algorithm does find the shortest path between two nodes, but as the last image shows, there are a lot of red lines. This means that all those edges were analyzed, which isn't a big deal because we have a small graph, but imagine a bigger graph; that would be just too many edges to analyze. If we could just find a way to reduce this and make the algorithm even more efficient... well I present you the A* (A-Star) algorithm.
Step 24: The A* Algorithm
The A* algorithm is a modified version of Dijkstra. It takes into consideration a modified way of getting the cost of each node with an heuristic approach. This means that we provide a little "help" for the algorithm and tell him where to go, working as a compass and moving the algorithm directly to the target.
Instead of calculating the cost of a node by summing the edge cost to the stored node cost, it is now calculated by summing the stored node cost and an Heuristic cost, which is an estimation of how close to the target the node we are analyzing is. This new cost is called the F cost
Step 25: The F Cost
The F cost is calculated using the following formula: F = G + H, where G is the cost of the node and H is the heuristic cost of that node to the target. In this tutorial the H cost will be calculated using the Euclidean distance between the node and the target, which is the straight line distance between the two nodes.
What this does is that at the end, the nodes with a lower F cost will be the first ones tested and because the F cost will depend mostly on the H cost, at the end the algorithm will always prioritize the nodes closest to the target.
Step 26: The A* Algorithm in AS3
In the Algorithms folder, create a new class named "Astar". The variables inside the class will be almost the same as the Dijkstra class, but here we will have another vector to store the F cost of each node:
1 |
|
2 |
package Algorithms{ |
3 |
import Graph.Edge; |
4 |
import Graph.Graph; |
5 |
import flash.geom.Vector3D; |
6 |
import utils.IndexedPriorityQ; |
7 |
|
8 |
public class Astar { |
9 |
private var graph:Graph |
10 |
private var SPT:Vector.<Edge> |
11 |
private var G_Cost:Vector.<Number> //This vector will store the G cost of each node |
12 |
private var F_Cost:Vector.<Number> //This vector will store the F cost of each node |
13 |
private var SF:Vector.<Edge> |
14 |
private var source:int; |
15 |
private var target:int; |
16 |
|
17 |
public function Astar(n_graph:Graph,src:int,tar:int) |
18 |
{
|
19 |
graph=n_graph; |
20 |
source=src; |
21 |
target=tar; |
22 |
SPT= new Vector.<Edge>(graph.numNodes()); |
23 |
G_Cost = new Vector.<Number>(graph.numNodes()); |
24 |
F_Cost = new Vector.<Number>(graph.numNodes()); |
25 |
SF = new Vector.<Edge>(graph.numNodes()); |
26 |
search(); |
27 |
}
|
28 |
}
|
29 |
}
|
Step 27: The New Search Class
The only difference between the Dijkstra algorithm search function and this one will be that the nodes will be sorted (in the Indexed Priority Queue) depending on the F cost vector and that the F cost vector will be given by the calculated H cost and the stored G cost:
1 |
|
2 |
private function search():void |
3 |
{
|
4 |
//The pq is now sorted depending on the F cost vector
|
5 |
var pq:IndexedPriorityQ = new IndexedPriorityQ(F_Cost) |
6 |
pq.insert(source); |
7 |
while(!pq.isEmpty()) |
8 |
{
|
9 |
var NCN:int = pq.pop(); |
10 |
SPT[NCN]=SF[NCN]; |
11 |
if(SPT[NCN]) |
12 |
{
|
13 |
SPT[NCN].drawEdge( |
14 |
graph.getNode(SPT[NCN].getFrom()).getPos(), |
15 |
graph.getNode(SPT[NCN].getTo()).getPos(), |
16 |
"visited"
|
17 |
); |
18 |
}
|
19 |
if(NCN==target)return; |
20 |
var edges:Array=graph.getEdges(NCN); |
21 |
for each(var edge:Edge in edges) |
22 |
{
|
23 |
//The H cost is obtained by the distance between the target node, and the arrival node of the edge being analyzed
|
24 |
var Hcost:Number = Vector3D.distance( |
25 |
graph.getNode(edge.getTo()).getPos(), |
26 |
graph.getNode(target).getPos()) |
27 |
var Gcost:Number = G_Cost[NCN] + edge.getCost(); |
28 |
var to:int=edge.getTo(); |
29 |
if(SF[edge.getTo()]==null) |
30 |
{
|
31 |
F_Cost[edge.getTo()]=Gcost+Hcost; |
32 |
G_Cost[edge.getTo()]=Gcost; |
33 |
pq.insert(edge.getTo()); |
34 |
SF[edge.getTo()]=edge; |
35 |
}
|
36 |
else if((Gcost<G_Cost[edge.getTo()])&&(SPT[edge.getTo()]==null)) |
37 |
{
|
38 |
F_Cost[edge.getTo()]=Gcost+Hcost; |
39 |
G_Cost[edge.getTo()]=Gcost; |
40 |
pq.reorderUp(); |
41 |
SF[edge.getTo()]=edge; |
42 |
}
|
43 |
}
|
44 |
}
|
45 |
}
|
Step 28: The Complete A* Class
These are the only changes needed, since the getPath function is the same for both classes. At the end the class will be this one:
1 |
|
2 |
package Algorithms { |
3 |
import Graph.Edge; |
4 |
import Graph.Graph; |
5 |
import flash.geom.Vector3D; |
6 |
import utils.IndexedPriorityQ; |
7 |
|
8 |
public class Astar { |
9 |
private var graph:Graph |
10 |
private var SPT:Vector.<Edge> |
11 |
private var G_Cost:Vector.<Number> //This vector will store the G cost of each node |
12 |
private var F_Cost:Vector.<Number> //This vector will store the F cost of each node |
13 |
private var SF:Vector.<Edge> |
14 |
private var source:int; |
15 |
private var target:int; |
16 |
|
17 |
public function Astar(n_graph:Graph,src:int,tar:int) |
18 |
{
|
19 |
graph=n_graph; |
20 |
source=src; |
21 |
target=tar; |
22 |
SPT= new Vector.<Edge>(graph.numNodes()); |
23 |
G_Cost = new Vector.<Number>(graph.numNodes()); |
24 |
F_Cost = new Vector.<Number>(graph.numNodes()); |
25 |
SF = new Vector.<Edge>(graph.numNodes()); |
26 |
search(); |
27 |
}
|
28 |
private function search():void |
29 |
{
|
30 |
//The pq is now sorted depending on the F cost vector
|
31 |
var pq:IndexedPriorityQ = new IndexedPriorityQ(F_Cost) |
32 |
pq.insert(source); |
33 |
while(!pq.isEmpty()) |
34 |
{
|
35 |
var NCN:int = pq.pop(); |
36 |
SPT[NCN]=SF[NCN]; |
37 |
if(SPT[NCN]) |
38 |
{
|
39 |
SPT[NCN].drawEdge( |
40 |
graph.getNode(SPT[NCN].getFrom()).getPos(), |
41 |
graph.getNode(SPT[NCN].getTo()).getPos(), |
42 |
"visited"
|
43 |
); |
44 |
}
|
45 |
if(NCN==target)return; |
46 |
var edges:Array=graph.getEdges(NCN); |
47 |
for each(var edge:Edge in edges) |
48 |
{
|
49 |
//The H cost is obtained by the distance between the target node, and the arrival node of the edge being analyzed
|
50 |
var Hcost:Number = Vector3D.distance( |
51 |
graph.getNode(edge.getTo()).getPos(), |
52 |
graph.getNode(target).getPos()) |
53 |
var Gcost:Number = G_Cost[NCN] + edge.getCost(); |
54 |
var to:int=edge.getTo(); |
55 |
if(SF[edge.getTo()]==null) |
56 |
{
|
57 |
F_Cost[edge.getTo()]=Gcost+Hcost; |
58 |
G_Cost[edge.getTo()]=Gcost; |
59 |
pq.insert(edge.getTo()); |
60 |
SF[edge.getTo()]=edge; |
61 |
}
|
62 |
else if((Gcost<G_Cost[edge.getTo()])&&(SPT[edge.getTo()]==null)) |
63 |
{
|
64 |
F_Cost[edge.getTo()]=Gcost+Hcost; |
65 |
G_Cost[edge.getTo()]=Gcost; |
66 |
pq.reorderUp(); |
67 |
SF[edge.getTo()]=edge; |
68 |
}
|
69 |
}
|
70 |
}
|
71 |
}
|
72 |
public function getPath():Array |
73 |
{
|
74 |
var path:Array = new Array(); |
75 |
if(target<0) return path; |
76 |
var nd:int = target; |
77 |
path.push(nd); |
78 |
while((nd!=source)&&(SPT[nd]!=null)) |
79 |
{
|
80 |
SPT[nd].drawEdge( |
81 |
graph.getNode(SPT[nd].getFrom()).getPos(), |
82 |
graph.getNode(SPT[nd].getTo()).getPos(), |
83 |
"path"
|
84 |
); |
85 |
nd = SPT[nd].getFrom(); |
86 |
path.push(nd); |
87 |
}
|
88 |
path=path.reverse(); |
89 |
return path; |
90 |
}
|
91 |
}
|
92 |
}
|
Step 29: Using the A* Algorithm
Once again open the "Main.as" file and import the Astar class, then erase the Dijkstra search we created, replacing it with an A* search:
1 |
|
2 |
package{ |
3 |
import flash.display.Sprite; |
4 |
import Graph.*; |
5 |
import utils.Grapher; |
6 |
import Algorithms.Dijkstra; |
7 |
import Algorithms.Astar; |
8 |
public class Main extends Sprite |
9 |
{
|
10 |
var graph:Graph = new Graph(); |
11 |
|
12 |
public function Main() |
13 |
{
|
14 |
|
15 |
var grapher:Grapher = new Grapher(550,400,7,7,graph); |
16 |
addChild(grapher); |
17 |
|
18 |
//We create a new Astar search that will look a path from node 24 to node 35
|
19 |
var astar:Astar = new Astar(graph,24,35); |
20 |
astar.getPath(); |
21 |
}
|
22 |
}
|
23 |
}
|
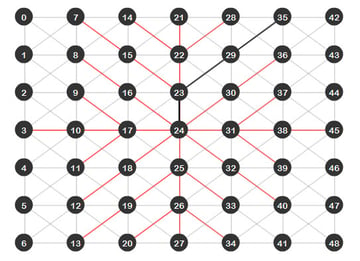
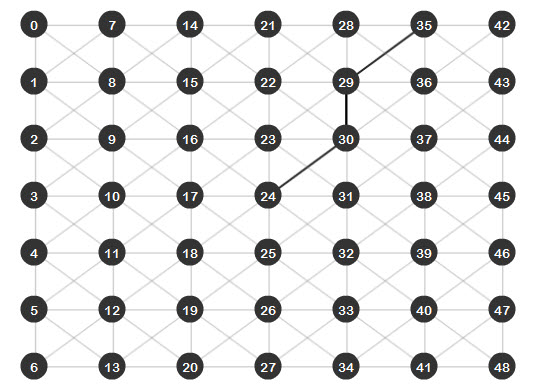
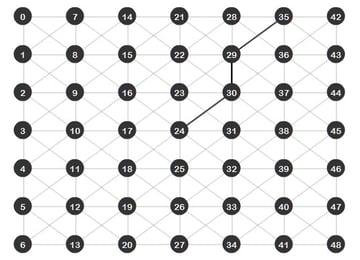
Save and run the file. As you can see, the result is very impressive, there are no red lines meaning that the search went directly from the source to the target without analyzing extra edges:
Step 30: Which One is better?
Well, even though the A* algorithm is faster and better in getting a direct path from the source to the target, there will be some cases where Dijkstra will be the best option.
For example, imagine an RTS game, where you've instructed your villager to go and find some resources; with the A* algorithm you would have to do a search for every resource on the map and then analyze which one is closer. With a Dijkstra search, since it expands the same amount to all directions, the first resource it finds will be the best one to gather and you will have performed just one search versus the many searches of the A*.
Basically, you will want to use the Dijkstra algorithm when you are doing a general search and the A* algorithm when you are looking for a specific item.
Conclusion
That's it for this tutorial, I hope you liked it and will use it for your projects. Keep track of the next tutorial of this AI series and let me know what you think about it.
Thanks for reading! -Eduardo
 By
By


